Introduction
Welcome to our comprehensive guide on where to plug an SSD into a motherboard.
Instead, they use flash memory, making them faster, quieter, and more durable.
Motherboardcompatibility is an essential factor to consider when installing an SSD.
The motherboard acts as the central hub of your system, connecting all components and peripherals.
It determines the types of storage devices that can be installed and the available slots for connection.
There are several types of SSDs available, including SATA SSDs, M.2 SSDs, and PCIe SSDs.
What Is an SSD?
This means that SSDs do not have moving parts, making them more durable and faster than HDDs.
The primary component in an SSD is the flash memory chip, which stores data electronically.
This allows for quicker access times and faster data transfer speeds compared to HDDs.
SSDs offer several advantages over traditional HDDs.
One of the most significant benefits is the improved performance.
This is because SSDs have incredibly fast read and write speeds, allowing for rapid data retrieval and storage.
Another advantage of SSDs is their shock and vibration resistance.
Since SSDs do not have any moving parts like HDDs, they are less prone to physical damage.
This makes them ideal for laptops and portable devices that are constantly on-the-go.
In terms of lifespan, SSDs tend to outlast HDDs.
As technology advances, SSDs continue to evolve with new form factors and connection interfaces.
Lets explore some of the key advantages of using an SSD.
Faster Performance: One of the most significant advantages of SSDs is their remarkable speed.
Since SSDs do not have any moving parts, they can access and retrieve data almost instantaneously.
This results in faster boot times, reduced program launch delays, and quicker file transfers.
Improved System Responsiveness: SSDs can significantly enhance the responsiveness of your system.
This is especially noticeable during multitasking and heavy workloads.
Enhanced Gaming Experience: Gamers can greatly benefit from using an SSD.
Durability and Reliability: SSDs are built to withstand shock, vibrations, and extreme temperatures better than HDDs.
This durability ensures that your data is safer and less likely to be lost due to physical damage.
Energy Efficiency: SSDs consume less power compared to HDDs.
This energy efficiency translates into longer battery life for laptops and reduced electricity costs for desktops.
Overall, the benefits of using an SSD are undeniable.
They offer superior speed, improved system responsiveness, durability, energy efficiency, and noiseless operation.
Next, lets delve into the important aspect of motherboard compatibility to ensure a successful SSD installation.
Understanding Motherboard Compatibility
When it comes toinstalling an SSD into your motherboard, understanding compatibility is crucial.
The motherboard serves as a central hub that connects various components and peripherals in your gear system.
It determines the types of storage devices that can be installed and the available slots for connection.
One important aspect of motherboard compatibility to consider is the interface that the motherboard supports.
The most common interface for traditional SATA SSDs is the SATA (Serial ATA) interface.
SATA SSDs use a data cable and a power cable to connect to the motherboard.
Anothertype of SSDthat has gained popularity in recent years is the M.2 SSD.
M.2 is a small form factor SSD that connects directly to the motherboard using the M.2 slot.
The M.2 slot supports different interfaces, including SATA and PCIe (Peripheral Component Interconnect Express).
PCIe SSDs are another option to consider, especially if youre seeking even faster speeds.
However, not all motherboards support PCIe SSDs, so its essential to verify compatibility before purchasing one.
In addition to the interface, you also need to consider the form factor of the SSD.
Lets explore the three main types of SSDs: SATA SSDs, M.2 SSDs, and PCIe SSDs.
SATA SSDs come in the standard 2.5-inch form factor, making them compatible with most desktops and laptops.
They are often an affordable option and offer reliable storage solutions for everyday computing needs.
M.2 SSDs come in different lengths and key types, denoting the physical and electrical specifications of the drive.
They are often found in newer laptops and desktops that prioritize space-saving designs and high-speed storage.
They directly connect to the PCIe slots on the motherboard, typically used for expansion cards like graphics cards.
PCIe SSDs bypass the traditional SATA interface, resulting in significantly faster transfer speeds and lower latency.
These connectors are often labeled SATA and come in the form of small rectangular ports.
Ensure that the connections are secure but avoid applying excessive force.
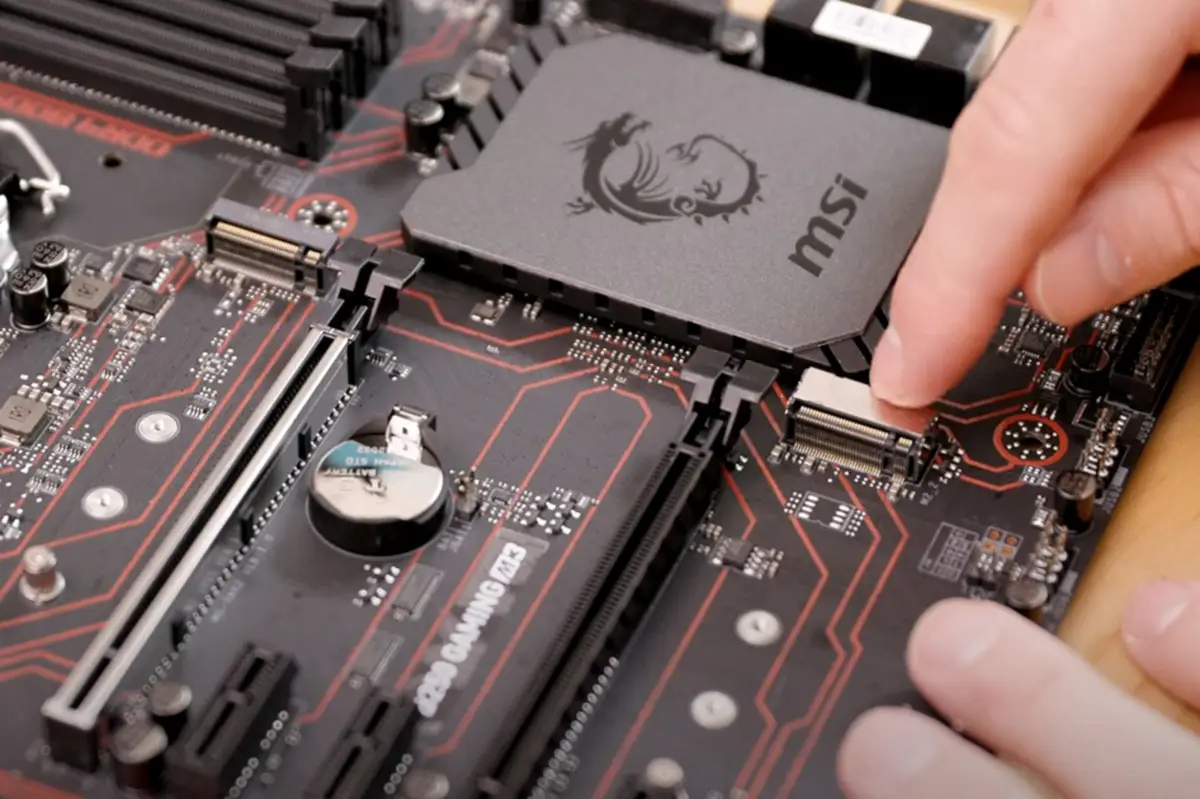
The M.2 slot is a small, narrow slot usually located near the center of the motherboard.
It may be labeled as M.2 or have a specific keying designation such as M Key or B+M Key.
Secure the SSD in place using the provided screw.
These slots are longer than the other connectors and are typically used for graphics cards and other expansion cards.
Apply gentle, even pressure to insert the SSD until it is fully seated.
Depending on the SSD model, you may also need to secure it using screws or a retention clip.
Remember to consult your motherboards user manual or manufacturers website for detailed instructions specific to your motherboard model.
Step-by-Step Guide: Installing an SSD Into a Motherboard
1.
Slide the panel off to expose the internal components.
Connect the other end to the SSD.
Connect the other end to your SSD.
Ensure the connections are secure but avoid applying excessive force.
Secure the SSD in place using the provided screw.
Insert the SSD into the slot, aligning the connector on the SSD with the slot on the motherboard.
Apply gentle, even pressure to insert the SSD until it is fully seated.
Depending on the SSD model, you may also need to secure it using screws or a retention clip.
see to it it is properly aligned and tightened.
Power on your setup: Plug the power cord back into the wall outlet and turn on your setup.
The BIOS should automatically detect the newly installed SSD.
You have successfully installed an SSD into your motherboard.
your rig should now benefit from the improved speed and performance provided by the SSD.
Dont panic weve got you covered!
Here are some troubleshooting tips to help you resolve these issues and ensure a successful installation.
Ensure that the data and power cables are properly seated and that the connections are tight.
Double-check your motherboards specifications and consult the SSD manufacturer to ensure compatibility before making a purchase.
Save the changes and restart the system.
Visit the motherboard manufacturers website and download the latest drivers for your specific motherboard model.
drop in the drivers and reboot the system to ensure that the SSD is recognized correctly.
Hardware conflicts: Sometimes, other hardware components may conflict with the SSD.
Try removing any unnecessary devices or expansion cards and disconnecting any external drives temporarily.
This can help isolate the issue and determine if there is a conflict with another hardware component.
you’re able to also seek assistance from online forums and communities specializing in SSDs and motherboard troubleshooting.
Additionally, always ensure that you handle computer hardware with care and follow proper safety precautions.
We hope this guide has been helpful in your journey to enhance your computers storage capabilities.
