So, lets dive in and embark on a delightful journey of ice cream making!
Here are the essential aspects you oughta know:
1.
Freezer Bowl: The freezer bowl is a key component of the Ice Cream Maker.
Before using it, ensure that it has been properly frozen according to the manufacturers instructions.
Its recommended to freeze the bowl for at least 24 hours prior to using it for optimal results.
Speed Control: The Kitchenaid stand mixer allows you to control the speed at which the attachment rotates.
Lets dive into the details in the following section.
These preparation steps ensure that your ice cream churns to perfection and achieves the desired consistency.
Heres what you’re gonna wanna do to prepare your ice cream maker:
1.
Freeze the Bowl: To ensure optimal ice cream freezing, the freezer bowl needs to be cold.
Place the freezer bowl in your freezer for a minimum of 24 hours before starting the ice cream-making process.
This step helps maintain a consistent temperature throughout the ice cream-making process.
Ensure that it securely locks into place and is properly aligned with the power hub of the mixer.
Place the Churning Paddle: Insert the churning paddle into the attachment, making sure it fits snugly.
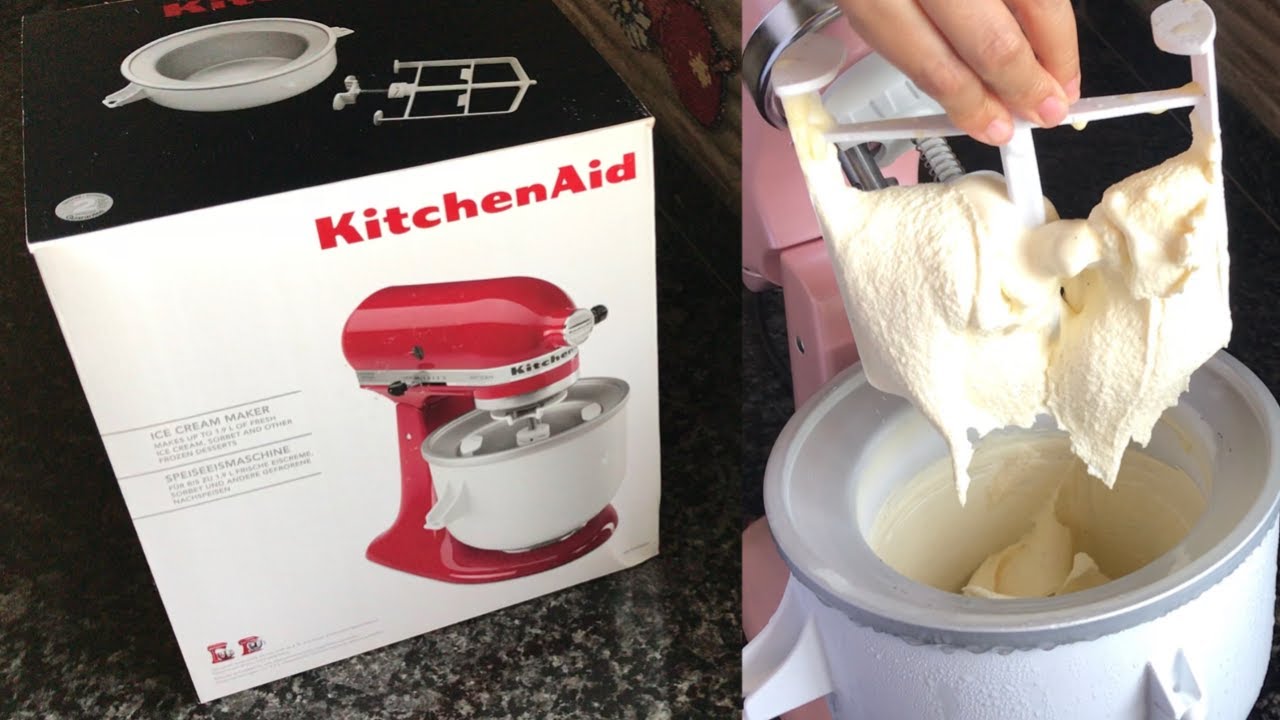
Churn the Ice Cream: Let theIce Cream Maker Kitchenaid work its magic!
Keep an eye on it to ensure it doesnt over-churn.
This additional freezing time will result in a scoopable texture similar to store-bought ice cream.
Remember to cover the container tightly with a lid or plastic wrap to prevent ice crystals from forming.
In the next section, well explore the step-by-step process of making ice cream using yourKitchenaid Ice Cream Maker.
Making Ice Cream with your Kitchenaid Ice Cream Maker
1.
Prepare your Ice Cream Mixture: Start by preparing your ice cream mixture according to your chosen recipe.
This typically involves combining ingredients such as milk, cream, sugar, and flavorings.
see to it all the ingredients are well-mixed and chilled before proceeding.
Ensure it is securely locked in place and aligned with the power hub of the mixer.
While the mixer is running, slowly pour the prepared ice cream mixture into the freezer bowl.
Be cautious not to overfill as the mixture will expand during churning.
you might periodically check the consistency through the transparent lid of the attachment.
The ice cream should have a thick and creamy texture when its ready.
This ensures even distribution throughout the ice cream.
Transfer the churned ice cream into a chilled container and cover it tightly.
Place the container in the freezer for at least 2-4 hours, or until firm enough to scoop.
Serve it in bowls, cones, or create delicious ice cream sundaes with your favorite toppings.
Experiment with different flavors, mix-ins, and recipes to create a wide variety of ice cream delights.
Chill Ingredients: Before starting the ice cream-making process, ensure that all your ingredients are properly chilled.
This helps the mixture freeze quickly and results in a creamier texture.
Pre-Freeze the Bowl: Its crucial to pre-freeze the freezer bowl for a minimum of 24 hours before use.
Use Quality Ingredients: The quality of your ingredients impacts the flavor and texture of your ice cream.
Leave some space for the mixture to expand and aerate properly.
Keep it Chilled: Assemble the Ice Cream Maker and ingredients in a cool environment.
Avoid placing it in direct sunlight or warm areas, as excessive heat can hinder the freezing process.
Chill the Mixture: Always chill your ice cream mixture thoroughly before pouring it into the freezer bowl.
This allows for faster freezing and better consistency.
This ensures even distribution throughout the ice cream without overmixing.
Experiment with Flavors: Dont be afraid to get creative with your flavor combinations.
Try different extracts, spices, or mix-ins to create unique and delicious ice cream flavors.
Label the container with the flavor and date to keep track of your creations.
Remember, practice makes perfect, so dont be discouraged if your first attempt isnt flawless.
With time and experience, youll master the art of homemade ice cream using your Kitchenaid Ice Cream Maker.
Here are some guidelines to keep your ice cream maker in top-notch condition:
1.
Unplug and Disassemble: Before cleaning your Ice Cream Maker, double-check it is unplugged from the power source.
Then, disassemble the attachment, churning paddle, and freezer bowl for individual cleaning.
Hand Wash: Avoid submerging the attachment and churning paddle in water.
Instead, gently hand wash them with warm soapy water.
Use a soft cloth or sponge to remove any residue, and rinse thoroughly.
Freezer Bowl Maintenance: The freezer bowl should be hand washed as well.
Rinse it with warm water and mild detergent, ensuring all traces of the ice cream mixture are removed.
Do not use abrasive cleaners or scrubbing pads that can damage the bowls surface.
Drying: After washing, allow all the components to air dry completely.
Ensure there is no moisture before reassembling or storing to prevent the growth of mold or unpleasant odors.
Use a plastic bag or cover to protect it from dust and potential contamination.
Regular Maintenance: Its recommended to periodically inspect your Ice Cream Maker for any signs of wear or damage.
Check the attachment, churning paddle, and freezer bowl for cracks, dents, or defects.
If you notice any issues, get in touch with the manufacturer for assistance.
Opt for plastic or silicone spatulas and scoops to handle and scoop out the ice cream.
Frequently Asked Questions (FAQs)
1.
Can I use my Ice Cream Maker Kitchenaid without pre-freezing the bowl?
No, it is essential to pre-freeze the freezer bowl for at least 24 hours before using it.
This ensures proper freezing of your ice cream mixture and achieves the desired consistency.
How long does it take to churn ice cream with the Kitchenaid Ice Cream Maker?
The churning time can vary depending on the recipe and desired consistency.
Typically, it takes around 20-30 minutes to churn ice cream using the Kitchenaid Ice Cream Maker.
However, its important to follow the specific instructions provided in your recipe for the best results.
Can I use the Ice Cream Maker attachment with a different brand of stand mixer?
No, the Ice Cream Maker attachment is specifically designed to fit and work with Kitchenaid stand mixers.
It may not be compatible with other brands due to differences in the power hub design and attachments.
How should I store homemade ice cream made with the Kitchenaid Ice Cream Maker?
After churning the ice cream, transfer it to a lidded container and place it in the freezer.
Ensure the container is tightly sealed to prevent freezer burn and maintain the quality of the ice cream.
Can I make other frozen desserts besides ice cream with the Kitchenaid Ice Cream Maker?
Experiment with different recipes and flavors to explore the versatility of your Ice Cream Maker.
How should I clean the Ice Cream Maker attachment and accessories?
The attachment and churning paddle should be hand washed with warm soapy water.
Avoid submerging them in water.
The freezer bowl should also be hand washed, ensuring all traces of the ice cream mixture are removed.
Allow the components to air dry completely before reassembling or storing.
Can I add mix-ins like cookies or fruits during the churning process?
This ensures even distribution of the mix-ins throughout the ice cream.
Be cautious not to overload the ice cream mixture, as it may affect the churning performance.
Is it normal for the ice cream mixture to be soft after churning?
Yes, freshly churned ice cream will have a softer consistency compared to store-bought ice cream.
Can I use the Ice Cream Maker attachment on a frozen freezer bowl?
No, the freezer bowl should only be used when it is properly pre-frozen according to the manufacturers instructions.
Can I make multiple batches of ice cream with the same freezer bowl?
In the final section, well wrap up the guide with some closing thoughts.
Conclusion
Congratulations!
To achieve the best results, practice proper cleaning and maintenance of your Ice Cream Maker.
Take care of each component, store them correctly, and regularly inspect for any wear or damage.
Happy ice cream making!
