Introduction
Nothing beats the classic taste of homemade ice cream.
While modern ice cream makers may offer convenience, theres something charming about using an old-fashioned ice cream maker.
These vintage appliances allow you to connect with tradition and create delectable frozen treats from scratch.
Using an old-fashioned ice cream maker may seem daunting, but fear not!
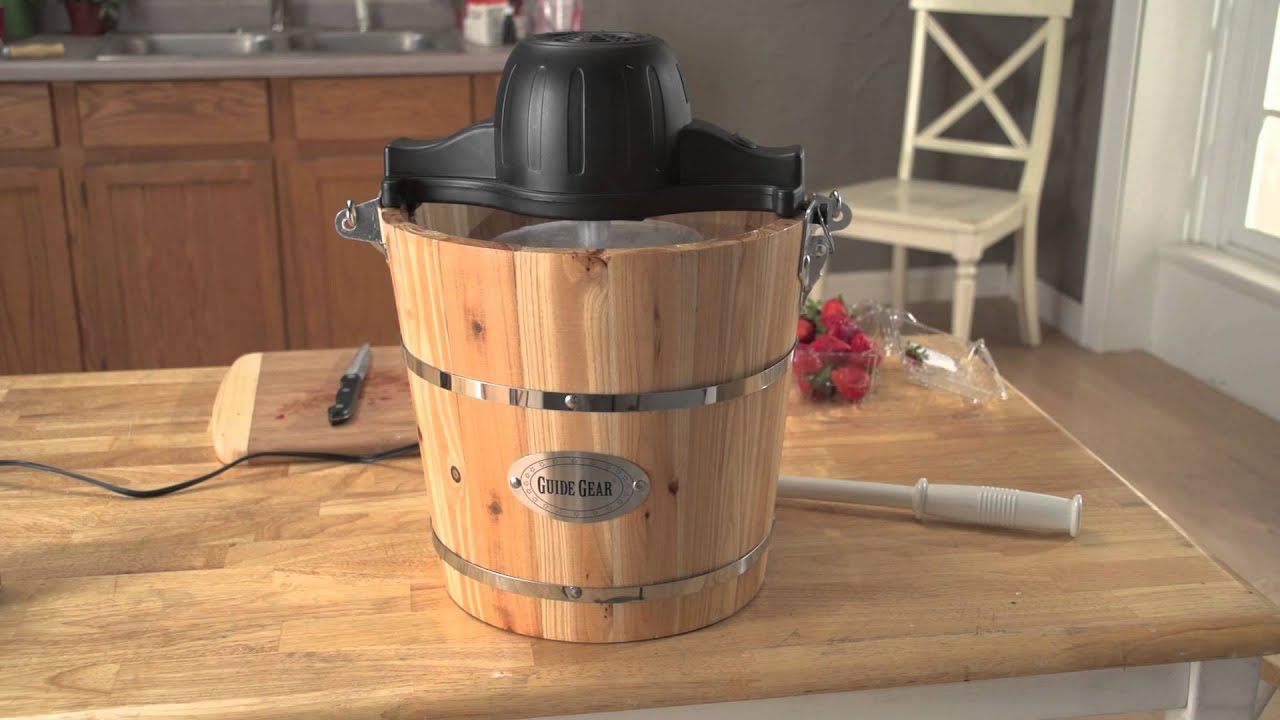
To assemble the ice cream maker, begin by placing the metal canister into the outer bucket.
confirm it fits securely and sits firmly in place.
This will help prevent any ice or salt from entering the ice cream mixture as it churns.
Once the ice cream maker is assembled, double-check that all the parts are securely in place.
Ensure the hand crank moves freely and smoothly.
Any loose or faulty connections may hinder the churning process and affect the final result.
Now that you have assembled the ice cream maker, youre one step closer to enjoying homemade ice cream.
Start by selecting your desired ice cream recipe or flavor.
In a large mixing bowl, combine the heavy cream, milk, and sugar.
Whisk until the sugar is fully dissolved and the mixture is well combined.
To pre-chill the ice cream maker, begin by removing the metal canister from the outer bucket assembly.
ensure to handle the canister with care as it may be cold from previous use or storage.
Once the canister is removed, rinse it with cold water to clear any residual ice cream or debris.
This step ensures that the canister is clean and ready for the new batch of ice cream.
After rinsing, dry the canister thoroughly.
you might use a clean kitchen towel or allow it to air dry.
verify there is no moisture left on the surface as it can affect the freezing process.
Next, place the clean and dry canister back into the outer bucket.
Ensure that it fits snugly and securely in place.
Now its time to prepare the freezing mixture.
You will need a combination of ice and rock salt.
Start by layering a generous amount of ice into the outer bucket.
Then, sprinkle a layer of rock salt over the ice.
Repeat this process, alternating layers of ice and rock salt until the bucket is almost full.
This information will help you achieve the optimal freezing conditions.
Ensure that the canister is fully surrounded by the ice and salt mixture.
Then, pour the mixture into the canister of the ice cream maker.
Be mindful not to overfill the canister, as the mixture will expand as it freezes and churns.
Leave some space at the top to allow for expansion during the churning process.
Typically, filling the canister to around two-thirds of its capacity is sufficient.
This ensures that your ice cream remains pristine and free from any unwanted particles or contamination.
Double-check that all the components are properly assembled and secured.
verify that the hand crank is attached securely to the canister.
No old-fashioned ice cream maker can operate without proper cranking.
So, grab hold of the hand crank and get ready to embark on a delightful churning experience.
Churning is the transformative step where the mixture turns from a liquid state into creamy ice cream.
Start by securing the canister back into the outer bucket filled with the ice and rock salt mixture.
Ensure that the canister is placed properly and that the freezing mixture surrounds it.
Once the canister is in place, you could start cranking the handle.
Hold onto the hand crank firmly and turn it in a steady, clockwise motion.
The churning process requires consistent and even cranking to achieve optimal results.
This is a sign that the churning process is underway.
Keep cranking at a moderate pace to maintain a consistent churning rhythm.
During the churning process, check the ice and rock salt mixture surrounding the canister.
If necessary, add more ice or rock salt to maintain the freezing environment.
Ensure that the level of the freezing mixture does not drop below the canister.
As time passes, you will notice the ice cream mixture thickening and transforming into a creamy consistency.
Take occasional breaks to check the texture and taste as it churns.
This allows you to adjust the churning time based on your desired firmness and flavor.
Remember, practice makes perfect when it comes to churning.
Adding mix-ins not only enhances the flavor but also adds texture and visual appeal to your frozen creation.
From chunks of chocolate or fruit to swirls of caramel or cookie dough, the possibilities are endless.
If you choose to incorporate mix-ins into your ice cream, there are a few methods you might try.
One option is to add the mix-ins during the last few minutes of churning.
This allows the mix-ins to distribute evenly throughout the ice cream.
An alternative method is to layer the mix-ins during the transfer to the freezer container.
Once youve finished churning, remove the canister from the ice cream maker.
Repeat this process until all the ice cream and mix-ins are layered in the container.
This method creates ribbons or pockets of flavor and ensures that the mix-ins are evenly distributed.
Get creative and experiment with different combinations to discover your personal favorite.
Remember, adding mix-ins is optional.
The beauty of homemade ice cream is that you have complete control over the flavor profile.
With mix-ins incorporated, your homemade ice cream is now a truly unique and decadent treat.
As the ice cream churns, its important to monitor the speed and rhythm of the churning.
Keep the hand crank moving steadily and consistently, without exerting too much force.
This helps to evenly distribute the freezing temperature and air throughout the mixture.
Additionally, observe the appearance of the ice cream as it churns.
Take occasional breaks from cranking to check the texture and consistency.
Use a long spoon or spatula to scoop a small amount of the mixture from the canister.
Observe how it holds its shape and if it has a smooth and creamy texture.
If the ice cream appears too soft, continue churning for a few more minutes.
On the other hand, if it becomes too firm, it may be over-churned.
Refer to the recipe guidelines, but also trust your instincts and judgment.
The more you make homemade ice cream, the better you will become at recognizing the ideal consistency.
Lastly, be mindful of any condensation that forms on the outside of the canister.
Its an exciting indication that your ice cream is almost ready to be enjoyed!
Start by carefully removing the canister from the ice cream maker.
Place it on a stable and clean surface.
Avoid shaking or tilting the canister to prevent any ice cream spillage.
see to it to work quickly to minimize any meltage.
Smooth the surface of the ice cream using the back of the spoon or spatula.
This helps to create an even and well-packed layer in the container.
This creates a barrier between the ice cream and any air in the container.
Seal the container tightly with a lid or wrap it securely with plastic wrap.
This helps to prevent any air from entering and damaging the texture and flavor of the ice cream.
Remember to label the container with the flavor and the date of preparation.
Once the ice cream is in the freezer container, transfer it to the coldest part of your freezer.
This ensures that it freezes quickly and thoroughly.
Allow the ice cream to freeze for a minimum of 4 hours or, preferably, overnight.
During this time, the ice cream will solidify and mature, developing its full flavor and creamy texture.
This crucial step allows the ice cream to fully set and develop its rich and creamy texture.
Place the sealed container of ice cream into the coldest part of your freezer.
Ensure that it is placed on a level surface to prevent any unnecessary shifting or tilting.
Allow the ice cream to freeze undisturbed for a minimum of 4 hours or, ideally, overnight.
Consult your recipe guidelines for recommended freezing durations.
This makes scooping easier and ensures a smooth and creamy texture.
Finally, sit back, relax, and indulge in the fruits of your labor.
In this guide, we have taken you through the step-by-step process of using an old-fashioned ice cream maker.
The possibilities are endless, allowing you to create an array of flavors and textures to suit your preferences.
Dont be afraid to experiment and explore new recipes and mix-ins.
With each batch, you will refine your technique and discover your own signature creations.
The joy and satisfaction of seeing your family and friends indulge in your homemade ice cream are truly unmatched.
So go ahead, dust off that old-fashioned ice cream maker, and let your creativity flow.
