Updating your PHP version may sound like a daunting task, but fear not!
This article is here to guide you through the process, whether youre a beginner or an experienced developer.
Why Update PHP Version?
Furthermore, updating your PHP version ensures compatibility with the latest frameworks, libraries, and plugins.
Lets explore some compelling reasons why you should stay up to date with the latest PHP version.
These optimizations can result in faster page load times, improved response times, and better overall user experience.
With each update, the PHP development community addresses security vulnerabilities and releases patches to fix them.
Compatibility with Modern Technologies
New PHP versions often introduce support for the latest web technologies and standards.
This compatibility ensures that your website can take advantage of the newest features, frameworks, and libraries available.
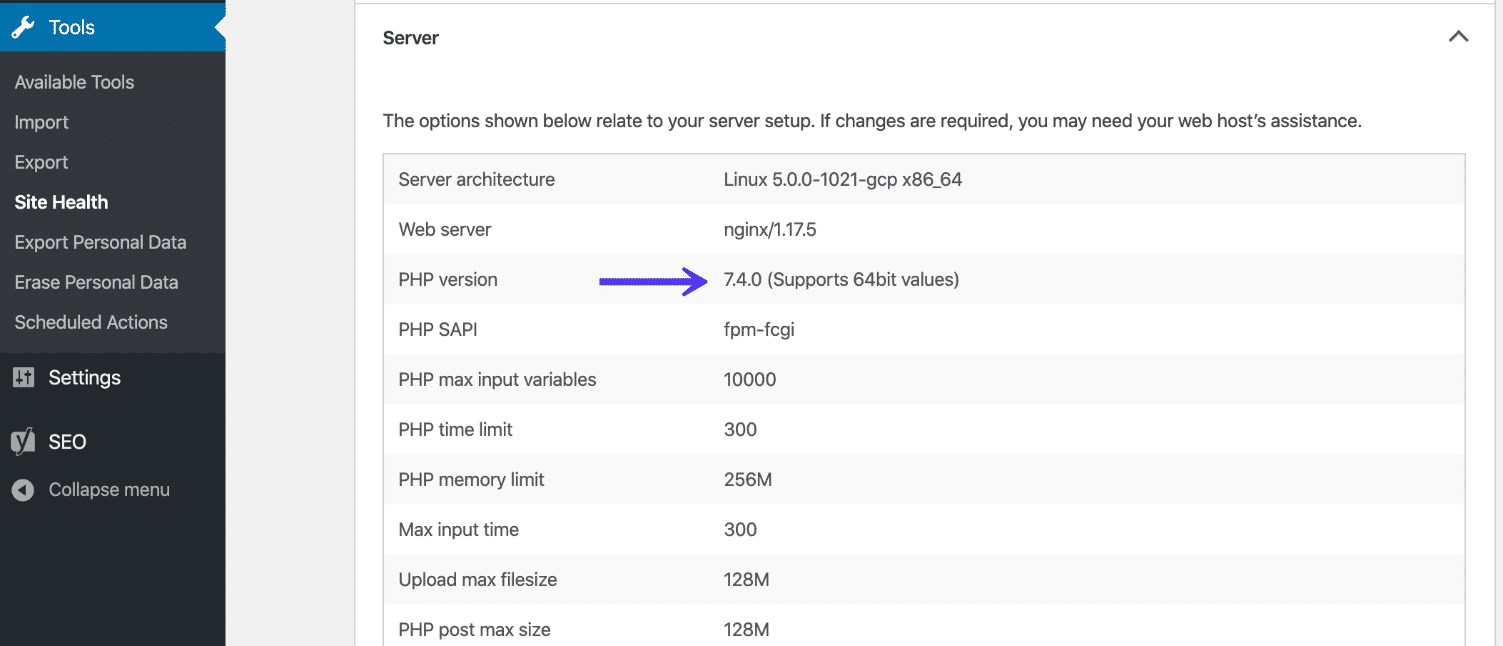
Checking your current PHP version is a straightforward process and can be done in a few simple steps.
Files Backup
2.
This step ensures that you have a copy of your websites content and parameters.
Heres how:
1. you could usually find this information in the PHP controls of your development software.
Determine the Desired PHP Version
Decide on the specific PHP version you want to update to.
Visit thePHP websiteor consult your project requirements to pick the appropriate version.
Once downloaded, trigger the installer and follow the installation instructions carefully.
Be sure to overwrite the existing PHP installation with the new version.
5. reset your Development Environment
To finalize the PHP update, reset your local development environment.
With these steps, you have successfully updated your PHP version locally.
Test your website thoroughly to ensure everything works as expected.
Heres how you’re able to update PHP on a shared hosting server:
1.
Some hosting providers allow you to switch between different PHP versions from within their control panel.
Backup Your Website
Before making any changes, its crucial to back up your website files and database.
Refer to the earlier section on backing up your website for detailed instructions.
This panel allows you to manage various aspects of your hosting account, including changing PHP versions.
This section may be labeled as PHP Configuration, PHP tweaks, or something similar.
Choose the desired PHP version from the available options.
ensure to thoroughly test your website to ensure that it works correctly with the updated PHP version.
Check Current PHP Version
First, determine the current PHP version running on your server.
Update PHP Package Repository
launch the appropriate command to update the PHP package repository on your server.
The specific command will depend on the operating system and package manager you are using.
The command to restart the web server will vary depending on the server software you are using.
Test Your Website
Finally, test your website to ensure that it functions correctly with the updated PHP version.
Visit various pages, submit forms, and verify that all website features are working as expected.
Its worth noting that updating PHP on a VPS or dedicated server may require advanced technical knowledge.
Heres a general guide on how to update PHP on a cloud platform:
1.
Access your Cloud Platform Dashboard
sign in to the management console or command-line interface provided by your cloud platform.
This is the central hub where you’re able to manage various aspects of your cloud infrastructure.
Locate your Server Instance
Identify the server instance or virtual machine that is running your website.
This will give you command-line access to your server.
Update PHP Packages
To update PHP, use the package manager specific to your servers operating system.
The actual command may vary, so consult the documentation for the package manager used.
Restart the Web Server
After the PHP update, power cycle your web server to apply the changes.
The command to restart the web server depends on the software used, such as Apache or Nginx.
Test your Website
Verify that your website works correctly with the updated PHP version.
Access various pages, submit forms, and test all website functionalities to ensure they are functioning properly.
Remember that the process may vary depending on your specific cloud platform and the configuration of your server.
Consult the official documentation or support resources provided by your cloud platform for detailed instructions tailored to your situation.
In the next section, we will cover the importance of testing your website after updating the PHP version.
Here are some essential steps to follow when testing your website:
1.
Check Frontend Functionality
Start by checking the frontend functionality of your website.
Test different pages, navigation menus, forms, and interactive elements.
Test various database-driven features, such as user registration, login, content management, and dynamic content displays.
confirm that data is being retrieved, stored, and updated accurately.
Test transactions, API calls, and any other functionality that relies on these integrations to ensure seamless operation.
Check that data validation, error messages, and form notifications are working as intended.
Check that error messages are displayed appropriately and logged for troubleshooting purposes.
Test Performance and Page Load Times
Assess the performance of your website after the PHP update.
Measure page load times and verify that the update has not introduced any significant performance regressions.
Use tools like Google PageSpeed Insights or GTmetrix to analyze your websites performance and make optimizations if necessary.
Ensure that your website displays correctly and functions properly on all major browsers.
Address any issues that arise during testing promptly to provide a seamless user experience to your visitors.
Understanding these errors and knowing how to troubleshoot them can help you resolve any potential problems effectively.
Here are a few common errors and troubleshooting techniques:
1.
Syntax Errors
Syntax errors occur when there is a mistake in the PHP code.
These errors can cause your website to display a blank page or a 500 Internal Server warning pop-up.
Deprecated Functions or Features
When updating PHP, certain functions or features may become deprecated or no longer supported.
These deprecated elements may result in errors or incompatibilities.
Extensions or Modules Compatibility
Some PHP updates may introduce changes in the compatibility of certain extensions or modules.
If your website relies on specific extensions or modules, check their compatibility with the updated PHP version.
Update or replace any incompatible extensions or modules to ensure smooth operation.
Make the necessary changes to the configuration file to resolve any configuration-related errors or conflicts.
Log and Debug
Logging and enabling error reporting can provide valuable information for troubleshooting.
Explain the issue, provide relevant error messages, and seek advice or assistance from experienced developers.
Remember, keeping your PHP version up to date is an ongoing task.
Thank you for reading, and happy PHP updating!
