Not to mention, its a fun project that can be enjoyed by individuals of all ages.
Take your time to gather all the necessary materials before you begin the construction process.
Here are some tips to help you choose the perfect LEGO pieces:
1.
Size and shape: Consider the dimensions and shape of your PC case design.
Choose pieces that fit together securely and create a solid structure.
Look for pieces with interlocking capabilities and avoid using loose or worn-out LEGO pieces.
Aesthetics: Decide on the color scheme and style you want for your LEGO PC case.
Depending on your collection, you may have a wide range of colors to choose from.
Consider whether you want a uniform color scheme or prefer a more colorful and eclectic design.
Functional considerations: While aesthetics are important, do not compromise on the functionality of your LEGO PC case.
Take your time to sort through your LEGO collection and experiment with different combinations.
Dont be afraid to mix and match pieces to create the perfect design.
Heres how you’re able to prepare the motherboard tray:
1.
Ensure that the baseplate is sturdy enough to support the weight of the motherboard.
Use a marker or pencil to mark the spots where the screws will go.
Double-check the alignment to ensure accurate hole placement.
Secure themotherboard standoffs: Attach the appropriate motherboard standoffs to the baseplate.
Align the standoffs with the drilled holes and secure them tightly.
Make any necessary adjustments to ensure a proper fit.
Ensure that there is enough clearance for connectors, ports, and components on the motherboard.
This will help distribute the weight of the components evenly and prevent any flexing or bending of the tray.
Heres how it’s possible for you to craft the side panels:
1.
Build the framework: Start by creating a frame using the chosen LEGO pieces.
Connect them vertically and horizontally to form a rectangular or square shape, depending on your design.
Ensure the corners are reinforced for added stability.
Consider using different colors, patterns, or unique LEGO pieces to create a visually appealing design.
Create ventilation openings: To ensure proper airflow and cooling, incorporate ventilation openings into the side panels.
Use small LEGO bricks or tiles to create evenly spaced holes or patterns.
Ensure the ventilation openings do not compromise the structural integrity of the side panels.
Adjust the size or shape of the side panels if necessary to ensure a snug fit.
Ensure that the side panels are firmly attached and provide adequate support to the interior components.
Remember to maintain sufficient space for ventilation and easy access to the components for future upgrades or maintenance.
Heres how you’ve got the option to build the front and back panels:
1.
Consider pieces that offer enough space for connectors and buttons, while maintaining the desired aesthetic appearance.
Consider the positioning and size of each connector and carefully measure and mark the locations for precise placement.
Ensure the alignment is correct and double-check the placement before securing them in place.
Build the structure: Assemble the LEGO pieces to construct the main structure of the front and back panels.
Reinforce the corners and edges for added strength and stability.
Consider incorporating additional LEGO elements, such as slopes or tiles, to enhance the appearance and add texture.
Make any necessary adjustments to ensure a precise fit without interfering with other components.
Ensure that the panels are firmly attached and provide accessibility to the necessary front-facing features.
Heres how you’ve got the option to create the top and bottom panels:
1.
Consider leaving ample space for proper ventilation and cable management.
Opt for pieces that can support the weight of the components while providing the desired aesthetics.
Design patterns using small LEGO bricks or tiles, allowing for efficient airflow while keeping the structure robust.
Design cable management features: Consider adding cable management features to the top and/or bottom panels.
Ensure that they align properly and provide sufficient clearance for the internal components and connectors.
Make any necessary adjustments to achieve a precise fit.
Heres how you could do it:
1.
Prepare the components: Ensure that all the necessary components for your PC build are ready.
Secure it in place using the appropriate screws, ensuring a snug fit.
- implement the CPU and memory: implement the CPU onto the motherboards socket according to the manufacturers instructions.
Attach the CPU cooler firmly to ensure proper cooling.
Insert the memory modules into the corresponding slots, applying even pressure until they click into place.
Install storage devices: Connect your hard drive or solid-state drive to the appropriate SATA ports on the motherboard.
Dont forget to connect peripherals such as the keyboard, mouse, and monitor.
Ensure that the case is fully closed and that all panels are aligned properly.
Heres how you could secure the components:
1.
Ensure that everything is tightly secured and that there are no loose or wobbly components.
Confirm that it is stable and free from any movement that could cause damage or interruptions.
Fasten the CPU cooler: Ensure that the CPU cooler is tightly fastened to the CPU socket.
Double-check that the fans are properly aligned and securely mounted.
This will prevent any potential overheating issues and ensure efficient cooling.
Fasten any necessary screws or brackets to provide additional support.
Ensure that all cables are properly connected to the storage gear and the motherboard.
Organize cables: Take the time to organize and manage all cables within the PC case.
Avoid any tangled or twisted cables that could obstruct airflow or cause connection issues.
Utilize cable tie-downs or routing channels within your LEGO PC case to keep cables neat and organized.
If there is any movement or instability, recheck the fasteners and connections to rectify the issue.
This not only prevents damage but also promotes optimal performance and reliability.
Heres how you’ve got the option to set up the power supply:
1.
Determine the PSU placement: Decide on the placement of the power supply within your LEGO PC case.
Consider factors such as ventilation, cable management, and the proximity to other components.
Clean the area if necessary to avoid any potential issues with proper installation.
Ensure that it is firmly and evenly attached.
Ensure that the correct cables and connectors are used and that they are firmly connected.
Utilize cable tie-downs or routing channels to keep the cables organized, prevent clutter, and optimize airflow.
Loose connections can lead to power disruptions and malfunctioning components.
Check that all components receive the necessary power and that there are no issues with startup or performance.
Installing the power supply properly is crucial to ensure reliable power delivery to your LEGO PC case.
Step 9: Connecting all the cables
1.
Different motherboards may have varying layouts and connector types.
Align the connector with the port on the motherboard near the CPU socket and firmly insert it.
Ensure a secure connection for reliable data transfer.
These connectors include power switch, reset switch, power LED, and HDD LED, among others.
Refer to the motherboard manual for the exact pin layout.
Take note of the specific connectors and their corresponding ports on the motherboard.
Organize and manage cables: Take the time to organize and manage the cables within your LEGO PC case.
Step 10: Testing and troubleshooting
1.
Press the power button on the case to start the system.
Verify if all the fans start spinning and lights on the components illuminate.
Monitor display: see if the monitor receives a signal from the graphics card.
Ensure that the display cable is securely connected to both the monitor and the graphics card.
If there is no display, double-check connections and try reseating the graphics card.
Verify that the system recognizes all components, such as the CPU, memory, and storage devices.
Make any necessary adjustments, such as enabling XMP for memory overclocking.
Monitor temperatures and performance to ensure stable operation.
If any issues arise, double-check connections and reseat components if necessary.
Check for software updates: Ensure that you have the latest drivers and firmware updates for your components.
Visit the manufacturers websites and download and install any available updates to optimize performance and compatibility.
Monitor temperatures, fan speeds, and system stability during the stress test to identify any potential problems.
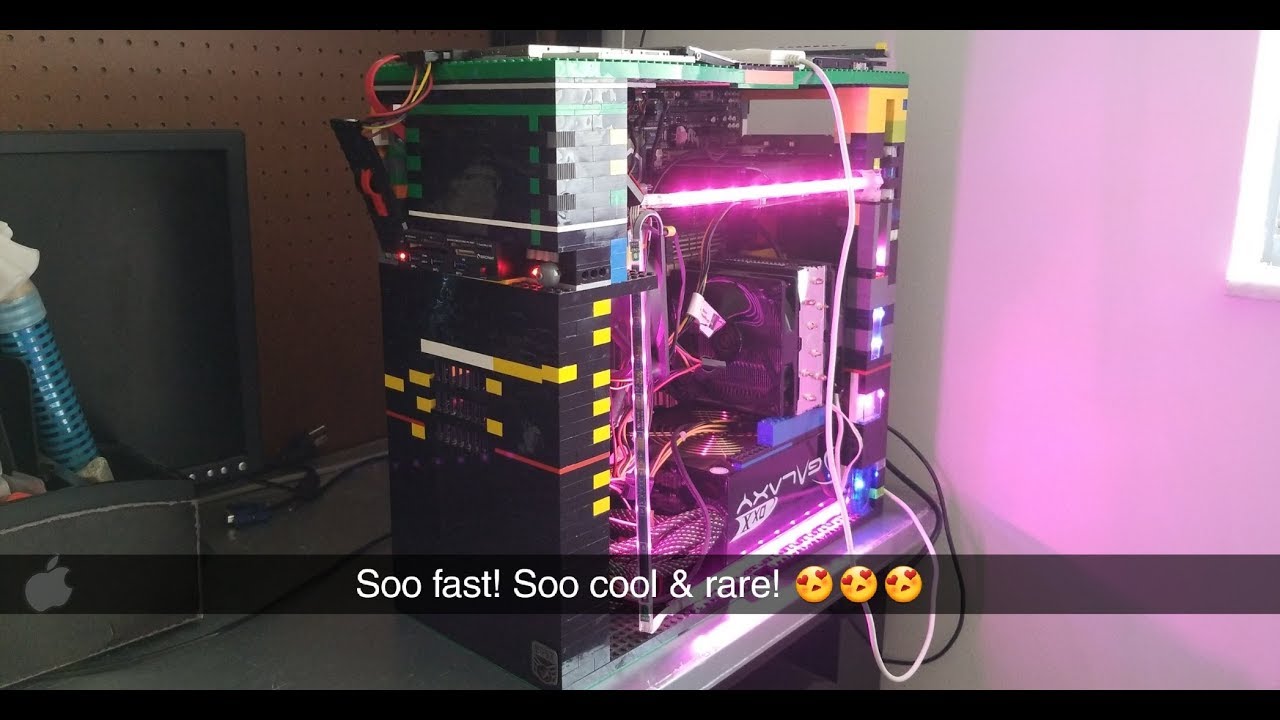
Conclusion
Congratulations!
You have successfully transformed LEGO pieces into a unique and functional PC case.
This ensures that your creation performs optimally and reliably, providing a seamless computing experience.
Enjoy the pride of owning a unique PC case that reflects your creativity and technical prowess.
Thank you for following this guide on how to turn LEGOs into a remarkable PC case.
We hope you had a satisfying and rewarding experience.
