Introduction
Welcome to the world of computer hardware troubleshooting!
One common issue that many PC users face is a faulty power supply unit (PSU).
What is a PSU?
A Power Supply Unit, or PSU, is an essential component in a computer system.
PSUs come in various wattages and configurations, depending on the power requirements of your rig.
Why should you test a PSU?
Testing a PSU is important for a couple of reasons.
Secondly, testing a PSU helps to ensure its functionality and reliability.
A Power Supply Unit, or PSU, is an essential component in a computer system.
Think of it as the heart of your box, supplying power to all the other vital organs.
The wattage rating of a PSU indicates how much power it can deliver to the computer components.
These features are designed to prevent damage to the computer hardware in case of irregularities in the power supply.
PSUs are typically located at the back of the computer case, near the power socket.
They have a variety of connectors and cables that attach to the different components inside the computer.
The most common connector is the 24-pin ATX connector, which provides power to the motherboard.
Overall, the power supply unit is a critical component in any computer system.
Testing the PSU helps you identify if it is the source of the problem.
Testing the PSU ensures it is functioning correctly, minimizing the risk of damage to other expensive hardware.
It saves you from purchasing a new PSU unnecessarily, especially if the issue lies elsewhere in your system.
It eliminates the worry of sudden shutdowns or system instability resulting from power-related issues.
What tools do you need?
Testing a PSU with a paperclip doesnt require any specialized or expensive tools.
In fact, you may already have everything you need right at home.
Here is a list of essential tools for PSU testing:
1.
Paperclip:
A simple paperclip is the key tool for PSU testing.
Multimeter:
While not mandatory, a digital multimeter comes in handy for more advanced PSU testing.
It allows you to measure voltages accurately and detect any fluctuations or abnormalities in the PSUs output.
A multimeter is especially useful if you suspect voltage issues but is not essential for the simple paperclip test.
Safety precautions:
Whenever working with a PSU or any electrical components, it is crucial to prioritize safety.
Now, lets proceed to the step-by-step guide on how to test a PSU with a paperclip.
This prevents any potential electrical hazards while working with the PSU.
It provides power to the motherboard and is the key component for the testing process.
This ensures that the PSU is isolated and not supplying power to any components during the testing process.
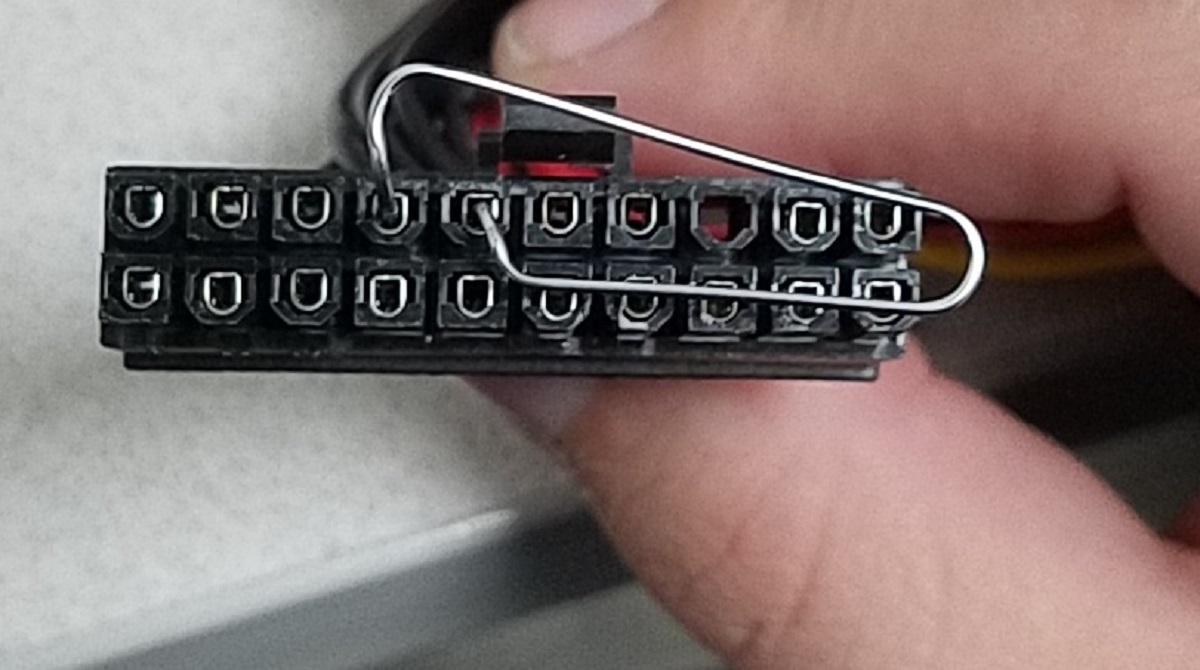
Step 4: Bend the Paperclip
Take a standard paperclip and straighten it.
Then, bend the paperclip into a U-shape, leaving a small loop at one end.
This loop will make it easier to remove the paperclip from the connector later.
Pin 16 is typically a green wire and is labeled either PS_ON or Power On.
This pin is responsible for signaling the PSU to turn on when the motherboard receives the power-on command.
Ensure that the paperclip remains inserted into pin 16 while the connector is securely attached.
Step 7: Power On the PSU
Locate the power switch on the back of the PSU.
Flip the switch to the On position without actually powering on the computer.
This supplies power to the PSU without any other components receiving power.
Step 8: Observe the PSU
With the PSU powered on, observe the PSUs fan.
In such cases, it is advisable to replace the PSU.
With these steps, you have successfully tested the PSU with a paperclip.
Here are some essential precautions to follow:
1.
This eliminates the risk of electrical shock and allows you to work safely.
Ground yourself:
Static electricity can damage sensitive computer components.
This protects you from electric shocks and prevents debris from entering your eyes.
Therefore, work in a well-ventilated area or consider using a fan to maintain a cool environment.
This also helps to avoid inhaling any potentially harmful fumes that might be released during the process.
This includes the 24-pin main power connector, PCIe connectors, SATA connectors, and any peripheral connectors.
This prevents any accidental damage to the components and ensures a safe testing environment.
This minimizes the risk of electric shocks and potential short circuits.
Read and follow the manufacturers guidelines for your PSU before attempting any testing.
Here are a few other methods to test a PSU:
1.
Using a PSU Tester:
APSU testeris a dedicated unit designed specifically for testing power supplies.
PSU testers are user-friendly and provide more detailed information than the paperclip method.
Connect the negative (black) probe to a black wire.
Disconnect the working PSU from the system and replace it with the one you want to test.
Power on the computer and monitor its performance.
If the system works flawlessly with the PSU installed, it indicates that the PSU is likely functioning correctly.
Conversely, if the system experiences issues or instability, it suggests a problem with the PSU.
Computer repair technicians or specialists can accurately diagnose and test the PSU using advanced tools and equipment.
They have the expertise to identify any underlying issues and provide appropriate solutions.
Keep in mind that while these methods can help diagnose PSU problems, they might not be foolproof.
Its important to note that PSU testing methods mentioned in this guide are meant for diagnosing basic issues.
Remember to consult the manufacturers guidelines and adhere to best practices when working with your PSU.
Keep your power supply in check, and happy computing!
