While the chances of data loss are minimal, its always better to be safe than sorry.
There are several methods it’s possible for you to use to back up your data.
One of the easiest and most common ways is to use an external hard drive or cloud storage service.
ensure to organize your data in a way that makes it easy to find and restore later on.
Simply create an account, roll out the necessary software, and start uploading your files.
This step will provide peace of mind knowing that your files are safe and secure.
Backing up your data is an essential step before setting up a new SSD in Windows 10.
Here are a few steps to follow:
1.
Check compatibility: Determine whether your system supports the punch in of SSD you have purchased.
Verify if it uses a SATA or NVMe interface, as this will affect the compatibility.
Consult your gear manufacturers website or user manual for information on the types of SSDs supported.
Check capacity: Assess your storage requirements and choose an SSD with sufficient capacity.
Its recommended to choose an SSD with a capacity that surpasses your current needs to accommodate future growth.
Consider form factor: Ensure that the physical size of the SSD matches the available slots in your gear.
Common form factors for SSDs include 2.5-inch and M.2, with the latter being more prevalent in newer systems.
Check your motherboard or consult the manufacturers documentation to determine the compatible form factors.
Verify power requirements: Some high-performance SSDs may require additional power compared to standard ones.
Confirm that your systems power supply can provide adequate power to support the new SSD.
you could consult the manufacturers specifications or refer to your power supply units documentation for this information.
Its essential to check these factors beforehand to prevent any compatibility or capacity issues during the installation process.
Physically plant the SSD
1.
This will help prevent any accidental damage to your system or yourself.
Refer to your computers user manual or look for online resources specific to your model for guidance.
Locate the storage drive slots: Identify the existing storage drive slots in your machine.
If necessary, refer to your computers documentation to determine the exact location.
Additionally, connect a SATA power cable from the power supply to the SSD.
If you are installing an M.2 SSD, skip this step as it does not require any additional cables.
Secure the SSD and wrap up the case: Double-check that all connections are secure and properly aligned.
If necessary, use cable ties or clips to tidy up any loose cables.
Finally, carefully kill the computer case, reattach any removed panels or covers, and fasten them securely.
Heres what you oughta do:
1.
You will also need your Windows 10 installation media or ISO file.
This will help you in setting up your new Windows installation to match your previous configuration.
This streamlines the installation process and reduces the chances of any interference.
This will allow your gear to automatically boot from the USB drive when you restart it.
Verify Internet connectivity: Ensure that you have a stable internet connection during the installation process.
This will enable Windows to download any necessary updates during the installation or set up process.
Heres a step-by-step guide to help you through the process:
1.
Download the Windows 10 ISO: Visit the official Microsoft website and download the Windows 10 ISO file.
see to it to choose the appropriate version and edition that matches your license.
Open File Explorer and right-press the USB drive, then select Format.
Choose the FAT32 file system and give it a name.
Click Start to format the drive.
Use Windows USB/DVD Download Tool: Download and plant the Windows USB/DVD Download Tool from the Microsoft website.
Launch the tool and follow the on-screen instructions.
The tool will create a bootable USB drive with the Windows 10 installation files.
Download and install Rufus, then launch the program.
Click Start to begin the process.
Once its done, you will have a bootable USB drive ready for installation.
Creating a bootable USB drive is a crucial step in installing Windows 10 on your new SSD.
It allows you to easily start the installation process and ensures a smooth transition to your upgraded storage system.
Change Boot Order and Install Windows 10
1.
Insert the bootable USB drive: Plug the bootable USB drive into an available USB port on your setup.
Change the boot order: Navigate to the Boot or Boot Order section in the BIOS or UEFI tweaks.
Modify the boot order to prioritize the USB drive as the first boot option.
Save the changes and exit the BIOS or UEFI parameters.
- reset your gear: The computer will now restart, and it should boot from the USB drive.
This will initiate the Windows 10 installation process.
- type your product key: If prompted, enter the product key for your Windows 10 license.
This step may vary depending on your installation media or licensing agreement.
- pick the SSD and begin installation: On the Where do you want to install Windows?
screen, select your new SSD as the destination.
Click Next to begin the installation process.
Windows will format the SSD and copy the necessary installation files.
Changing the boot order and installing Windows 10 on your new SSD is a crucial step in the process.
Heres how to do it:
1.
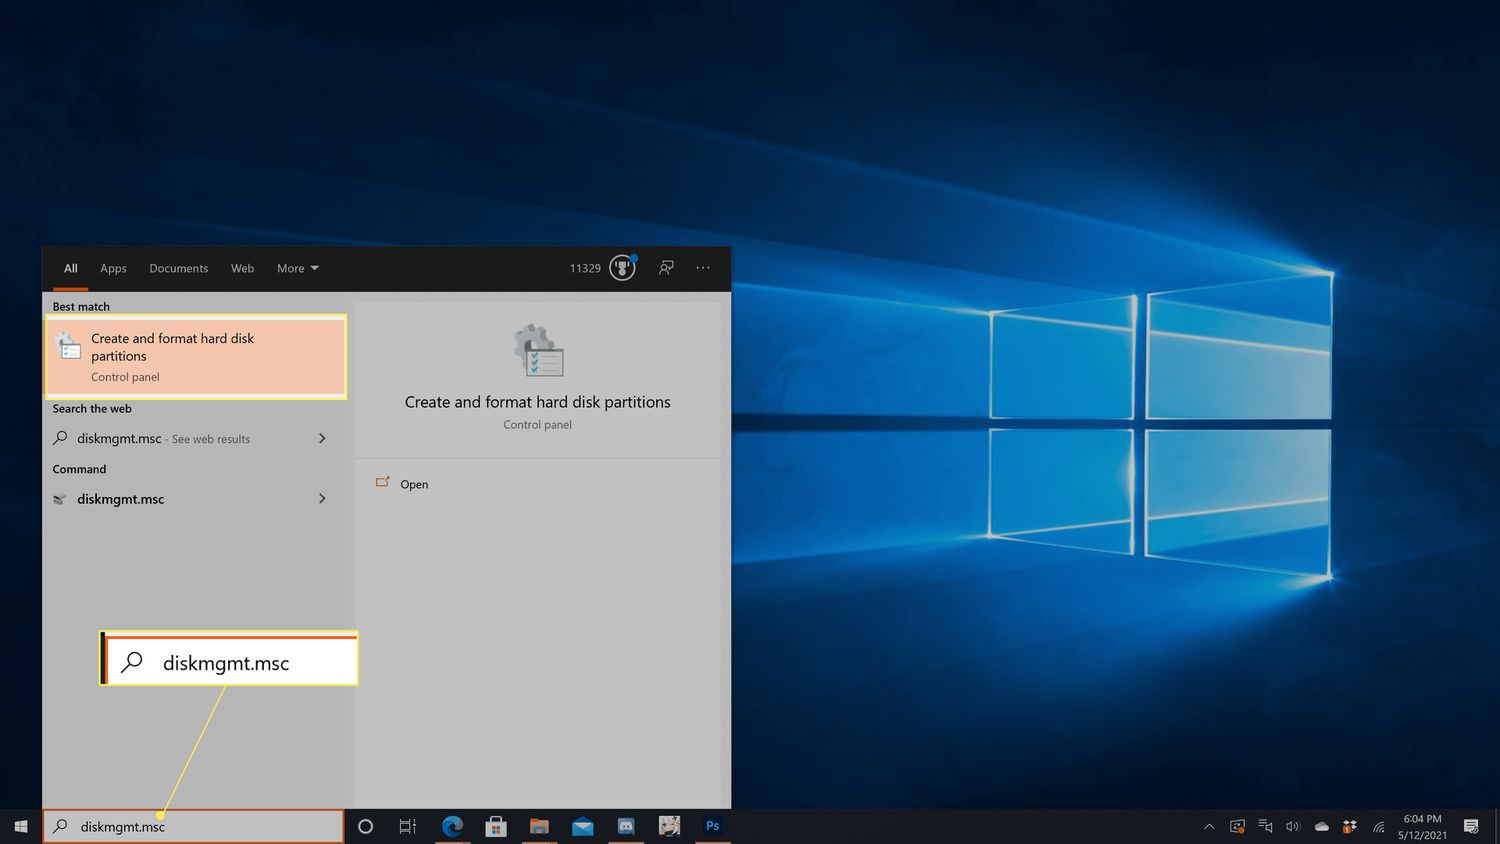
Open Disk Management: Right-punch the Start button and select Disk Management from the context menu.
This will fire up the Disk Management utility.
Locate the SSD: In the Disk Management window, you will see a list of all connected drives.
Locate your new SSD, which should be labeled as Unallocated or Raw.
Initialize the SSD: Right-hit the SSD and select Initialize Disk.
Format the partition: opt for newly created partition, right-press it, and choose Format.
In the Format window, choose the file system (typically NTFS) and optionally provide a volume label.
Ensure that the Quick Format option is selected for faster formatting and click OK to start the formatting process.
Once its complete, the SSD will be ready for use.
If so, you have successfully initialized and formatted your SSD.
This process allows your SSD to be recognized and utilized by your Windows 10 system.
Heres how to load the drivers:
1.
Identify your hardware: Before proceeding, identify the specific hardware components in your system that require drivers.
Visit the manufacturers website: Go to the website of each hardware components manufacturer to download the latest drivers.
Look for a Support or Downloads section on their website and search for your specific model or product.
- plant the drivers: Double-tap on each driver file and follow the on-screen instructions to install them.
Most drivers come in an executable format that will guide you through the installation process.
Verify driver installation: After restarting your rig, check the machine Manager for any unrecognized or problematic hardware.
launch the equipment Manager by right-clicking on the Start button and selecting equipment Manager from the context menu.
Look for any yellow exclamation marks or question marks next to devices, indicating driver issues.
If there are any devices with driver issues, right-tap on the gear and select Update driver.
This step is crucial for achieving maximum performance and compatibility in your Windows 10 system.
Transfer Data from Old Drive (Optional)
1.
This ensures that your data is safe in case anything goes wrong during the transfer.
Using File Explorer: Open File Explorer and navigate to your old drive.
go for the files and folders you want to transfer, right-click, and choose Copy.
Then, navigate to your new SSD, right-click in the desired location, and choose Paste.
This method can be time-consuming if you have a large amount of data.
it’s possible for you to access these tools by searching for Backup and Restore in the Start menu.
These tools offer more advanced features and faster transfer speeds.
Open them and ensure they are accessible and intact.
It allows you to seamlessly continue using your files and applications without the need for manual reinstallation or configuration.
This mode enables advanced features and performance optimization specifically designed for SSDs.
Windows 10 automatically detects SSDs and disables defragmentation, but its a good idea to double-check this setting.
Windows 10 should have TRIM enabled by default, but you could manually verify and enable it if needed.
launch the Command Prompt as an administrator and throw in the command fsutil behavior query DisableDeleteNotify.
If the result is DisableDeleteNotify = 0, TRIM is already enabled.
Adjust power options: SSDs dont require the same power management options as traditional hard drives.
Take the time to fine-tune these parameters, and you will experience thefull benefits of your new SSD.
Heres how you’ve got the option to do it:
- key in the command fsutil behavior set DisableDeleteNotify 0 and press Enter.
This will enable TRIM on your SSD, allowing it to efficiently manage and optimize its storage.
Heres how to disable hibernation:
bring up the Command Prompt as an administrator.
key in the command powercfg.exe /hibernate off and press Enter.
This will disable hibernation and remove the hiberfil.sys file from your SSD, recovering disk space.
Ensure that the result is DisableDeleteNotify = 0.
To verify that hibernation is disabled, initiate the Command Prompt and pop in the command powercfg.exe /a.
Look for a line that says Hibernation capabilities: Off.
This confirms that hibernation is disabled.
These steps will help you maximize the performance and longevity of your SSD.
Regular updates provide important security patches, bug fixes, and performance enhancements.
Heres how to update Windows and drivers:
1.
Update Windows:
snag the Start button and select tweaks (the gear icon).
In the options window, select Update & Security.
It will bring up the Windows Update controls.
press Check for updates.
Windows will scan for available updates and download/install them automatically.
cycle your setup if prompted to complete the installation.
Look for a Support or Downloads section on their website.
kickstart your rig after installing each driver to ensure proper functionality and configuration.
Automatic driver update:
Windows 10 has a feature that automatically updates unit drivers.
To enable it:
In the Windows Update options (Step 1), punch Advanced options.
This will allow Windows to automatically search and install available driver updates for your hardware components.
Enjoy Your New SSD
Congratulations on successfully setting up your new SSD in Windows 10!
Here are a few final tips to maximize your enjoyment:
1.
Create a logical folder structure and keep your files neatly organized.
This will make it easier to find and access your files, enhancing your productivity.
This includes productivity tools, web browsers, and any software you use regularly.
Loading times will be significantly reduced, saving you valuable time and improving overall workflow.
Invest in an external hard drive or utilize cloud storage to create a backup of your important files.
This ensures that your data is safe in case of any unforeseen issues or SSD failure.
Maintain your SSD: To keep your SSD in optimal condition, periodically perform maintenance tasks.
Enjoy the quick startup and shutdown of your machine, along with improved system responsiveness for everyday tasks.
your gear will feel snappier and more enjoyable to use.
The increased speed and performance will enhance your computing experience, making everyday tasks more efficient and enjoyable.
Embrace the power of your new SSD and unleash the full potential of your Windows 10 system!
