Introduction
The ASUS Ultrabook is a sleek and powerful laptop that offers incredible performance and innovative features.
In this article, we will guide you through various methods to take screenshots on yourASUS Ultrabook.
We will explore both built-in and third-party tools that can be used to capture screenshots effectively.
Whether you prefer using keyboard shortcuts or specialized software, weve got you covered.
Capturing screenshots on your ASUS Ultrabook can be a useful skill for a variety of tasks.
By learning different screenshot methods, youll have the flexibility to choose the option that best suits your needs.
So lets dive into the various methods and explore how totake screenshots on your ASUS Ultrabook.
Now, lets get started with the first method: using the Windows key.
This method relies on the built-in screenshot functionality provided by the Windows operating system.
Locate the Windows key on your ASUS Ultrabooks keyboard.
It is usually located between the Ctrl and Alt keys, and it has the Windows logo on it.
Press the Windows key along with the PrtScn (Print Screen) key simultaneously.
The screenshot will be saved automatically in the Screenshots folder in the Pictures directory of your Windows user account.
Then, initiate the Screenshots folder, where you will find the captured screenshot in PNG format.
Using the Windows key method is straightforward and requires no additional software or tools.
It is ideal for quickly capturing the entire screen without any customization options.
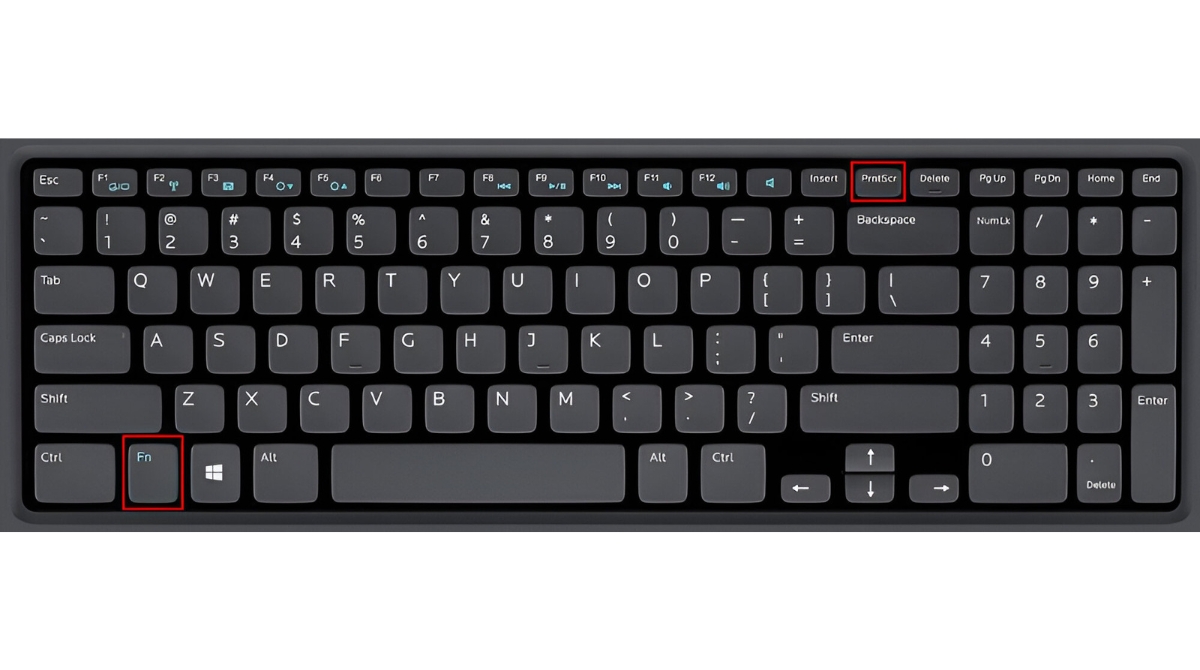
Step 2: Using the Print Screen Key
1.
Display the content that you want to capture on your screen.
Locate the Print Screen (PrtScn) key on your ASUS Ultrabooks keyboard.
It is usually located in the top row, alongside other function keys.
Press the PrtScn key to capture a screenshot of the entire screen.
The screenshot will be stored in the clipboard.
Using the Print Screen key method gives you more control over the captured screenshot.
you could choose to capture the entire screen or a specific window depending on your needs.
It offers more advanced screenshot capturing options compared to the previous methods.
The Snipping Tool allows you to capture a specific area of the screen or create free-form captures.
Once the Snipping Tool is open, tap on the New button to start capturing a screenshot.
The screen will fade, and youll see a + cursor.
Click and drag the cursor to grab the area that you want to capture.
After selecting the desired area, release the mouse button.
The captured screenshot will then appear in the Snipping Tool window.
you’re free to save it in PNG, JPEG, GIF, or HTML format.
This tool provides a convenient and user-friendly way to capture screenshots on your ASUS Ultrabook.
Heres how you’re able to use the ASUS Screen Capture Tool:
1.
Look for the ASUS Screen Capture Tool on your ASUS Ultrabook.
It may be pre-installed or available for download from the ASUS Support website or the Microsoft Store.
Launch the ASUS Screen Capture Tool from your Start menu or desktop.
snag the desired mode according to your preference.
Use the designated capture buttons or hotkeys provided by the ASUS Screen Capture Tool to initiate the screenshot capture.
These buttons/hotkeys may vary depending on the ASUS Ultrabook model and version of the tool.
Take advantage of these features to customize your screenshot.
Finally, save the screenshot to your desired location on your ASUS Ultrabook.
The tool may give you the option to choose the image format and specify the file name.
The ASUS Screen Capture Tool offers an intuitive interface and additional features tailored to ASUS devices.
There are many reliable and feature-rich third-party screenshot tools available for download.
Research and select a reputable third-party screenshot tool that meets your requirements.
Some popular options include Snagit, Greenshot, ShareX, and Lightshot.
Visit the official website or app store of the chosen software and download it onto your ASUS Ultrabook.
- load the software following the instructions provided by the tools developer.
Launch the software and familiarize yourself with its user interface and features.
Each software may have its own set of capturing methods, hotkeys, and editing options.
Take some time to explore and customize the options to your liking.
Save the edited screenshot in your chosen format and location on your ASUS Ultrabook.
Most tools offer options to directly save to specific folders or automatically upload to cloud storage.
Using third-party software provides a wide array of features and customization options, catering to specific screenshot needs.
Evaluate your needs and consider the features and cost before selecting the most suitable tool for your ASUS Ultrabook.
Choose the method that best fits your requirements and start capturing and sharing your screen in no time.
In this article, we explored five different methods for taking screenshots on your ASUS Ultrabook.
Screenshots serve various purposes, from creating study materials and documentation to communicating ideas and troubleshooting.
Additionally, explore the different tools and software available to find the one that suits your preferences and requirements.
So go ahead and start capturing those important moments and information with ease!
