Its important to note that opening your rig and tampering with its internal components may void your warranty.
Before starting, ensure you have the necessary tools and materials on hand.
Having these items at hand will ensure a smooth and successful process.
Ensuring you have everything you need beforehand will save you time and make the process more efficient.
Step 1: Safety Precautions
1.
This will eliminate the risk of electric shock and protect both you and your PC.
Ground yourself: To prevent static electricity discharge, its important to ground yourself.
These particles can be harmful when inhaled.
Working in a well-ventilated area or using a dust mask can help protect your respiratory system.
Be gentle and cautious: When handling the computer components, be gentle and avoid applying excessive force.
Some internal parts are delicate and can be easily damaged.
Take your time and proceed with caution.
Consider using a small container or a magnetic tray to keep them organized.
This will prevent losing any small parts and make reassembly easier.
This will prevent the loss of any important data and ensure a smooth shutdown process.
Allow the computer to fully shut down before proceeding to the next steps.
This will remove any source of electrical power and minimize the risk of electrical shock during the removal process.
Carefully unplug each cable from the appropriate ports on the back or side of the PC.
Disconnect these cables as necessary.
This will provide a safe environment to proceed with the removal of the back cover in the following steps.
Remember to handle the cables carefully to avoid damaging them or their respective connections.
Step 3: Lay the PC on a Stable Surface
1.
A desk or table with ample space is ideal for this task.
Ensure that the surface is flat and stable to avoid any wobbling or tilting during the process.
Gently lower the PC onto the cloth or non-slip mat, ensuring that it is laying flat and secure.
Be cautious to avoid putting excessive pressure on the screen or any other fragile components.
This allows for proper airflow and prevents the PC from overheating during the removal process.
Avoid working in cramped or enclosed spaces that may restrict airflow.
This ensures that the PC remains steady throughout the process and provides a comfortable work environment.
Remember to handle the PC with care to prevent any accidental damage or mishaps.
Step 4: Locate the Screws Holding the Back Cover
1.
Examine the back of the PC: Take a close look at the back of your HP All-In-One PC.
You should see a series of screws surrounding the edges of the back cover.
These screws hold the cover securely in place.
They are usually small and can be either Phillips head or flathead screws.
Inspect the corners and sides: Pay close attention to the corners and sides of the back cover.
In most cases, you will find screws located in these areas.
Its common for PCs to have screws in each corner as well as additional screws along the sides.
Carefully inspect the back cover for any removable parts that may be covering hidden screws.
Use gentle pressure to remove these covers and reveal the screws beneath.
This will help ensure that you reattach the back cover correctly later on.
you might use a pen and paper or snap pictures to document the positions and types of screws.
This will ensure that you remove all of them before attempting to remove the back cover.
Remember, missing screws can make the cover difficult to remove or cause damage.
Take your time to ensure you find all of them and make note of their sizes and locations.
This prepares you for the next step of actually removing the screws to detach the back cover.
Step 5: Use a Screwdriver to Remove the Screws
1.
It may be a Phillips head or flathead screwdriver.
Ensure that the screwdriver bit matches the size of the screws to avoid damage.
Apply gentle pressure and turn the screw counterclockwise.
Keep a firm grip on the screwdriver to prevent slipping.
Slowly loosen the screw while maintaining a steady, consistent twisting motion.
Work systematically, starting from one corner and moving your way around the back cover.
Keep track of the screws as you remove them to ensure they are all accounted for.
Having the screws stored properly will make reassembly easier.
Step 6: Gently Slide the Back Cover Off
1.
This will provide stability and prevent the cover from slipping or falling off accidentally.
This will allow for easier maneuvering and sliding off the cover.
Apply gentle pressure: With a firm grip, apply gentle and even pressure on the back cover.
Push or slide the cover towards the direction indicated by arrows or handles, if present.
if you hit any difficulty, try gently wiggling the cover back and forth to loosen it.
Continue applying gentle pressure and repeat the motion until the cover starts to slide off smoothly.
Move with caution to avoid any sudden jolts or accidental dislodging of internal components.
Take your time to ensure a gradual and complete removal of the back cover.
Always exercise patience and be mindful of the delicate internal components.
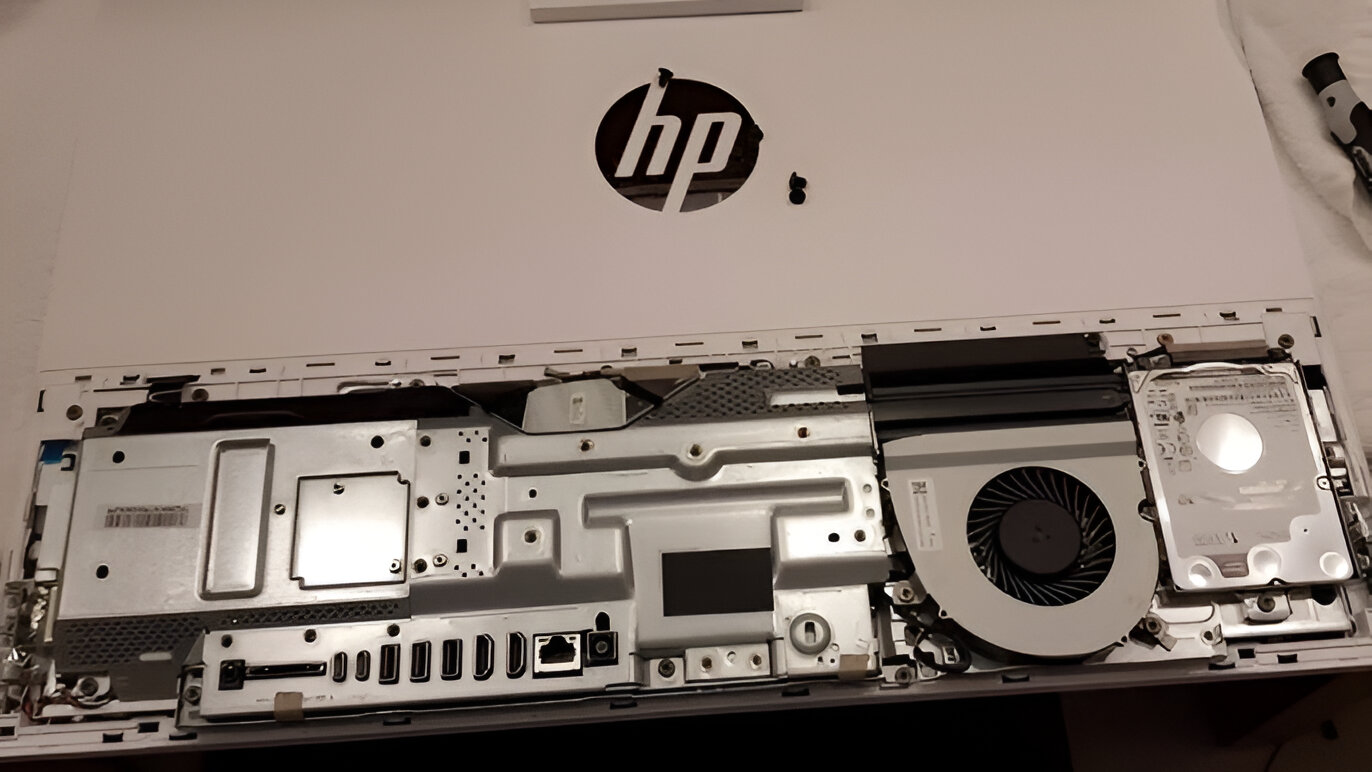
Step 7: Removing the Back Cover Completely
1.
Carefully disconnect these connections by gently tugging or releasing the tabs.
Lift off the back cover: Once all connections are detached, proceed to lift off the back cover.
Place your hands on the edges or designated handles, if available, and lift in an upward motion.
Place it face down to prevent scratching or smudging the inner side of the cover.
Store it in a safe place to avoid damage while you perform maintenance or make any necessary upgrades.
Look for any visible signs of dust, debris, or loose connections.
Step 8: Cleaning the Inside of the PC
1.
This will help remove any loose dust or particles from the components and improve overall ventilation.
Be cautious not to apply excessive pressure or snag any delicate parts.
Hold the canister upright and use short bursts of air to dislodge any accumulated dust.
Use the compressed air to clean out the fan vents, ensuring they are free from blockages.
Additionally, find out if your PC has any removable air filters.
Clean these filters according to the manufacturers instructions or replace them if necessary.
Gently press and secure these connections, ensuring they are properly seated.
This can help address any performance issues due to loose connections and improve the overall stability of your PC.
Liquid can cause damage and even lead to electrical shorts.
By following these cleaning steps, you might significantly improve the performance and longevity of your HP All-In-One PC.
Regular cleaning helps maintain proper airflow, prevent overheating, and ensure the smooth operation of your system.
Step 9: Reattaching the Back Cover
1.
Align the back cover: Start by aligning the back cover with the main body of the PC.
Take your time to ensure a precise fit.
Apply gentle, even pressure to ensure that the cover slides smoothly and evenly.
Avoid any sudden jerking or forcing that could damage the cover or internal components.
Take the screws you removed earlier and insert them back into their respective holes.
Ensure that there are no gaps, wobbling, or unevenness.
The cover should be securely fastened, providing optimal protection and stability to the internal components.
Tighten the screws until they are snug but do not apply excessive force beyond what is necessary.
Take extra care to ensure a proper fit and avoid overtightening the screws.
Conclusion
Congratulations!
You have successfully learned how to remove the back cover of your HP All-In-One PC.
Remember to exercise caution, be patient, and keep track of the screws and connections throughout the process.
When reattaching the back cover, ensure a proper fit and secure it with the screws without overtightening.
Enjoy exploring the possibilities and optimizing the performance of your PC!
