If youre wondering how toremove the SD card from your Samsung phone, youve come to the right place.
So, lets get started and learn how to safely remove the SD card from your Samsung phone.
A menu will appear on the screen, giving you the option to power off the phone.
In such cases, simply powering off the unit using the power button is sufficient.
Depending on the model of your Samsung phone, the location of the SD card slot may vary.
You may need to use a SIM card ejection tool or a small paperclip to initiate the slot.
Insert the tool into the tiny hole adjacent to the slot and apply gentle pressure to release the tray.
To do this, locate the small notch or groove on the edge of the phone.
With your fingernail or a small prying tool, carefully lift the cover and remove it from the phone.
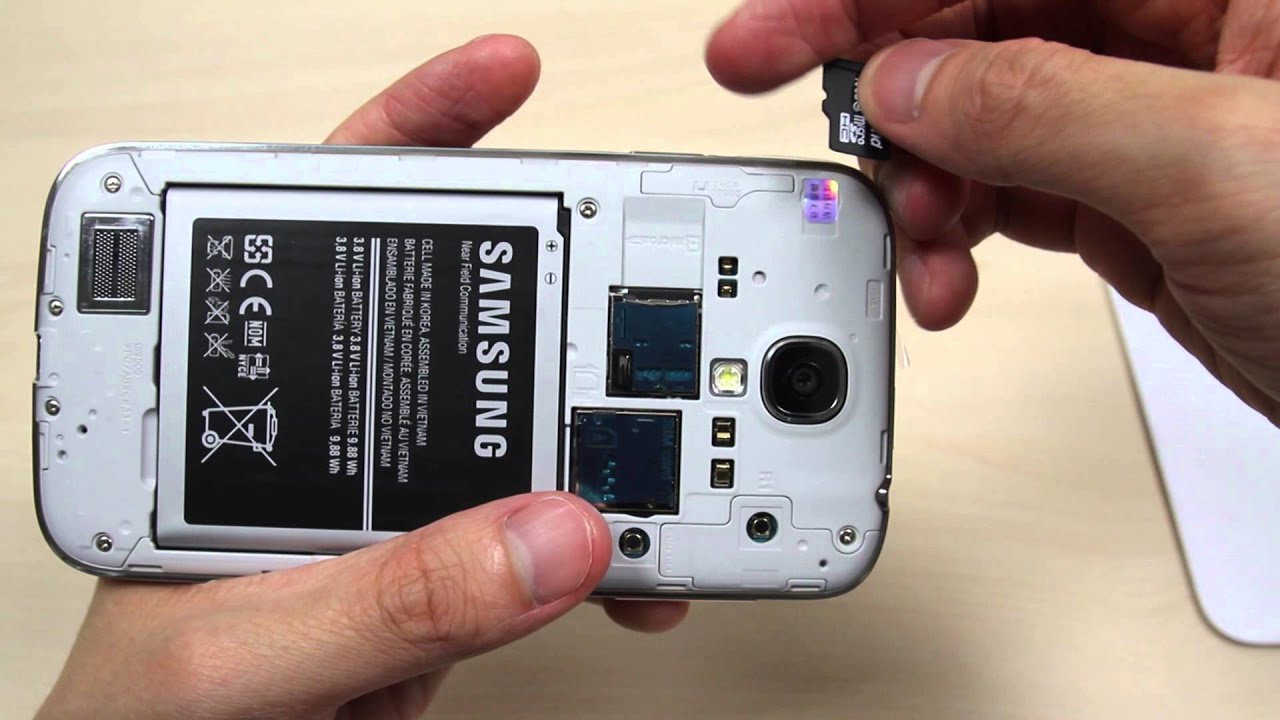
The SD card slot will be clearly labeled, making it easy to identify.
Take a moment to familiarize yourself with the slots location to ensure a smooth removal process.
It is worth noting that not all Samsung phone models support expandable storage via an SD card.
This tool is essential for accessing the SD card and safely removing it without causing any damage.
Many Samsung phones come with an ejector tool included in the box.
It is a small pin-like object that is specifically designed to eject the SD card tray.
If you have the ejector tool, simply take it out from its packaging or storage compartment.
However, if you dont have the ejector tool, dont worry.
A bent paperclip can serve as a suitable alternative.
Ensure that the ejector tool or paperclip is clean and free from any dirt or debris.
Hold the ejector tool or paperclip firmly and get ready to move on to the next step.
This step will allow you to get into the SD card and remove it safely from the machine.
Locate the small hole or notch next to the SD card slot on your Samsung phone.
This is where you will insert the ejector tool or the bent end of the paperclip.
Apply gentle but firm pressure to push the tool into the hole.
You should feel a slight resistance as you do so.
Continue to push the ejector tool or paperclip until you hear a click or feel a release.
This indicates that the SD card tray has been unlocked and is ready to be removed.
Be cautious not to apply excessive force or bend the tool during this process.
after you snag successfully ejected the SD card tray, carefully pull it out from the equipment.
The tray should slide out smoothly, allowing you easy access to the SD card inside.
Take note of the orientation of the tray and the position of the SD card within it.
It is important to handle the SD card tray and the SD card itself with care.
Hold the SD card tray and the SD card by their edges to minimize the risk of any damage.
You have successfully completed the step of ejecting the SD card tray from your Samsung phone.
Now, lets move on to the next step of removing the SD card from the tray itself.
Inspect the SD card tray that you have removed from your Samsung phone.
You will notice a small slot or groove within the tray where the SD card is placed.
Gently push the SD card from the tray to partially release it.
With one hand, carefully grip the SD card and slide it out of the tray entirely.
Be cautious not to apply any unnecessary force or bend the card during this process.
If the SD card seems stuck, do not force it out.
At this point, you have successfully removed the SD card from the tray of your Samsung phone.
Take the SD card tray that you previously removed and align it with the slot on your Samsung phone.
The orientation may vary depending on your specific phone model.
Carefully slide the SD card tray back into the gear until it is fully inserted.
Ensure that the tray goes in smoothly and fits snugly into the slot.
if you hit any resistance or difficulty while inserting the tray, double-check its alignment and retry.
Avoid applying excessive force that could potentially damage the tray or the phone itself.
A gentle and firm press is usually sufficient to lock the tray into place.
Press and hold the power button until the screen lights up and the phone starts to boot.
It may take a few moments for the phone to fully power on and recognize the newly-inserted SD card.
You have successfully reinserted the SD card tray into your Samsung phone.
Now you’re able to enjoy the benefits and convenience of having expandable storage in your unit.
Remember to follow each step carefully to ensure the safety of both your phone and the SD card.
Regularly back up your data to avoid any unforeseen data loss and protect your valuable files.
We hope this guide has been helpful to you.
Happy SD card management!
