Introduction
When building or upgrading a computer, one crucial step is connecting the CPU power cable.
It is essential to plug in the CPU power cable correctly to avoid any potential issues or malfunctions.
Before we begin, its important to note that working with computer components requires caution and attention.
Be sure to ground yourself properly by touching a metal object to discharge any static electricity.
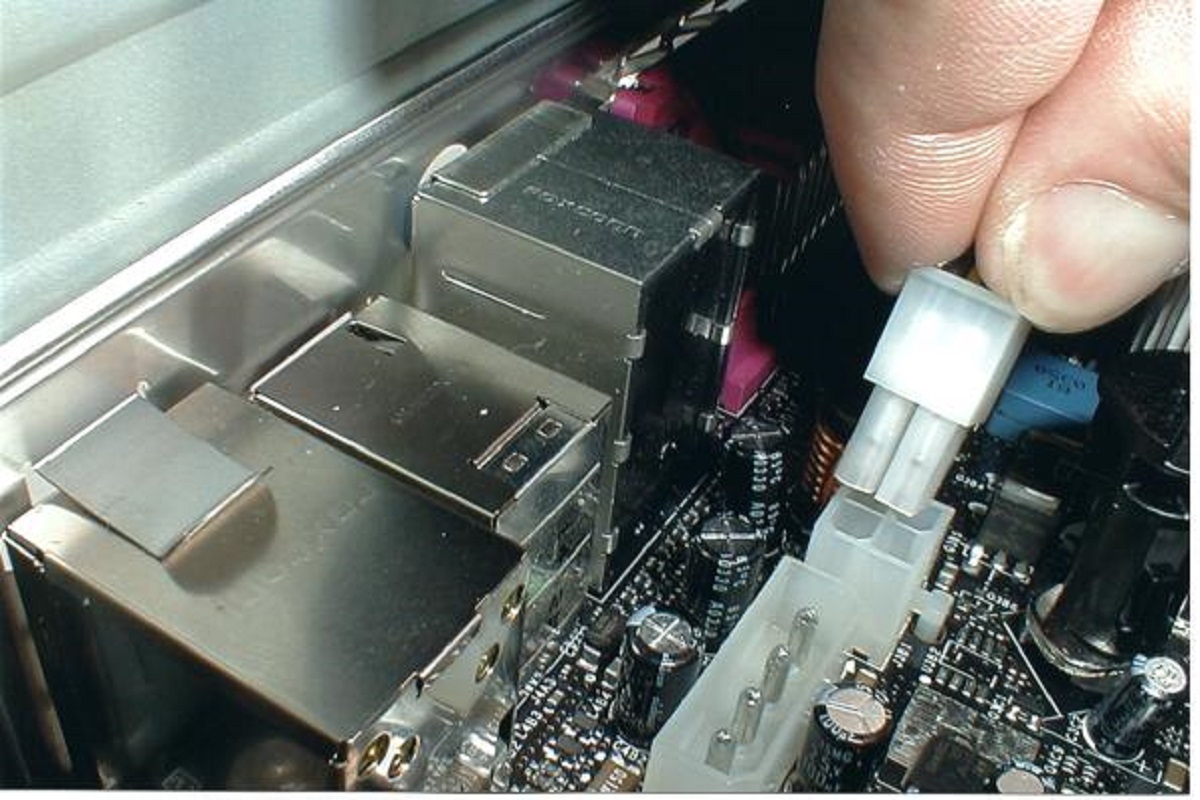
The CPU power cable is a thick cable with a specific connector designed to supply power to the CPU.
To ensure you are identifying the correct cable, refer to your motherboards manual or manufacturers website.
The manual will provide detailed information about the CPU power cable and its specific connector.
Familiarizing yourself with these identifiers will help you locate the proper cable.
It may also have additional notches or clips on one or both sides.
This connector is designed to fit into the corresponding CPU power connector on the motherboard.
Take your time to carefully identify the CPU power cable among the other cables included with your PSU.
This connector is where you will plug in the CPU power cable to provide power to the CPU.
To find the CPU power connector, consult your motherboards manual or manufacturers website.
The CPU power connector on the motherboard is usually labeled as CPU_PWR or something similar.
double-check to examine the connector closely to confirm its label and pin configuration before proceeding.
Carefully examine the connector and the CPU power connector on the motherboard.
Ensure that the shape, pin configuration, and any notches or clips on the connectors align perfectly.
This alignment is crucial to prevent any potential damage to the connectors and ensure a successful connection.
Take your time to make small adjustments as needed to achieve a seamless alignment between the two connectors.
Avoid using excessive force or bending the pins during this process, as it may result in damage.
This step ensures that the CPU receives the necessary power to operate efficiently.
The connector should slide in smoothly, without the need for excessive force.
Be sure to push the connector in until it is fully seated and snugly connected.
Double-check that the CPU power connector is securely attached to the motherboard.
Gently wiggle the cable at the connection point to ensure there is no movement or looseness.
A properly plugged-in CPU power cable will have a tight connection with no visible gaps or wiggle room.
Its important to note that some motherboards may have both a4-pin and an 8-pin CPU powerconnector.
Using cable ties or clips, secure the cable to prevent any unnecessary strain or interference with other components.
First, visually inspect the CPU power cable connection.
A snug and secure connection should show no visible gaps or movement.
Additionally, gently tug on the CPU power cable near the CPU connector.
There should be minimal to no movement or disconnection between the cable and the connector.
Next, route the CPU power cable within your setup case in a neat and organized manner.
Proper cable management prevents any strain on the cable and maintains unobstructed airflow within the case.
Ensure that your rig starts up without any error messages or issues related to power supply.
Congratulations on a crucial step towards assembling or upgrading your machine!
