Introduction
Welcome to the ultimate guide on how to open a power bank charger!
Additionally, always exercise caution and work in a clean and well-lit area to avoid accidents or mishaps.
Now, lets delve into the steps of opening a power bank charger and uncover the mysteries hidden inside!
The exact location and number of screws can vary depending on the model and design of your charger.
Start by carefully inspecting the exterior of the power bank.
Look for any visible screws or small compartments that might conceal screws.
If you dont see any screws, your power bank may have a snap-on or slide-to-open mechanism.
Its essential to proceed with caution and avoid using excessive force when searching for screws or hidden compartments.
Applying unnecessary pressure or using sharp objects can damage the casing or the internal components of the power bank.
This information will come in handy when you proceed with the disassembly process in the next steps.
The throw in of tool youll need depends on the throw in of screws used in your charger.
If your power bank has Phillips screws, use a Phillips screwdriver that matches the size of the screws.
If your power bank has Torx screws, youll need a set of Torx screwdrivers.
Be careful not to slip and strip the screw or damage the surrounding area.
confirm to obtain the correct tools to avoid damaging the screws or the screwdriver.
Work your way around the edges, exerting even force to avoid bending or breaking the plastic.
Remember to keep track of the screws and any other small components you remove.
This step requires careful handling to prevent any damage to the internal components or the casing itself.
Take your time and apply even pressure along the edges to avoid snapping or cracking the casing.
If your power bank has a snap-on or slide-to-open mechanism, start by identifying the point of separation.
Insert a plastic opening tool into the gap and use it to pry apart the casing gradually.
While opening the casing, be mindful of any cables or wires connected to the internal components.
Avoid putting unnecessary pressure on them or yanking them out abruptly.
Pay attention to any adhesive or tape holding the components in place and gently detach them if necessary.
This observation will be helpful when its time to reassemble the charger later on.
Its better to be thorough and ensure youve removed all the fasteners before exerting excessive force.
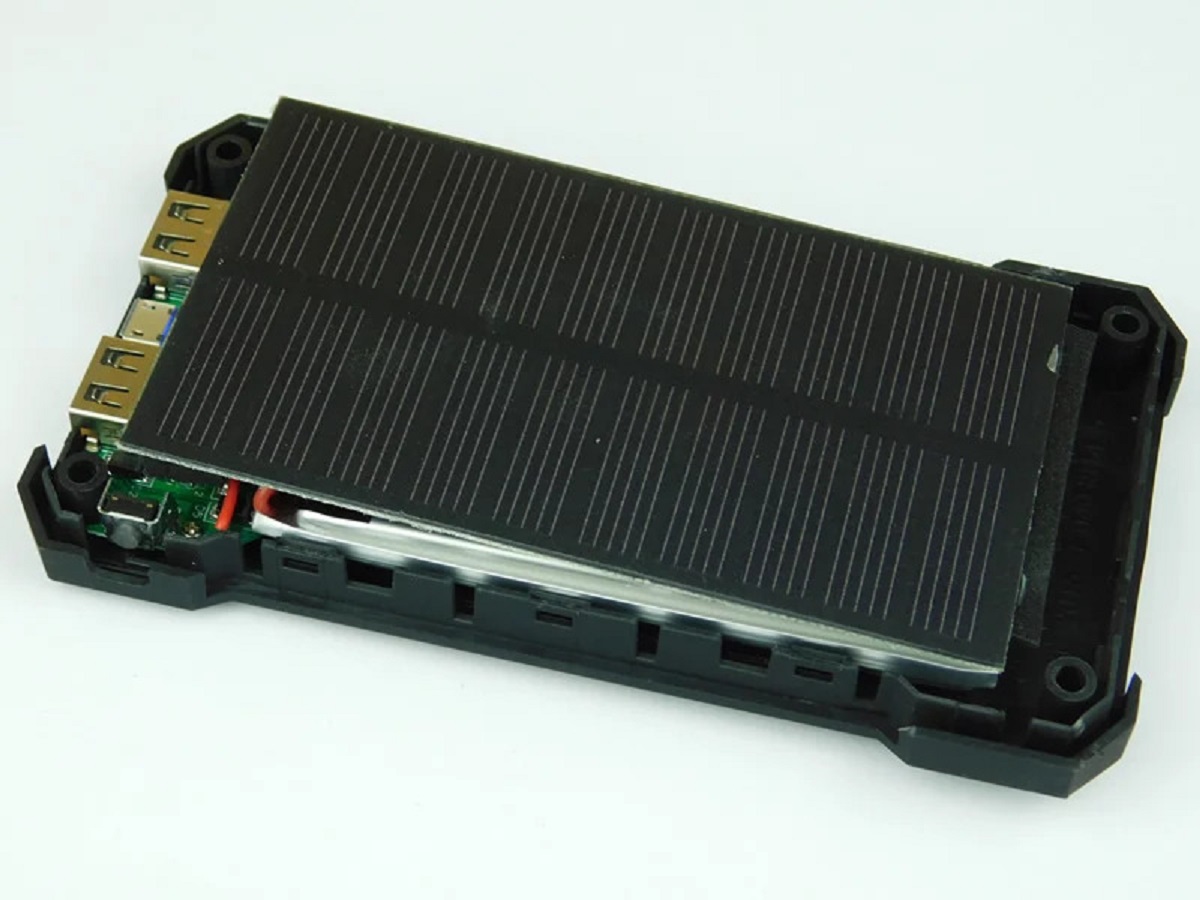
Once the power bank casing is opened, set it aside in a safe place.
You have successfully opened the power bank casing.
Now, its time to delve further and examine the internal components of your charger.
Start by closely examining the circuit board (also known as the PCB).
Pay close attention to their positions and connections, as this information will be useful during reassembly.
Next, direct your attention to the battery.
Observe any other components present inside the power bank, including connectors, wires, or additional circuitry.
Take note of their locations and how they are connected to the circuit board or other components.
During this step, it may be helpful to take pictures or make sketches of the internal components.
This will serve as a visual reference when you are ready to reassemble the power bank charger.
This step is crucial to ensure the proper functioning and longevity of your power bank.
These signs can indicate potential issues that may affect the performance of the power bank charger.
Check all the solder joints on the circuit board to ensure they are intact and properly connected.
Inspect the battery for any physical damages, such as dents, bulges, or leakage.
If you notice any swelling, its a sign of a malfunctioning or deteriorating battery that should be replaced.
Faulty batteries can not only affect the charging performance but also pose a safety hazard.
Check the battery terminals for any corrosion or dirt buildup and carefully clean them if necessary.
Its important to maintain clean and proper connections for optimal performance.
However, exercise caution when working with electricity and follow appropriate safety protocols.
after you snag reassembled the power bank charger, plug it into a power source and test its functionality.
verify if it charges your devices properly and if the indicators and buttons function as expected.
Remember to follow any specific instructions or guidelines provided by the manufacturer during reassembly.
Conclusion
Congratulations on successfully learning how to open and reassemble a power bank charger!
Remember, when opening a power bank charger, always exercise caution and use the appropriate tools.
Once the casing is open, inspect the circuit board and battery for any signs of damage or malfunction.
Pay attention to the solder joints, cleanliness, and connections to ensure optimal performance.
Double-check the connections and give the charger a final visual inspection before testing its functionality.
Remember to always refer to the manufacturers instructions and guidelines specific to your power bank charger model.
We hope this guide has empowered you to confidently open and reassemble your power bank charger.
