Introduction
Welcome to the world of Chrome extensions!
With just a few changes, you could completely transform the functionality and appearance of your favorite extensions.
Chrome extensionsare small software programs that enhance the browsers capabilities.
They are written in HTML, CSS, and JavaScript, which makes them highly customizable.
In this guide, we will walk you through the process of modifying Chrome extensions step by step.
If youre new to web development, dont worry!
Well provide explanations along the way to help you grasp the concepts and techniques involved.
So, if youre ready to unleash the full potential of your favorite Chrome extensions, lets get started!
The next steps will guide you through the process, helping you understand the underlying concepts and techniques involved.
Remember, modifying an extension requires careful attention to detail and a good understanding of web technologies.
Now, lets move on to understanding Chrome extensions in more detail!
It provides important metadata about the extension and acts as a bridge between the extension and the online window.
They can make API requests, manipulate data, or interact with the browsers functionality.
Background scripts are crucial for extensions that require continuous monitoring or background tasks.
web client Action/Page Action:web client actions and page actions provide the user interface for the extension.
These actions can trigger events, display popup windows, or perform specific actions based on user input.
Understanding these components is essential for modifying Chrome extensions.
In the next step, we will learn how to locate the extensions code to make changes.
To make changes to an extension, youll need access to its source code.
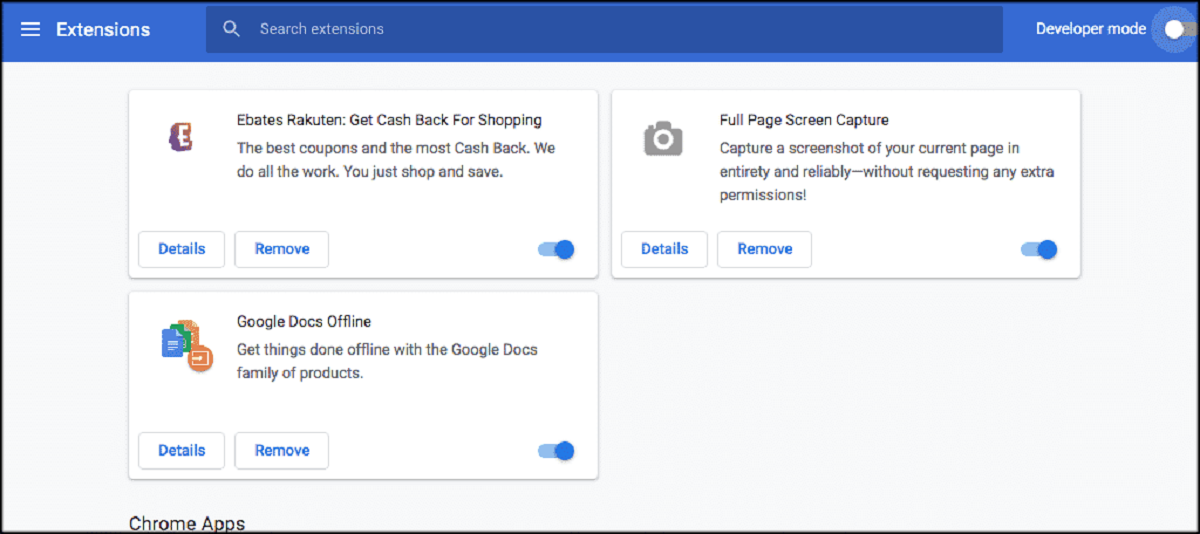
you might do this by typing chrome://extensions in the address bar.
On the Extensions page, youll find a list of all the installed extensions.
Look for the extension you want to modify and opt for Details button.
This will take you to the extensions details page, where you’re free to access its code.
The extension files are usually stored in a specific directory on your system.
For Windows users, the default location is C:\Users[Your Username]\AppData\Local\Google\Chrome\User Data\Default\Extensions.
On Mac, it is located at /Users/[Your Username]/Library/app Support/Google/Chrome/Default/Extensions.
The code of a Chrome extension is organized into different files based on their functionality.
In the next step, we will explore how to make changes to the extension code efficiently and effectively.
Understanding the purpose of each file will help you locate the code you want to modify.
pop kick open the relevant HTML, CSS, or JavaScript file in your text editor.
Modify the code as per your requirements.
Find the modified extension and tap on the Reload button.
This will refresh the extension and apply the changes you made to the code.
Verify that everything is functioning correctly and that no errors or unexpected behavior occurs.
Iterate and Refine:Modifying an extension is an iterative process.
You may need to make multiple changes and test them iteratively to get the desired outcome.
Keep refining your modifications until you achieve the desired result.
Making changes to an extension requires a good understanding of HTML, CSS, and JavaScript.
If youre new to web development, its a great opportunity to learn and practice your skills.
Testing and debugging are crucial steps in the modification process to identify and fix any issues or unexpected behavior.
Locate the modified extension and hit the Reload button.
This will reload the extension and apply the changes you made to the code.
Interaction Testing:Interact with the modified features of the extension to verify their functionality.
Test all the modified functionalities extensively to ensure they work as intended.
This can help you identify any errors, unexpected behavior, or log specific data for debugging purposes.
Error Handling:Take care of error handling in your modified extension.
Consider scenarios where things might go wrong or behave unexpectedly, and implement appropriate error handling mechanisms.
Proper error handling can prevent the extension from crashing or causing unwanted issues.
User Testing:Involve others in testing your modified extension.
Ask friends or colleagues to plant the modified extension and provide feedback on its functionality and user experience.
Their input can help identify any issues or areas for improvement that you might have missed.
Iterative Testing and Debugging:Testing and debugging is an iterative process.
Continue refining and debugging your modifications until the modified extension works smoothly and without any issues.
Taking the time to thoroughly test and debug your modifications will result in a more reliable and user-friendly extension.
To do this, youll need to package the modified extension.
go for the directory containing the modified extensions files and click Pack Extension.
Chrome will create a .crx file, which is the packaged version of the modified extension.
Distributing the Extension:when you obtain the .crx file, you might distribute the modified extension to others.
Once approved, your modified extension will be accessible by anyone through the Chrome Web Store.
Sharing the Source Code:Alternatively, you might also share the modified extensions source code with others.
you could upload it to a code-sharing platform like GitHub, where users can access and download the code.
You have successfully completed all the steps of modifying and sharing a Chrome extension.
Conclusion
Modifying Chrome extensions opens up a world of possibilities for customization and personalization.
Knowing the structure of an extension is crucial in navigating and making changes to its code effectively.
Testing and debugging the modified extension were also key steps in ensuring its functionality.
Now its time to put your knowledge into action and start exploring the possibilities of modifying Chrome extensions.
