Introduction
Welcome to the fascinating world of stamp making with a laser engraver!
With its versatility and accuracy, a laser engraver is an ideal choice for stamp making.
This modern technique allows you to unleash your creativity and produce professional-quality stamps with ease.
In this guide, we will walk you through the step-by-step process of making stamps using a laser engraver.
So lets dive in and explore the art of stamp making with a laser engraver!
What is a Laser Engraver?
A laser engraver is a equipment that uses precise laser technology to etch or engrave designs onto various materials.
Laser engravers offer a wide range of possibilities when it comes to stamp making.
They can be used on various materials like rubber, polymer, wood, acrylic, and even metal.
Another benefit of using a laser engraver for stamp making is its efficiency and speed.
The automated process eliminates the need for manual carving or cutting, saving you time and effort.
A stamp is essentially a tool used to create impressions or marks on various surfaces.
It consists of two main components: the stamp design and the stamp material.
The stamp design is the image or pattern that you want to imprint.
It can be a logo, a monogram, a decorative motif, or even a custom artwork.
The design can be created digitally using graphic design software or hand-drawn and scanned for digital processing.
The stamp material refers to the medium on which the design is engraved or etched.
Traditionally, stamps were made from materials such as rubber, wood, or even metal.
The laser beam removes the material in a controlled manner, leaving behind a clean and detailed engraving.
Understanding the basics of stamp making will help you approach the process with greater clarity and confidence.
So lets continue our stamp making journey and bring your design ideas to life!
Materials Youll Need
Creating stamps with a laser engraver requires a few essential materials to get started.
Gathering these supplies beforehand will ensure a smooth and enjoyable stamp making experience.
So lets continue our creative exploration and bring your stamp-making dreams to life!
Consider factors such as the size and level of detail you want to achieve.
If youre not comfortable with graphic design software, dont worry.
There are plenty of online resources and marketplaces that offer pre-made stamp templates.
Browse through these platforms and choose a template that aligns with your vision.
Then, customize the template by adding your personalized text or tweaking the design to make it uniquely yours.
Alternatively, if you have a hand-drawn design, scan it and digitize it using a scanner or camera.
When designing your stamp, keep in mind its purpose and the surfaces youll be stamping on.
Additionally, consider the size of the stamp and ensure that your design scales well without losing its clarity.
after you snag finalized your stamp design, save it in a compatible format for thelaser engraver software.
Popular file formats include JPEG, PNG, or vector-based formats like SVG or AI.
Consult your specific engravers manual or software to ensure compatibility.
Designing your stamp is the creative starting point of the stamp-making process.
In the next section, well discuss how to prepare the stamp material for engraving.
So lets move forward and bring your stamp design to life!
If you opt for rubber stamp material, ensure that it is specifically made for laser engraving.
This jot down of material is usually a sheet of rubber backed with adhesive for easy mounting.
Its important to choose a thickness that is suitable for your design and the intended use of the stamp.
If you prefer polymer stamp material, again, ensure it is compatible with laser engraving.
Polymer stamps are known for their durability and ability to hold fine details.
They often come in pre-cut shapes or sheets that can be easily engraved and mounted for use.
Acrylic is another option that works well for laser-engraved stamps.
It is durable, easy to clean, and allows for clear and precise engravings.
Use a cutting tool or scissors to achieve clean and precise edges.
ensure the stamp material fits within the working area of your laser engraver.
Preparing the stamp material is an important step to ensure optimal engraving results.
Take the time to choose and prepare the material that best suits your design and desired outcomes.
Proper setup is crucial to ensure accurate and precise engraving.
Begin by positioning your laser engraver in a well-ventilated area with a stable surface.
Ensure that there is enough space around the machine for easy accessibility and proper airflow.
Refer to the manufacturers instructions for any specific requirements or recommendations for setting up your particular model.
Next, double-check that your engraving software is properly installed on your gear and connected to the laser engraver.
Install any necessary drivers or plugins to ensure a smooth communication between the software and the engraver.
Now, its time to load your stamp design into the engraving software.
Configure the laser engraver prefs according to the stamp material you are using.
This includes adjusting the laser power, engraving speed, and resolution.
Refer to the material specifications and consult the engraver manual for recommended controls.
once you nail verified the configs, secure the prepared stamp material in the engraver bed or holder.
Ensure that it is properly aligned and firmly in place to prevent any movement during the engraving process.
With all the setup steps completed, you are now ready to start the laser engraving process.
Double-check all the controls, safety measures, and proper alignment one last time before initiating the engraving.
Setting up your laser engraver correctly is essential to ensure accurate and precise stamp engraving.
By following the manufacturers instructions and accurately configuring the engraver controls, you could achieve optimal results.
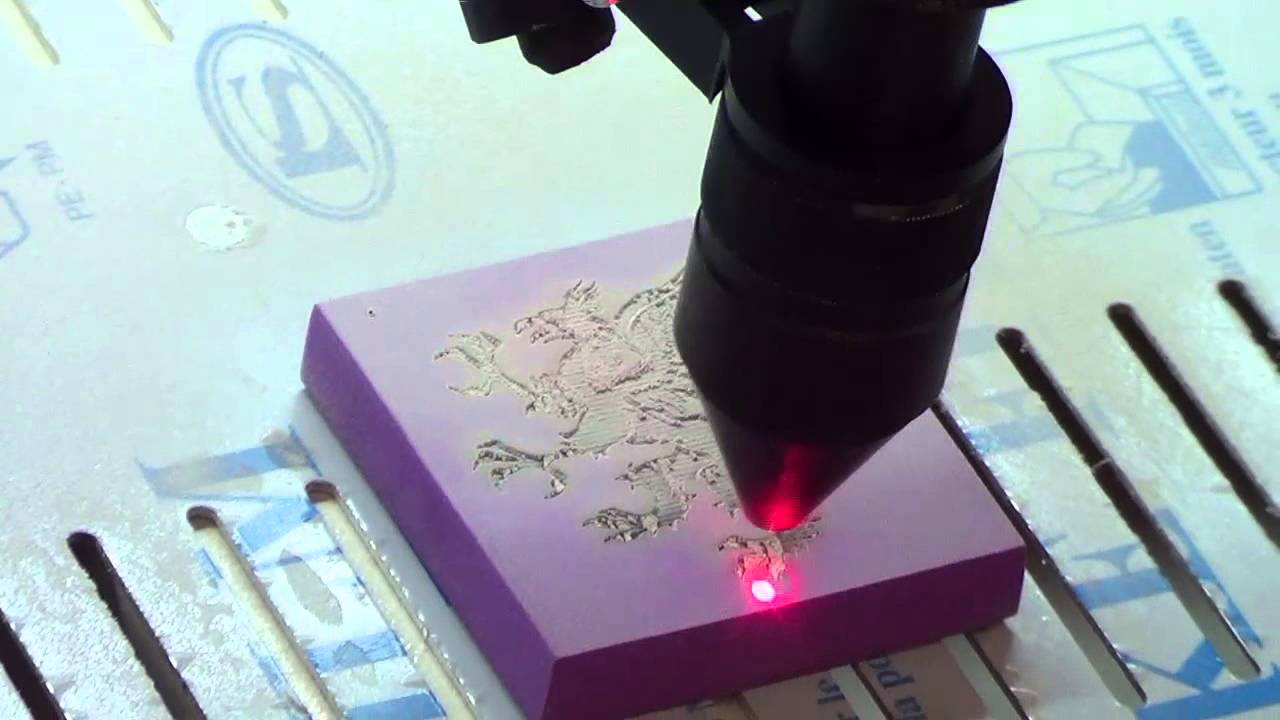
This is where you will see your design come to life as it is etched onto the stamp material.
Initiate the engraving process by starting the laser engraver and selecting the appropriate engraving controls in the software.
These options may include the laser power, engraving speed, and resolution.
Its crucial to use the recommended controls that align with the throw in of stamp material youre using.
As the engraving begins, the laser beam precisely follows the paths defined by your stamp design.
It removes or vaporizes the surface layer of the stamp material, creating the desired engraved design.
The laser engraver controls the depth and accuracy of the engraving, ensuring consistent results.
Make any necessary adjustments to the tweaks as needed.
Be patient and allow the laser engraver to complete the process without interruption.
Once the engraving is complete, carefully remove the stamp material from the engraver.
Be cautious as the material may still be warm.
Inspect the engraved design to ensure that it matches your intended design and that all details are clearly visible.
You have successfully engraved your stamp design using a laser engraver.
So lets move forward in our stamp-making journey!
Begin by gently wiping the surface of the stamp material with a clean, dry cloth.
This helps remove any loose debris or dust particles that may have accumulated during the engraving process.
Apply the solution to a soft brush or cloth and gently scrub the engraved surface.
Avoid using harsh chemicals or abrasive materials that could damage the stamp.
Rinse the stamp with clean water to remove any cleaning solution residue.
ensure the stamp is completely dry before moving on to the next step.
Inspect the engraved design after cleaning to ensure that it is clear and free of any remaining debris.
If needed, repeat the cleaning process until youre satisfied with the cleanliness and visibility of the design.
This will ensure a secure and stable grip during stamping.
Cleaning up the stamp is an important step in maintaining its performance and ensuring crisp and clear impressions.
Proper cleaning removes any residue, dust, or debris that could affect the stamping quality.
The handle provides a comfortable grip and makes it easier to apply pressure when stamping.
Stamp handles are commonly made of wood or acrylic, providing a sturdy and comfortable grip.
Begin by selecting a stamp handle that is suitable for the size and thickness of your stamp material.
Ensure that the handle has a flat surface or a designated area where you could securely attach the stamp.
Allow the adhesive to dry according to the manufacturers instructions.
Drill small holes in the stamp material and corresponding holes in the handle.
Align the holes and insert the screws, tightening them to secure the stamp material in place.
Ensure that the stamp is properly aligned on the handle, with the engraved design facing outward.
The handle should provide a comfortable grip and allow you to apply pressure evenly when stamping.
If everything is secure, your stamp is now ready for use!
Attaching the stamp handle is the final step in completing your stamp-making process.
A well-attached handle ensures stability and ease of use when stamping.
In the next step, we will discuss how to test your stamp to ensure accurate impressions.
So lets keep moving forward and ready our stamp for action!
Testing the stamp allows you to make any necessary adjustments before using it for your desired applications.
Start by preparing a testing surface.
Ensure that the surface is clean and free from any dust or debris.
Ink your stamp by applying a thin and even layer of stamping ink to the engraved surface.
verify that the ink covers the entire design, but avoid excess ink that could cause smudging or smearing.
Press the stamp firmly and evenly onto the testing surface.
Apply consistent pressure for a few seconds to allow the ink to transfer from the stamp to the surface.
Lift the stamp slowly and carefully to reveal the impression.
Inspect the impression for clarity, definition, and completeness.
Check for any areas where ink may have smudged or not transferred properly.
If necessary, adjust the pressure, angle, or ink software for optimal results.
Continue testing the stamp on various surfaces and materials to evaluate its performance.
Once you are satisfied with the results of your stamp testing, congratulations!
Your stamp is now ready for use in your desired applications.
Remember to clean your stamp after each use to maintain its performance and longevity.
Use a stamp cleaner or a gentle wipe with a damp cloth to remove any excess ink.
Proper care and maintenance will ensure that your stamp stays in excellent condition for future stamping needs.
Conclusion
Congratulations on completing this journey into the world of stamp making with a laser engraver!
Experiment with different stamp materials and engraving parameters to achieve optimal results.
Clean and maintain your stamps to ensure their longevity and performance.
Continuously explore new techniques, learn from experienced stamp makers, and seek inspiration to enhance your craft.
