This shift is driven by the superior speed, durability, and efficiency that SSDs offer.
This means that you will need to back up your existing data and reinstall any necessary applications.
double-check you have a copy of the Windows operating system that you want to install on your setup.
This will ensure that your files are safe in case of any unforeseen issues during the installation process.
Check the user manual or consult the manufacturers website to determine the specific tools required.
6.System specifications:Familiarize yourself with the system requirements for the version of Windows youll be installing.
This includes the minimum processor, RAM, and storage space requirements.
Ensure that your gear meets or exceeds these specifications to ensure optimal performance.
Its crucial to have everything you need on hand to ensure a smooth and hassle-free installation experience.
Make a list of these items to ensure that nothing is overlooked during the backup process.
Dont skip this step its an essential precautionary measure to protect your valuable data.
Ensure that all cables are disconnected, and that the power is turned off.
Refer to your computers user manual or the manufacturers website for specific instructions on opening the case.
3.Identify the storage bay:Look for the storage bays inside your setup case.
These are typically rectangular slots where the hard drives and SSDs are installed.
Refer to your computers manual for guidance.
4.Mount the SSD:Gently insert the new SSD into an available storage bay.
Align the screw holes on the SSD with the holes on the bay and secure it with screws.
Be careful not to overtighten the screws, as this may damage the SSD or the bay.
5.Connect the cables:Locate the SATA data cable and the SATA power cable.
Connect the SATA power cable to the SSD and the power supply unit (PSU).
Ensure that all screws are tightened and that the case is properly secured.
7.Power on your rig:Connect the power cable and any other necessary cables to your rig.
Press the power button to turn it on.
Take your time and ensure that all connections are secure before moving on to the next step.
If youre using a DVD, insert it into the optical drive of your rig.
2.cycle your gear:Once the installation media is inserted, cycle your gear.
Consult your computers manual or the manufacturers website for the specific key to reach the boot menu.
Press Enter to boot from the selected equipment.
4.Windows loading screen:After booting from the Windows installation media, youll see the Windows loading screen.
This indicates that the installation process is about to start.
6.Activate Windows:If prompted, input your Windows product key to activate your license.
Click Next to proceed.
Click Next to continue.
This will allow you to opt for newly installed SSD as the installation destination.
9.opt for SSD:Youll see a list of available drives.
snag the SSD drive where you want to install Windows.
Ensure that you choose the correct SSD and not any other existing drives or partitions.
10.Begin the installation:Click Next to begin the installation process.
Windows will now install on your new SSD.
This may take some time, so be patient and let the process complete.
Ensure that you follow the on-screen instructions and make the necessary selections to ensure a smooth installation process.
Select your region and language preferences and click Next to proceed.
2.Install now:On the next screen, choose the Install now button to initiate the installation process.
3.input your product key:If prompted, enter the product key for your version of Windows.
Click Next to continue.
4.Accept the license terms:Read through the license terms and conditions and accept them by clicking the checkbox.
Click Next to proceed.
This will allow you to choose the SSD as the installation destination.
6.snag the SSD:On the next screen, youll see a list of available drives.
snag the SSD where you want to install Windows.
Ensure that you choose the correct SSD and avoid selecting any other existing drives or partitions.
Click Format to create a new partition for Windows.
8.Wait for the installation:Windows will now begin the installation process on your SSD.
This may take some time, so be patient and avoid interrupting the process.
9.power cycle your rig:Once the installation is complete, your rig will automatically restart.
Remove the Windows installation media (USB drive or DVD) from your rig during the restart process.
By following these steps, youll initiate the Windows installation process on your new SSD.
Be sure to follow the on-screen instructions carefully and make the necessary selections throughout the installation process.
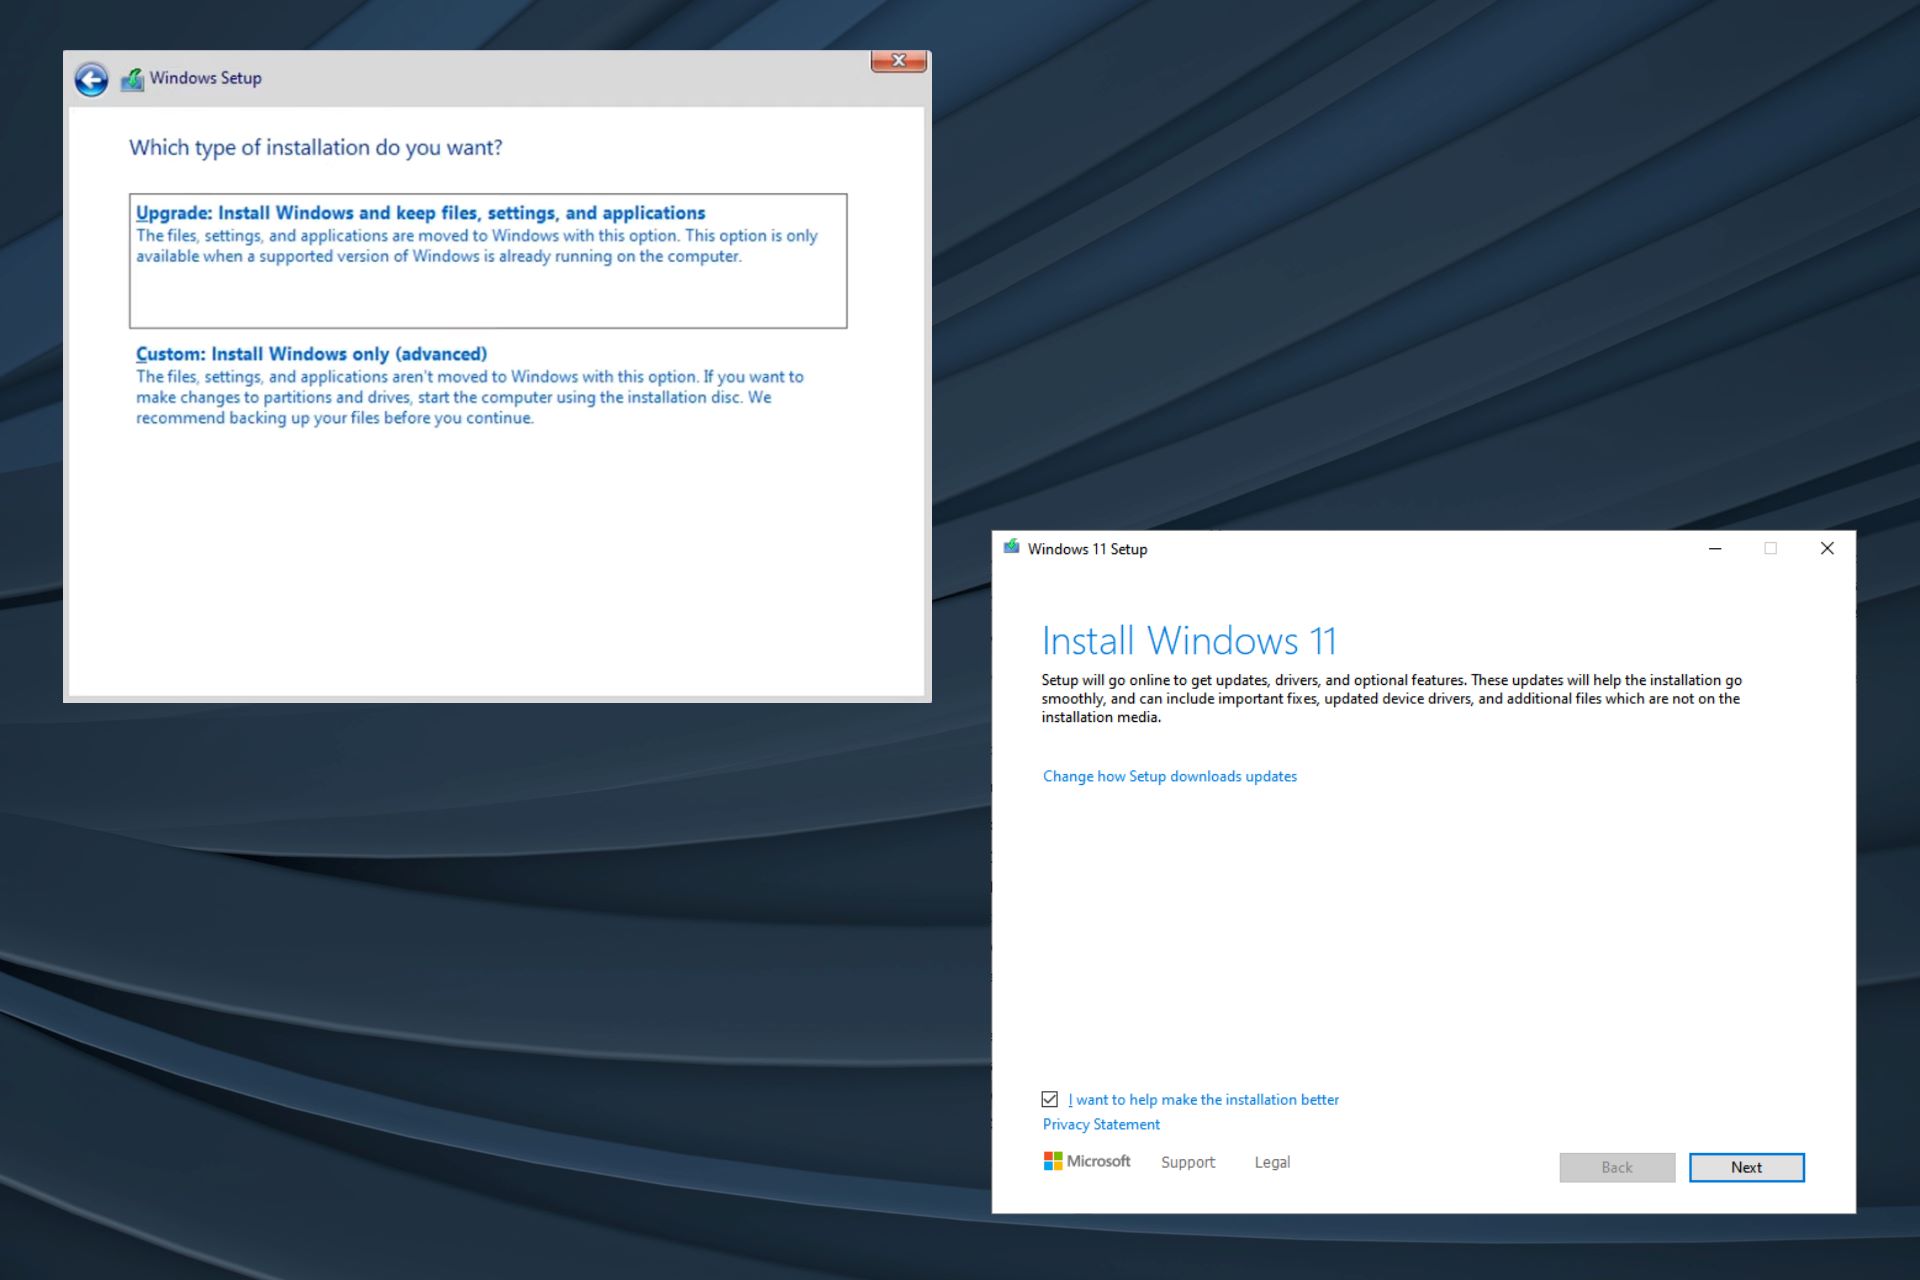
Select Custom: Install Windows only (advanced) to proceed.
2.snag the SSD:On the next screen, youll see a list of available drives.
Locate the SSD drive that you have installed in your system.
double-check you carefully identify the correct SSD to avoid installing Windows on the wrong drive.
To format the SSD, pick the drive and choose the Format option.
Ensure that you have selected the correct partition and havent accidentally chosen any other drives or partitions.
Windows will now install on the selected SSD.
7.Wait for the installation to complete:The installation process may take some time to finish.
Avoid interrupting the process or turning off your machine during this time.
Windows will automatically power cycle your box once the installation is complete.
Take your time to double-check your choices and ensure that you havent accidentally selected another drive or partition.
Allow the installation to finish without interrupting it.
The progress will be displayed on the screen.
Choose the appropriate configs and click Next to continue.
3.Accept the license terms:Read and accept the license terms presented on the screen.
Tick the checkbox to indicate that you agree to the terms, then click Next to proceed.
Make the desired selections and click Next to continue.
5.Create a user account:Windows will then prompt you to create a user account.
input your desired username and password, and provide any additional information requested.
Click Next to proceed.
If you prefer to use a local account instead, snag the Offline account option.
This may take some time, depending on the size and number of updates.
Allow Windows to complete this process without interruption.
9.Finalize the installation:After all the updates have been installed, your gear will be ready for use.
Windows will present you with the desktop screen, indicating that the installation and setup process is complete.
By following these on-screen prompts, you will complete the installation of Windows on your new SSD.
Be sure to carefully review and make the desired selections for each prompt.
select Check for updates to see if there are any available updates for your system.
If updates are found, tap on Install to begin the update process.
It may take some time to download and load the updates, so be patient.
2.Install driver software:Windows usually installs generic drivers for most hardware devices during the installation process.
trigger the installer for each driver and follow the on-screen instructions to install them on your system.
implement the driver following the provided instructions.
This will ensure that you have the latest features and stability improvements for gaming and other graphical applications.
check that to download them from reputable sources to avoid malware or other security risks.
This will ensure that all changes are applied and that your system is functioning optimally.
Keeping your system up-to-date will help maintain stability, security, and performance.
Regularly updating your system will help enhance the stability, security, and performance of your Windows installation.
Ensure that the unit is recognized by your rig and accessible.
2.Locate and transfer your files:Identify the files and folders that you backed up before the installation.
kick off the files and check for any data corruption or missing content.
if you catch any issues, refer back to your backup machine and try restoring the files again.
Use the original installation files or download them from reliable sources.
ensure to enter any required license keys or registration information during the installation process.
This will help free up storage space and ensure that your backup remains up to date with future changes.
Press Enter to execute the command.
2.Disable hibernation:Hibernation can take up precious storage space on your SSD.
Press Enter to execute the command.
This will free up disk space and prevent frequent write operations associated with hibernation.
3.Turn off unnecessary visual effects:Windows has various visual effects that can impact performance.
To optimize your SSD, go to the Control Panel and search for Performance.
4.Disable unnecessary startup programs:Running unnecessary programs at startup can slow down your system boot times.
fire up the Task Manager by right-clicking on the taskbar and selecting Task Manager.
Navigate to the Startup tab and disable any programs that you dont need to launch at startup.
This will help improve the overall startup speed of your setup.
Save the controls and exit the BIOS.
7.Regularly update drivers:Keeping your drivers up to date ensures compatibility and optimal performance.
Check the manufacturers website for your computers components, such as the motherboard, chipset, and SSD.
Download and drop in the latest drivers as necessary.
8.Monitor SSD health:Install SSDhealth monitoring software to keep track of your SSDs health and performance.
This software can provide insights into various metrics, such as temperature, lifespan, and wear leveling.
Regularly check the status of your SSD and take appropriate action if any issues are detected.
By following these optimization steps, you might enhance the performance and longevity of your new SSD.
Conclusion
Congratulations!
You have successfully installed Windows on your new SSD and optimized it for better performance.
You have also learned how to backup and restore your important data and optimize your SSD for better performance.
Remember, regular maintenance is essential to ensure the longevity and continued optimal operation of your SSD.
Thank you for following this guide.
