Introduction
Welcome to our guide on how to install an SSD into your laptop.
This makes them ideal for laptops, especially if you often travel or use your laptop on the go.
The two key factors to consider when selecting an SSD are the form factor and the interface.
Most laptops use either a 2.5-inch SATA SSD or an M.2 SSD.
2.5-inch SATA SSDs are similar in size to traditional laptop hard drives and connect through a SATA interface.
They are a common choice for older laptops that have traditional hard drive bays.
They are becoming increasingly popular, especially in newer laptops that prioritize slim and lightweight designs.
SSDs come in various storage capacities, ranging from 120GB to multiple terabytes.
Consider your storage needs and budget when choosing the capacity.
Performance-wise, SSDs with higher read and write speeds will generally provide faster boot times and program loading times.
Before making a purchase, its always a good idea to read reviews and compare different SSD models.
This ensures that you wont lose any files during the process.
There are several methods you might use to back up your data.
Simply connect the storage unit to your laptop and copy and paste the files you want to save.
Another option is to use cloud storage services, such as Google Drive, Dropbox, or OneDrive.
If you prefer an automated backup solution, you’ve got the option to use backup software.
These tools allow you to schedule regular backups and restore your data easily in case of any unforeseen issues.
Its better to be safe than sorry!
The first step is to save any open files or documents and close all running applications.
This ensures that no active processes interfere with the installation process.
Next, punch the Start menu and snag the Shut Down option to power off your laptop properly.
Allow it a few moments to completely shut down before proceeding.
Once your laptop is powered down, youll need to locate and remove the battery.
Refer to your laptops user manual or the manufacturers website for specific instructions on how to remove the battery.
If your laptop has a non-removable battery, you might skip this step and proceed to the next one.
Just check that your laptop is completely turned off before moving on.
Removing the battery ensures that there is no power running through the laptop while youre performing the SSD installation.
This minimizes the risk of electrical shock and protects both you and the laptop from any potential damage.
As every laptop model is different, the exact process of opening the case may vary.
However, the general steps remain consistent.
Start by flipping your laptop over and locating the screws that secure the bottom cover in place.
Use a small screwdriver that fits the screw heads, and carefully unscrew them.
Remember to keep track of the screws and their placement, as they may differ in size or length.
Consider placing them in a small container or using a magnetic mat to prevent them from getting lost.
Once youve successfully removed all the screws, its time to pry bring up the laptop case.
Use a plastic pry tool or a flathead screwdriver covered in a cloth to prevent scratching the case.
Work your way around the entire perimeter of the case, carefully freeing the clips one by one.
Take your time and be patient to avoid damaging any internal components or breaking the clips.
However, be cautious as there may still be ribbon cables or connectors attached between the two parts.
These need to be carefully disconnected before fully separating the case.
Refer to your laptops user manual or manufacturers website for specific guidance on disconnecting cables or connectors.
Usually, they can be detached by gently pulling them straight out from their sockets or by releasing latches.
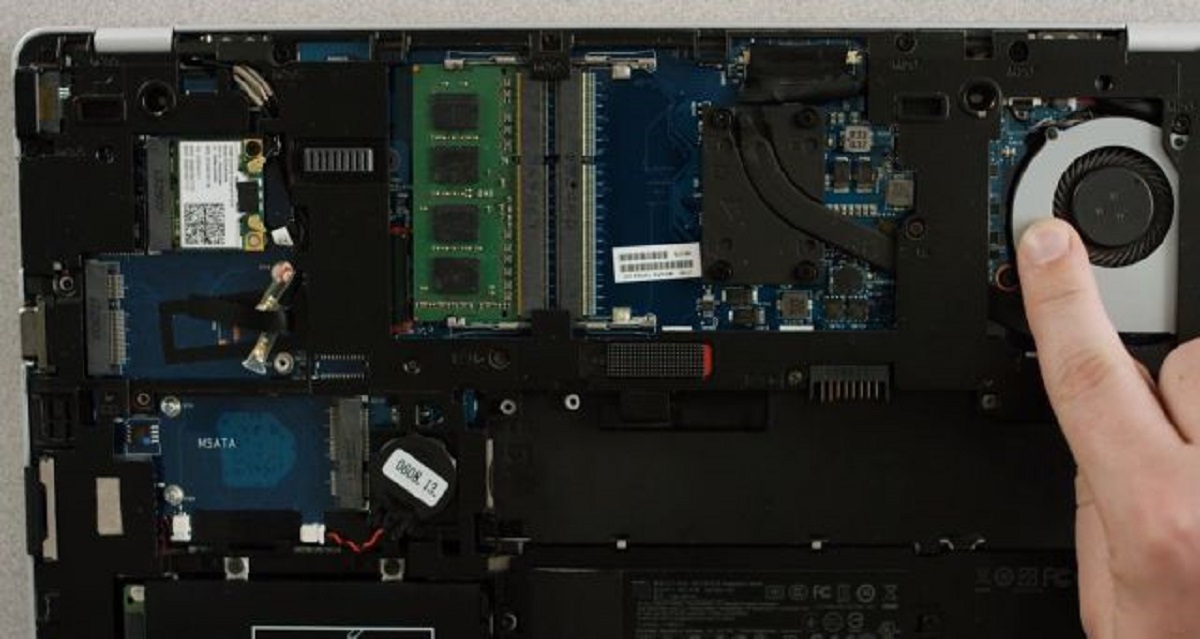
The hard drive bay is the area where the current hard drive is installed.
Its usually a small rectangular or square compartment specifically designed to hold the hard drive securely.
The location of the hard drive bay can vary depending on the laptop model.
These cables may include the data cable (SATA or M.2) and power cable.
Refer to the user manual or manufacturers instructions to ensure you disconnect them correctly.
After disconnecting the cables, youll find the hard drive secured in place by screws or brackets.
These can typically be removed using a small screwdriver or a suitable tool.
Note the placement of screws and brackets to make reinstallation easier later on.
Gently remove the screws or brackets and carefully take out the existing hard drive from the bay.
With the existing hard drive removed, you have made room for the installation of the new SSD.
This ensures proper installation and prevents any interference or damage to the SSD.
First, take your new SSD and carefully align it with the connectors in the hard drive bay.
Once aligned, gently slide the SSD into the bay, applying even pressure until it is fully inserted.
Some laptops may require you to secure the SSD with screws, brackets, or securing clips.
Consult your laptops user manual or manufacturers instructions to determine the specific installation method.
If your SSD connects via a data cable, ensure that it securely plugs into the corresponding port.
Likewise, if your SSD requires a power connection, ensure that it is properly connected.
This may involve plugging in a power cable or securely attaching the appropriate power connector to the SSD.
Double-check that the SSD is firmly seated in the bay and that all connections are secure.
The SSD should be in a stable position with no loose parts or cables.
This ensures a smooth installation process and avoids any complications down the line.
Depending on your laptop model, there are various ways to secure the SSD.
Once aligned, insert the screws into the holes and tighten them evenly to secure the SSD in place.
Take care not to overtighten the screws as this may damage the SSD or the bracket.
Refer to your laptops user manual or manufacturers instructions for guidance on the appropriate method.
When using screws, align the holes on the SSD with the corresponding holes on the hard drive bay.
Insert the screws and tighten them evenly until the SSD is firmly secured.
Again, be cautious not to overtighten the screws.
Alternatively, securing clips can be used to hold the SSD in place.
Carefully follow the instructions provided by the manufacturer to properly secure the SSD using clips.
If it feels loose, double-check your installation and make any necessary adjustments to properly secure the SSD.
Confirm that all connections are still intact and that the SSD is in the correct position.
Take a moment to inspect the overall setup and ensure that everything is properly aligned and secured.
In the next step, well guide you through closing up the laptop case and screwing it back together.
This step ensures that all the internal components are protected and properly secured.
Begin by aligning the top cover of the laptop with the bottom cover.
Take care to match any tabs, connectors, or screw holes present on both pieces.
Gently press the top cover down onto the bottom cover, applying even pressure along the edges.
Ensure that the two pieces fit together snugly and that there are no gaps or misalignments.
Once the top and bottom covers are aligned, its time to screw them back together.
Locate the screw holes on the bottom cover that correspond to the screw holes on the top cover.
Begin by inserting one screw into a hole, but refrain from fully tightening it.
Instead, loosely screw it in place.
Repeat this process for all the remaining screws, ensuring each screw is initially tightened partially.
Begin with the center screws and work your way out towards the corners.
Make any necessary adjustments before fully tightening all the screws.
The laptop case should be secure and tightly closed without any loose or protruding parts.
If you removed the laptops battery earlier, carefully slide it back into its designated compartment.
Ensure that it is inserted in the correct orientation and fully seated.
This ensures that your laptop has a stable power supply during the startup process.
Now, press the power button to boot up your laptop.
The power button is usually located somewhere on the keyboard or near the edge of the laptop.
Press and hold the button for a few seconds until the laptop powers on.
This is normal and should only happen the first time you boot up your laptop after the installation.
If your laptop successfully boots up and you see the operating systems login screen or desktop, congratulations!
Your laptop is now powered on and running with the newly installed SSD.
Congratulations on successfully completing the installation!
In the next step, well guide you through the process of formatting and initializing the SSD for use.
The exact process may vary depending on your operating system, so well provide general guidance here.
In Windows, you’re free to format and initialize the SSD using the Disk Management utility.
To access this utility, right-hit the Start button and select Disk Management from the menu.
Find the SSD in the list of drives displayed and take note of its disk number.
Once the SSD is formatted, its time to initialize it.
Right-press the SSD again and choose the Initialize Disk option.
go for the appropriate disk throw in (usually MBR or GPT) and follow any additional instructions provided.
After initializing the SSD, it should be recognized by your operating system and ready for use.
Launch Disk Utility from the Applications folder or by searching for it in Spotlight.
choose the SSD from the list of drives and choose the Erase option.
press the Erase button to begin the formatting process.
Once the formatting is complete, the SSD will be ready to use.
you’re free to now exit the Disk Utility and start using your SSD.
Keep in mind that formatting and initializing the SSD will erase any existing data on it.
Therefore, check that you have backed up all necessary files before proceeding.
The exact method of restoring your data will depend on how you backed it up.
Most cloud storage services have desktop applications that sync your files automatically, making it a seamless process.
Additionally, you’ve got the option to reach out to the software or service provider for assistance.
This will help you maintain a more organized and efficient workflow going forward.
You have now completed the process of restoring your data to the newly installed SSD.
Your laptop is now ready to deliver faster performance and improved storage capabilities.
Ensure that the data cable or M.2 slot is securely connected to the SSD.
Additionally, verify that the SSD is properly installed in the hard drive bay and all connections are secure.
Double-check the form factor and interface requirements of your laptop and compare them to the specifications of the SSD.
Consult your laptops user manual or the manufacturers website for compatibility information.
If necessary, consult the documentation or seek support from the backup software or service provider.
Confirm that the correct file system and partition configs are selected during the formatting process.
Youve successfully completed the installation process and troubleshooting.
Enjoy the improved speed and performance of your laptop with the newly installed SSD!
Conclusion
Congratulations on successfully installing an SSD into your laptop!
Remember, patience and attention to detail are key when performing an SSD installation.
With your newly installed SSD, your laptops performance has received a significant boost.
Enjoy the improved speed and efficiency and take full advantage of the increased storage capabilities.
Dont forget to periodically check for firmware updates for your SSD to ensure optimal performance and compatibility.
By spreading the knowledge, we can help more people enhance their computing experience.
Thank you for choosing this guide to assist you in installing an SSD into your laptop.
May your laptop now soar to new heights with the power of solid-state storage!
