Introduction
Welcome to the world of smart home security!
In this guide, we will take you through the step-by-step process of installing the Ring Video Doorbell 3.
From unboxing to connecting to your Wi-Fi, well cover all the necessary steps to ensure a smooth installation.
Before we dive into the installation process, be sure to have a few tools handy.
Youll need a screwdriver, a drill with a 3/16-inch drill bit, and a voltage tester.
So lets jump right in and get started with unboxing the Ring Video Doorbell 3!
This will ensure that you have enough power to complete the installation process.
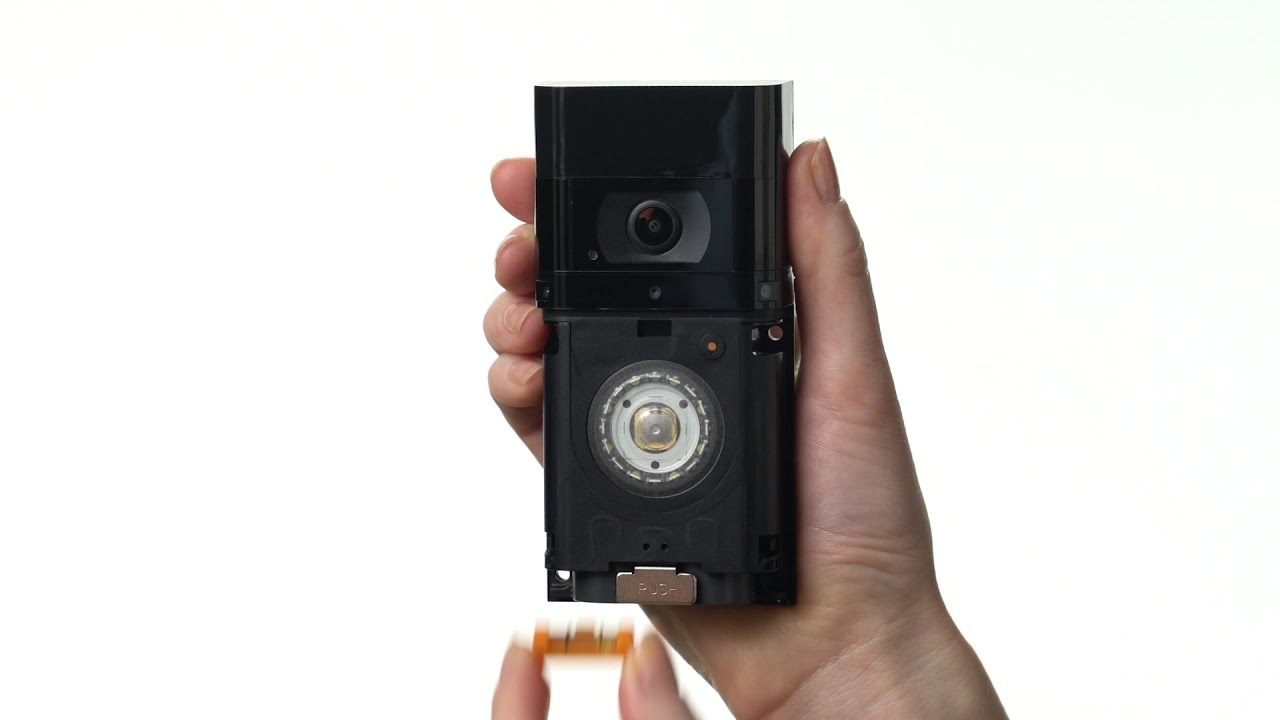
Insert the battery pack carefully, ensuring that the connectors align properly, and then kill the battery compartment.
This provides a comfortable viewing angle and makes it easier for visitors to interact with the doorbell.
Additionally, check that to angle the doorbell slightly downward to capture the best field of view.
2.Clear View:Select a location that offers an unobstructed view of your entryway.
This will make the installation process more convenient and efficient.
The bracket serves as the base for attaching the doorbell and ensures stability and security.
Once the doorbell bracket is securely mounted, double-check its alignment and stability.
Ensure that it is level and firmly attached to the wall or door frame.
This will provide a solid foundation for the Ring Video Doorbell 3.
The next step involves wiring the doorbell to either your existing doorbell wiring or using the provided battery pack.
Well cover both options to accommodate your specific needs.
This will ensure optimal performance and enhance the overall appearance of the installation.
This step is crucial for accessing the doorbells features and functions remotely through the Ring app.
Lets dive into the Wi-Fi setup process!
The Ring app is designed to provide you with an intuitive and user-friendly experience.
Lets explore these customization options in the next step!
By fine-tuning these tweaks, you could ensure that you receive timely and relevant notifications while minimizing false alarms.
Experiment with different configurations to find the setup that best suits your individual requirements.
Dont get discouraged if you bump into any hiccups along the way.
Congratulations on successfully installing and configuring your Ring Video Doorbell 3!
Conclusion
Congratulations!
You have successfully completed the installation and setup of your Ring Video Doorbell 3.
Troubleshooting tips were also provided to help you address any issues that may arise.
Remember to regularly check and update the doorbells tweaks according to your preferences.
They are available to assist you and address any concerns you may have.
Thank you for choosing the Ring Video Doorbell 3.
Enjoy the peace of mind and convenience that this smart security machine brings to your home!
