Introduction
Welcome to this guide on how to install a new M.2 SSD in your gear.
In this step-by-step guide, we will walk you through the process of installing a newM.2 SSDinto your system.
Well cover everything, from gathering the necessary tools and materials, to formatting and configuring the new drive.
Now, lets get started with the first step: gathering the necessary tools and materials.
Its always a good practice to double-check everything before proceeding to ensure a smooth installation process.
This ensures your safety and prevents any potential damage to your hardware.
Its important to be thorough and double-check that all power sources are disconnected before proceeding to the next step.
This ensures your safety and prevents any accidental damage to your setup or its components.
after you grab successfully removed the side panel, you will have a clear view inside your rig case.
Remember to handle the panel with care to avoid any accidental damage.
Always handle internal components by their edges to prevent damage from static electricity or accidental mishandling.
Now that your setup case is open, you are one step closer to installing your new M.2 SSD.
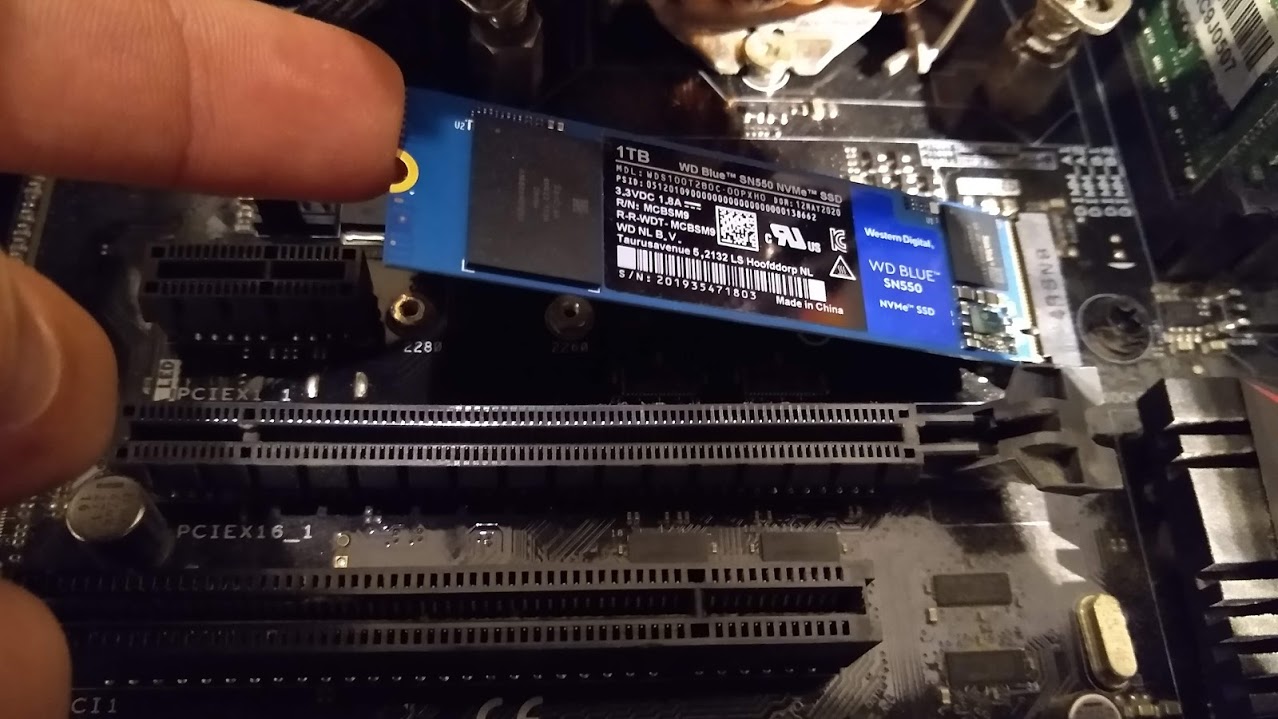
The M.2 slot is a small, rectangular connector where the SSD will be securely inserted.
We will cover this in detail in the following section.
This step requires precision and attention to detail to ensure a proper and secure installation.
Its important to note that some M.2 slots have multiple lengths or support different types of M.2 SSDs.
Note:Avoid using excessive force when inserting the M.2 SSD into the slot.
If it doesnt slide in easily, double-check the alignment and take another crack.
Forcing the SSD may damage the delicate connectors.
We will cover this in detail in the following section.
This step ensures that the SSD remains firmly attached to the motherboard and prevents any unwanted movement.
Its important to note that not all motherboards require a mounting screw for the M.2 SSD.
In such cases, verify the specific requirements and recommendations in your motherboards user manual.
Note:Pay attention to the level of tightness when securing the mounting screw.
Over-tightening can lead to damage, while loose screw connection may result in poor contact or instability.
Use an appropriate amount of force to ensure a secure fit without applying excessive pressure.
We will guide you through this step in detail in the following section.
Double-check that the side panel is properly closed and securely fastened.
Its crucial to ensure a proper seal to prevent dust, debris, or accidental contact with internal components.
Avoid forcing the panel into place, as it may indicate a misalignment that could potentially damage your system.
We will guide you through these steps in the following section.
This step ensures that your setup has the necessary power to recognize and utilize the newly installed M.2 SSD.
As your system powers on, it will go through the usual startup process.
We will guide you through this process in detail in the following section.
Formatting and initializing the SSD prepares it for use and allows your operating system to utilize its storage capacity.
Refer to the documentation or online resources specific to your operating system for more detailed instructions if needed.
We will guide you through this process in the following section.
Enjoy the improved performance and efficiency that the M.2 SSD brings to your box system.
Congratulations on successfully installing and setting up your M.2 SSD!
Now its time to reap the benefits of improved storage performance and enhanced speed in your gear system.
Thank you for following this step-by-step guide.
We hope it has been informative and helpful in installing and setting up your new M.2 SSD.
