Introduction
Welcome to our guide on how to install a M.2 Solid State Drive (SSD).
As technology advances, SSDs have become increasingly popular due to their lightning-fast speed and reliability.
Therefore, its crucial to check whether your motherboard has an available M.2 slot before proceeding with the installation.
So lets get started and unleash the full potential of your setup with an M.2 SSD!
What is an M.2 Solid State Drive?
One of the key advantages of an M.2 SSD is its compact and lightweight design.
Another notable feature of M.2 SSDs is their compatibility with the NVMe (Non-Volatile Memory Express) protocol.
This results in significantly faster data transfer speeds and reduced latency, ultimately improving overall system performance.
Furthermore, M.2 SSDs are known for their durability and reliability.
Why Install an M.2 Solid State Drive?
There are several compelling reasons to install an M.2 Solid State Drive (SSD) in your rig.
Lets explore the key benefits of installing an M.2 SSD.
Incredible Speed:M.2 SSDs are known for their lightning-fast read and write speeds.
Improved System Responsiveness:The fast access times of M.2 SSDs result in enhanced system responsiveness.
Tasks like file transfers, loading large multimedia files, and running multiple applications simultaneously become seamless and lag-free.
Efficient Multitasking:M.2 SSDs excel at multitasking due to their high random read and write speeds.
This allows you to work on multiple applications simultaneously without experiencing performance bottlenecks.
Increased Productivity:The improved speed and responsiveness of an M.2 SSD can boost your productivity.
Reliability and Durability:M.2 SSDs are more durable than HDDs as they lack moving mechanical parts.
This makes them more resistant to shock, vibration, and accidental drops.
Here are a few key factors to consider when performing a compatibility check:
1.
Additionally, peek if the M.2 slot supports the NVMe protocol, as this will ensure optimal performance.
M.2 Form Factor:M.2 SSDs come in various sizes, denoted by their length and width measurements.
Common form factors include 22mm wide with lengths of 30mm, 42mm, 60mm, 80mm, or 110mm.
Ensure that your M.2SSD sizematches the available slot size on your motherboard to guarantee a proper fit.
Check the specifications of your motherboard to determine which interface is supported by the M.2 slot.
Check the manufacturers website for any available BIOS updates specific to your motherboard model.
Additionally, check that that your SSDs firmware is up to date for optimal performance and compatibility.
Storage Capacity:Consider the storage capacity of the M.2 SSD you intend to install.
Verify that the drives capacity meets your requirements and is supported by your motherboard.
Keep in mind that some older motherboards may have limitations on the maximum storage capacity supported.
Additional Considerations:While not directly related to compatibility, its worth mentioning a few additional factors to consider.
Ensure that you have enough space inside your machine case to accommodate the M.2 SSD.
Performing a compatibility check ensures a smooth installation process and prevents any compatibility issues that may arise.
Its important to thoroughly research and understand your computers specifications and limitations before purchasing an M.2 SSD.
Here are some essential steps to follow:
1.
Gather the Tools:verify you have all the necessary tools and equipment on hand.
Read the Documentation:Carefully read the documentation and user manual provided by the SSD manufacturer.
Familiarize yourself with any specific installation instructions, precautions, or recommendations mentioned in the documentation.
Shut Down your box:Before working on your box, ensure that it is powered off completely.
This ensures that you wont accidentally damage any sensitive electronics during the installation process.
Locate the M.2 Slot:bring up the computer case and locate the M.2 slot on your motherboard.
Refer to the motherboards documentation to find the exact location and any specific instructions for accessing the M.2 slot.
If you notice any, gently remove or adjust them to create a clear path for the SSD.
Consult the motherboards documentation to locate the appropriate mounting screw and keep it ready for the installation.
- Review the Installation Steps:Take a moment to review the installation steps provided by the SSD manufacturer.
Now lets move on to the detailed steps of the installation process in the next section.
Step 1: Shutting Down and Opening the Computer Case
1.
Save and Close Programs:Save any open documents or projects and close all running programs.
This will prevent any data loss or interruptions during the shutdown process.
Wait for the system to completely shut down before proceeding to the next step.
This is an important safety step to avoid any electrical shock or damage to your setup components.
Ground Yourself:To prevent static electricity from damaging any sensitive components, its important to ground yourself.
This will help you identify the location of the M.2 slot for the SSD installation.
Avoid unnecessary jostling or applying excessive force to prevent any damage to the delicate parts of your box.
Step 2: Finding the M.2 Slot
1.
Identify the Motherboard:Take a careful look at the motherboard inside your gear case.
The motherboard is the large circuit board that connects and powers all the components of your system.
The manual should provide detailed diagrams and instructions specific to your motherboard model.
Look for the term M.2 or variations such as M-Key or M.2 socket.
These labels may be printed near the PCIe slots or around the storage connectors.
Examine the Motherboard Layout:Some motherboards have conveniently placed a dedicated slot for the M.2 SSD.
It typically looks like a horizontal slot with contact pins in it.
Look for any references to M.2 slots or additional storage expansion options.
Locating the M.2 slot is an important step before proceeding with the installation of your M.2 SSD.
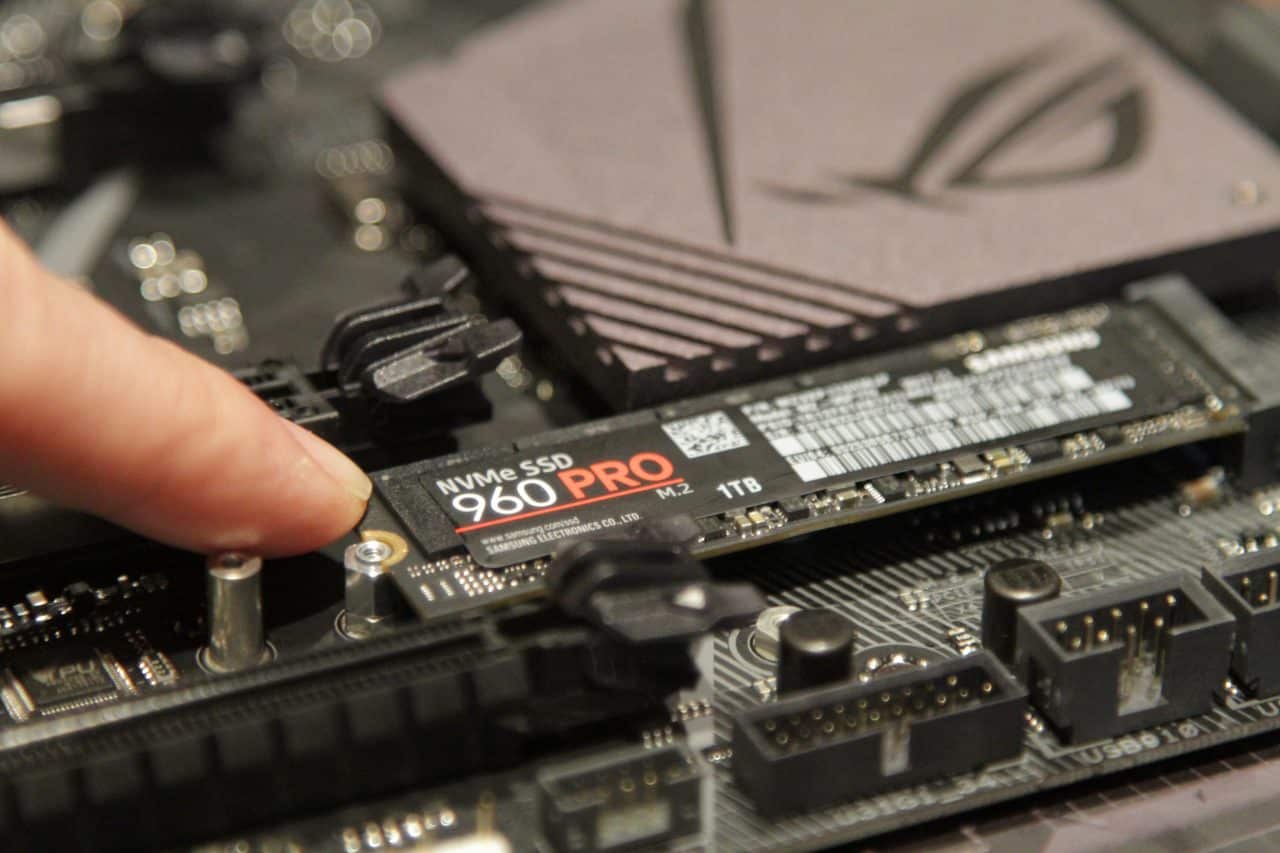
Step 3: Installing the M.2 Solid State Drive
1.
Handle the SSD by its edges, avoiding contact with the gold connectors or circuitry.
Align the Notch:Examine the M.2 SSD and locate the notch on its connector edge.
This notch corresponds to the keying notch on the M.2 slot.
Align the notches to ensure that the SSD is inserted in the correct orientation.
Refer to your motherboards manual to locate the appropriate screw hole near the M.2 slot.
Insert the screw and tighten it to secure the SSD in place.
Simply tighten it until it is snug to keep the SSD securely in place without applying excessive force.
Ensure that it is properly aligned and secured according to the manufacturers instructions.
Verify that the connection is stable and that the SSD is not loose or wobbly in the slot.
Some motherboards may require additional configuration or controls adjustments to fully utilize the features of the M.2 SSD.
You have successfully installed the M.2 Solid State Drive into the M.2 slot on your motherboard.
The SSD is securely connected and ready to unlock faster performance and improved storage capabilities.
Step 4: Securing the M.2 Solid State Drive in Place
1.
It is usually a small hole located near the end of the SSD slot or labeled M.2 Screw.
Choose the Correct Mounting Screw:Most motherboards provide a mounting screw for securing the M.2 SSD.
Ensure that the screw matches the specifications outlined in your motherboards manual.
Ensure that the SSD is secured firmly in the slot and that there is no noticeable movement or looseness.
This step confirms that the SSD is properly fastened in place.
Align the cover or heatsink properly and secure it according to the manufacturers instructions.
This step adds an extra layer of protection and stability to the M.2 SSD.
Inspect Surrounding Components:Take a moment to inspect the area surrounding the M.2 SSD.
Adjust any cables or components if needed to avoid any potential damage or loosening of the SSD connection.
Ensure that all screws are tightened properly, and the SSD is snug within the M.2 slot.
A tight and stable connection ensures reliable performance and prevents any accidental disconnections.
Step 5: Closing the Computer Case and Powering On
1.
Position the Side Panel:Ensure that any cables or connectors are neatly arranged inside the computer case.
Secure the Side Panel:Using the appropriate screws or latches, tighten the side panel onto the case.
Reconnect Power and Peripherals:Reconnect the power cord to the wall outlet or power strip.
Power On the System:Press the power button of your gear to switch it on.
Verify that the M.2 SSD is recognized in the system configuration and adjust any necessary configs for optimal performance.
Ensure that the system recognizes the SSD correctly and that it is functioning as expected.
Step 6: Verifying the Installation
1.
It should display the correct storage capacity and be labeled accordingly.
Ensure that the drive capacity matches the expected size and that no significant discrepancies are present.
Monitor the SSDs temperature, firmware version, and any signs of potential issues that may arise.
Verify Boot Time:reset your box and time the boot process.
If the system boots quickly and smoothly, it indicates successful installation.
If the file transfer completes quickly and without any issues, it indicates the SSD is functioning properly.
Monitor System Performance:Keep an eye on your systems overall performance after installing the M.2 SSD.
Notice improvements in system loading times, responsiveness, and multitasking capabilities.
If you experience smoother operations and a noticeable boost in performance, the installation was successful.
Keeping your SSD firmware up to date ensures optimal performance, reliability, and compatibility with the latest technologies.
Enjoy the enhanced speed and performance that the SSD brings to your system!
Conclusion
Congratulations on successfully installing your M.2 Solid State Drive (SSD)!
Continuously monitoring the health and performance of your SSD will help maintain its reliability and longevity.
Take advantage of the increased speed and efficiency that the M.2 SSD brings to your system.
