Introduction
Welcome to our comprehensive guide on how to insert an SSD in the PS5!
The PlayStation 5 is a game-changing console that offers incredible graphics and performance.
In this step-by-step tutorial, we will walk you through the entire process, from preparation to initialization.
Before we dive in, its important to note that not all SSDs are compatible with the PS5.
Sony has provided a list of recommended SSDs that meet their performance and size requirements.
confirm to choose an SSD from this list to ensure optimal compatibility and performance.
Are you ready to expand your storage and take your gaming experience to the next level?
This will help you better understand the steps involved in the installation process.
Next, power off your PS5 and disconnect all cables from the console.
This includes the power cable, HDMI cable, and any other peripheral cables that may be connected.
Now, touch a metal surface or wear an anti-static wristband to discharge any static electricity from your body.
This precaution will help prevent damage to the sensitive electronic components of the PS5.
Prepare yourself for an exciting journey of expanding your PS5s storage capacity!
Take a moment to marvel at the sleek design and craftsmanship of the console.
Its important to handle the PS5s internals with care.
Avoid touching any exposed circuitry or delicate components.
Always handle the console by its edges to prevent accidental damage.
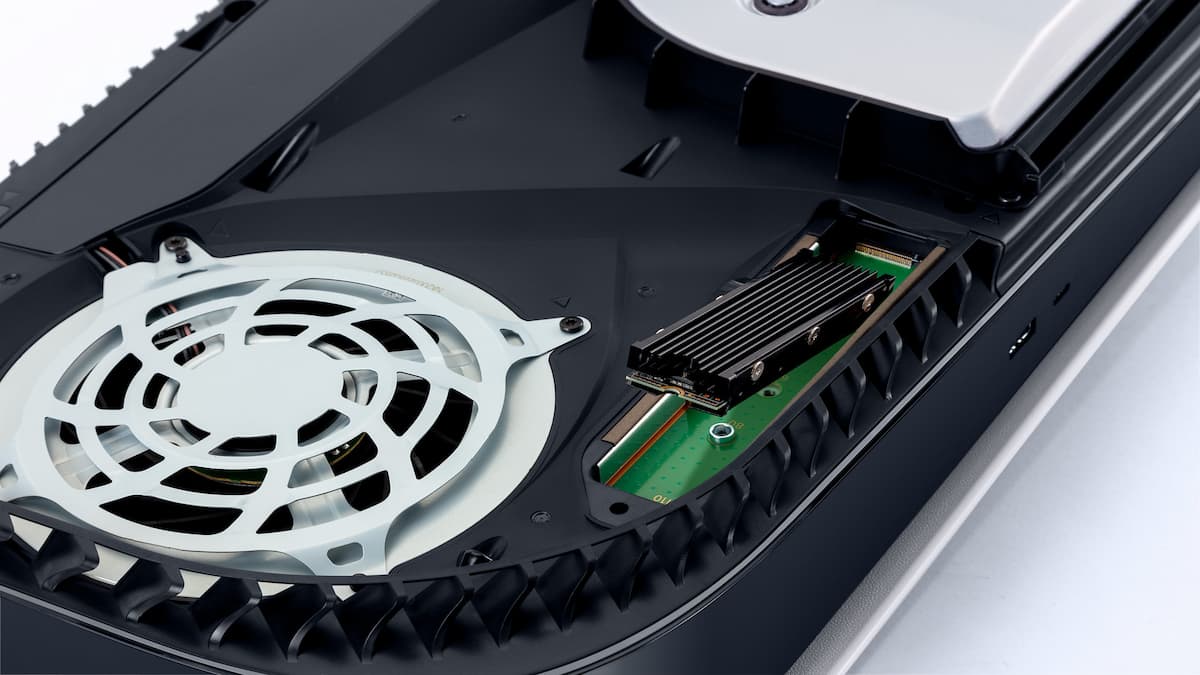
The exciting part is just around the corner as you prepare to identify the SSD slot!
This will help you align the new SSD correctly during the installation process.
Its worth noting that the SSD slot may be covered by a heat sink.
With the SSD slot identified, youre one step closer to expanding your PS5s storage.
This will ensure optimal thermal performance and prevent any issues during the installation process.
Keep up the great work!
Attempting to insert multiple SSDs or other incompatible components can cause damage to the console.
Now, its time to put everything back together and bring your console back to life!
Check that the cover is flush with the console and that there are no gaps or misalignments.
Before reconnecting any peripheral cables, take a moment to double-check that everything is in order.
Ensure that the SSD is securely inserted, the cover is properly fastened, and all screws are tightened.
This will help prevent any issues during the initialization process.
Get ready to witness the enhanced storage capacity and improved gaming experience!
Its important to note that formatting or initializing the SSD will erase any existing data on the drive.
double-check to back up any important files or game saves before proceeding with this step.
You have successfully installed and initialized an SSD in your PS5.
Enjoy the additional storage space and improved performance that this upgrade brings.
Conclusion
Congratulations on successfully inserting an SSD into your PS5!
Take full advantage of the expanded storage capacity and explore a vast library of games without limitations.
Thank you for using our guide to insert an SSD in your PS5.
We hope this article has provided you with the necessary guidance and information to complete the installation process successfully.
