If youre a Windows 10 user and considering upgrading to an SSD, youve made a wise decision.
However, its important to properly format your SSD to ensure optimal performance and compatibility with your operating system.
In this article, well guide you through the step-by-step process of formatting an SSD in Windows 10.
It may seem like a daunting task, but dont worry well break it down for you.
So, grab your SSD and lets get started on this exciting journey.
One option is to manually copy your files to an external hard drive or another storage rig.
Another convenient option is to use cloud storage services such as Google Drive, Dropbox, or OneDrive.
These services offer ample storage space and automatically sync your files across multiple devices.
Its always a good idea to verify the backup by opening a few files and ensuring their integrity.
Taking these precautions will give you peace of mind throughout the formatting process and prevent any potential data loss.
Firmware is the software embedded in the SSDs memory that controls its operation and functionality.
Updating the firmware can improve performance, reliability, and compatibility with your computers hardware and operating system.
Look for the specific model of your SSD and search for any available firmware updates.
Download the latest firmware version and follow the manufacturers instructions to install it.
Its crucial to ensure that your SSD is running the latest firmware version before proceeding with the formatting process.
Firmware updates often include bug fixes, performance enhancements, and compatibility improvements.
Sometimes, the manufacturer may release firmware updates that specifically address compatibility issues with Windows 10. when you obtain access to the drive bays, locate a suitable slot for your SSD.
Gently connect the necessary cables, ensuring a secure connection without forcing them.
Refer to the manufacturers instructions or consult a professional if youre unsure.
After connecting the SSD, reassemble your gear and ensure all cables are properly connected.
In the BIOS/UEFI options, navigate to the drive configuration or storage options section.
Verify that the SSD is recognized and listed as one of the connected drives.
If it isnt detected, double-check the connection and cables, ensuring they are properly seated.
Additionally, its advisable to enable AHCI (Advanced Host Controller Interface) mode for improved performance.
This setting optimizes communication between the SSD and the computers motherboard.
Consult your motherboards manual or the manufacturers documentation for instructions on enabling AHCI mode.
This ensures your safety and prevents any potential damage to the SSD or your box components.
once you nail access to the drive bays, locate an available slot for the SSD.
Most SSDs use the SATA interface, so look for SATA connectors on your motherboard.
Ensure a secure connection without applying excessive force.
It may involve inserting the SSD into a dedicated slot on the motherboard or using an adapter card.
After connecting the SSD, reassemble your gear and ensure all cables are properly connected.
Double-check the connections to ensure they are secure and correctly attached.
Partitioning allows you to divide the SSD into separate sections, while formatting prepares those sections for data storage.
Locate your SSD in the list of drives.
It should be labeled as Unallocated or RAW.
Right-opt for SSD and select New Simple Volume from the context menu.
it’s possible for you to repeat this process to create multiple partitions if desired.
When formatting the SSD, confirm to choose a quick format option if available.
This option speeds up the formatting process by skipping the thorough data erasure.
However, if you want to completely wipe the SSD, pick the full format option.
Its important to note that formatting will erase all existing data on the SSD.
Therefore, ensure that youve backed up your data before proceeding to avoid any loss of important information.
Once the formatting process is complete, you will have successfully partitioned and formatted your SSD.
Remember to assign meaningful names to your partitions to easily identify and organize your data.
Check your computers manual or manufacturers website if youre unsure of the key.
In the BIOS/UEFI configs, navigate to the boot options or boot priority section.
This section may be named differently depending on your motherboard.
This ensures that the computer boots from the SSD first.
Save the changes and exit the BIOS/UEFI configs.
The computer will restart automatically.
Once the computer restarts, it will boot from the SSD.
Setting the SSD as the boot drive is a crucial step to fully utilize its speed and performance benefits.
Ensure that the SSD is properly connected, formatted, and recognized by the system.
Remember that setting the SSD as the boot drive does not automatically transfer your operating system to the SSD.
Consult the softwares documentation or seek professional assistance for a smooth migration process.
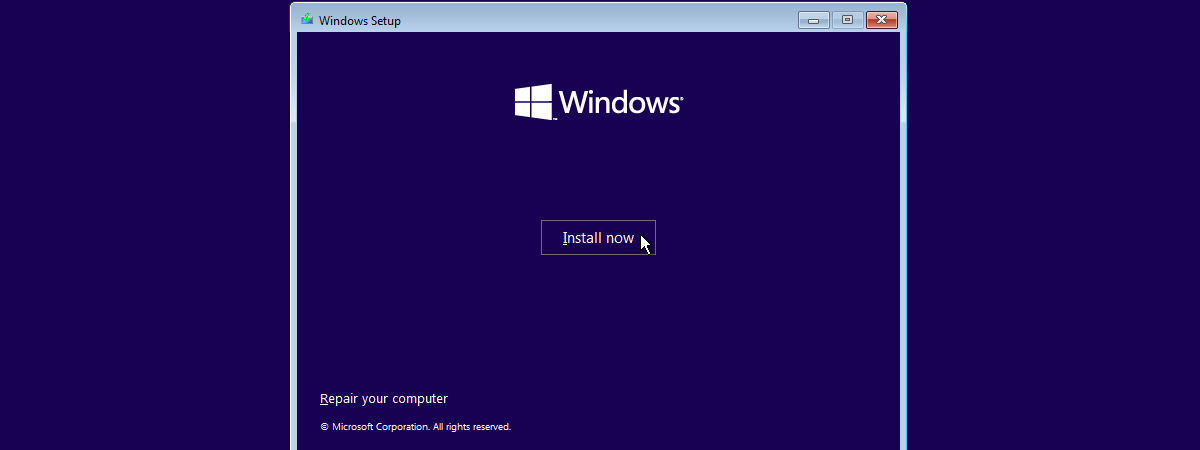
Step 7: Install Windows 10 on the SSD
1.
Insert the Windows 10 installation media, such as a USB drive or DVD, into your system.
Look for the boot options or boot priority section and set the installation media as the primary boot gear.
Save the changes and exit the BIOS/UEFI tweaks.
The computer will restart and boot from the Windows 10 installation media.
In the installation options, go for the SSD as the destination drive for Windows 10.
If you have multiple partitions on the SSD, opt for desired partition for the operating system installation.
Proceed with the installation process by following the remaining on-screen instructions.
Windows 10 will be installed on the SSD, and your gear will restart multiple times during the process.
check that to plant the necessary machine drivers and updates for your system after the Windows 10 installation.
Remember to transfer your backed-up data from the external storage gear or cloud storage back to your SSD.
Conclusion
Congratulations!
Youve successfully formatted and installed Windows 10 on your SSD.
It also provides a reliable and durable storage solution for years to come.
As technology evolves and new advancements arise, its important to stay updated and keep your SSDs firmware current.
Thank you for following this guide.
We hope it has provided you with the necessary knowledge and confidence to format and utilize your SSD effectively.
Enjoy the enhanced performance and reliability that your SSD brings to your Windows 10 system!
