However, similar to any storage gear, SSDs may require formatting at some point.
Formatting an SSD involves preparing it for initial use or erasing all the existing data to start afresh.
So, why should you format your SSD?
Lets explore these reasons:
1.
This can lead to slower read and write speeds and decreased overall performance.
Prepare for a Fresh Start:Formatting your SSD is an excellent way to start fresh.
It allows you to set up your system from scratch, ensuring optimal performance and stability.
Sometimes, corrupt system files or conflicting software can cause these problems.
This ensures the privacy and security of your personal and confidential data.
Formatting the SSD can help fix these errors and restore the file system to a healthy state.
It ensures the integrity of your data and reduces the risk of data loss due to file system issues.
Upgrade SSD Firmware:Formatting your SSD also provides an opportunity to upgrade the firmware of your drive.
SSD manufacturers often release firmware updates that bring performance improvements, bug fixes, and enhanced compatibility.
It is essential to perform regular SSD formatting to maintain the efficiency and longevity of your storage rig.
These precautions include:
1.
It is essential to ensure that the formatting method you choose is compatible with your system.
Taking this precaution will help ensure a smooth and uninterrupted formatting process.
Before formatting, ensure that the write protection feature is disabled on your SSD.
Consult the manufacturers documentation or look for instructions specific to your SSD model to disable this feature if necessary.
Verify Drive Health:you’d be smart to check the health status of your SSD before formatting.
If any issues are detected, it is advisable to address them before proceeding with the formatting process.
This will allow you to seamlessly reinstall the operating system after formatting without any delays or complications.
These steps will help ensure a smooth and successful formatting process for your SSD.
The command syntax may vary slightly depending on your operating system.
Remember to double-check the drive letter assigned to your SSD to avoid formatting the wrong drive.
This method offers more flexibility and control but requires some familiarity with command-line interfaces.
These programs often provide a user-friendly interface and a wide range of formatting capabilities.
Some popular third-party software includes EaseUS Partition Master, MiniTool Partition Wizard, and AOMEI Partition Assistant.
Third-party software is suitable for users who require advanced features and more control over the formatting process.
Choose the method that best suits your needs and comfort level.
Formatting your SSD using this tool is a straightforward process.
Here are the steps to format your SSD using the Windows Disk Management tool:
1.
Open Disk Management:Right-go for the Start button and select Disk Management from the menu.
Locate your SSD:In the Disk Management window, locate your SSD.
It will be listed under the Disk Drives section.
Take note of the drive letter assigned to your SSD.
Right-click and select Format:Right-hit your SSD drive and grab the Format option from the context menu.
A new window will appear with formatting options.
The most commonly used file system for Windows is NTFS.
you might also assign a volume label to your SSD for easy identification.
Additionally, you could choose the allocation unit size.
For most users, the default allocation unit size is recommended.
- opt for format options:There are two options available for formatting: Quick Format and Full Format.
The Full Format option checks for bad sectors and provides a more thorough formatting process.
Choose the option that best suits your needs.
A warning message may appear, informing you that all data on the SSD will be erased.
Double-check that you have backed up any important data before proceeding.
During the process, the Disk Management tool will display a progress bar.
Once the formatting is complete, you will see a message indicating that the process was successful.
Formatting your SSD using the Windows Disk Management tool is a reliable and convenient method.
It does not require any additional software and provides basic formatting functionality.
Here are the steps toformat your SSD using the Command Prompt:
1.
Open Command Prompt:Press the Windows key + R to fire up the Run dialog box.
punch in cmd and press Enter to launch the Command Prompt.
List available disks:In the Command Prompt window, throw in diskpart and press Enter.
Identify your SSD based on its size and other information.
This command selects your SSD as the active disk for further operations.
throw in clean and press Enter.
Be cautious, as this command will erase all data on the selected SSD.
This command creates a primary partition on your SSD.
- opt for new partition:key in select partition 1 and press Enter.
This command selects the newly created partition on the SSD.
This command formats the partition using the NTFS file system with quick formatting.
Alternatively, it’s possible for you to replace ntfs with fat32 or other supported file systems.
This command assigns the specified drive letter to the partition, allowing you to access it in File Explorer.
Exit DiskPart:pop in exit and press Enter to exit the DiskPart utility.
The Command Prompt method provides more advanced options and allows for more precise control during the formatting process.
However, it requires familiarity with the command-line interface and careful attention to the commands entered.
Be cautious while using the Command Prompt, as incorrect commands can lead to unintended consequences or data loss.
Using third-party software
Another way to format your SSD is by utilizing third-party software.
There are various software programs available that offer advanced features, additional formatting options, and a user-friendly interface.
Here are the general steps to format your SSD using third-party software:
1.
Choose a reliable third-party software:Research and select a reputable third-party software program that suits your needs.
Some popular options include EaseUS Partition Master, MiniTool Partition Wizard, and AOMEI Partition Assistant.
Download and implement the chosen software on your setup.
It might be labeled as Format, Partition, or something similar.
hit this option to proceed with formatting.
Configure formatting prefs:Depending on the software, you might have various formatting options to choose from.
Adjust the prefs according to your preferences or leave them at the default values.
The software will begin formatting your SSD according to the specified tweaks.
Depending on the size of your SSD and the chosen options, the formatting process may take some time.
you’re able to kill the software and proceed to use your formatted SSD.
Using third-party software offers more advanced options and flexibility compared to the built-in tools provided by the operating system.
These software programs often have user-friendly interfaces and allow for more precise control over the formatting process.
Here are the steps to format your SSD using this built-in utility:
1.
Open Disk Management:Right-pick the Start button and select Disk Management from the menu.
Alternatively, press the Windows key + X and choose Disk Management.
Locate your SSD:In the Disk Management window, locate your SSD.
It will be listed under the Disk Drives section.
see to it to identify the correct SSD to avoid formatting the wrong disk.
snag the allocation unit size and provide a volume label for identification purposes.
Choose quick or full format:Youll have the option to perform a quick format or a full format.
If you want a faster formatting process, select Quick Format.
If you want a more thorough format that checks for bad sectors, select Full Format.
Note that the full format takes longer to complete.
Initiate the formatting:tap on the OK button to start the formatting process.
A warning message will appear, informing you that all data on the SSD will be erased.
Double-check that you have backed up any important data before proceeding.
Click OK to confirm and begin the formatting process.
Monitor the formatting progress:The Disk Management tool will display a progress bar indicating the formatting progress.
Depending on the size of your SSD and the selected options, the formatting process may take some time.
Be patient and allow the tool to complete the formatting process.
Your SSD is now formatted and ready to use.
It is important to note that formatting erases all data on the SSD.
Ensure that you have backed up any necessary files before proceeding with the formatting process.
Additionally, double-check that you have selected the correct SSD to avoid formatting the wrong disk.
Here are the steps to format your SSD using the Command Prompt:
2.
Launch DiskPart:In the Command Prompt window, throw in diskpart and press Enter.
This command opens the DiskPart utility for disk-related operations.
List available disks:In the DiskPart window, key in list disk and press Enter.
This command displays a list of all available disks on your system.
Identify your SSD based on its size and additional information.
Make note of the disk number assigned to your SSD.
This command selects your SSD as the active disk for further operations.
bang out clean and press Enter.
Be cautious, as this command will erase all data on the selected SSD.
This command creates a primary partition on your SSD.
- go for the new partition:jot down select partition 1 and press Enter.
This command selects the newly created partition on the SSD.
This command formats the partition using the NTFS file system with quick formatting.
you’re able to replace ntfs with fat32 or other supported file systems, depending on your needs.
This command assigns the specified drive letter to the partition, allowing you to access it in File Explorer.
Exit DiskPart:jot down exit and press Enter to exit the DiskPart utility.
The Command Prompt method allows for more advanced options and greater control over the formatting process.
Double-check your commands and ensure that you have selected the correct SSD to format.
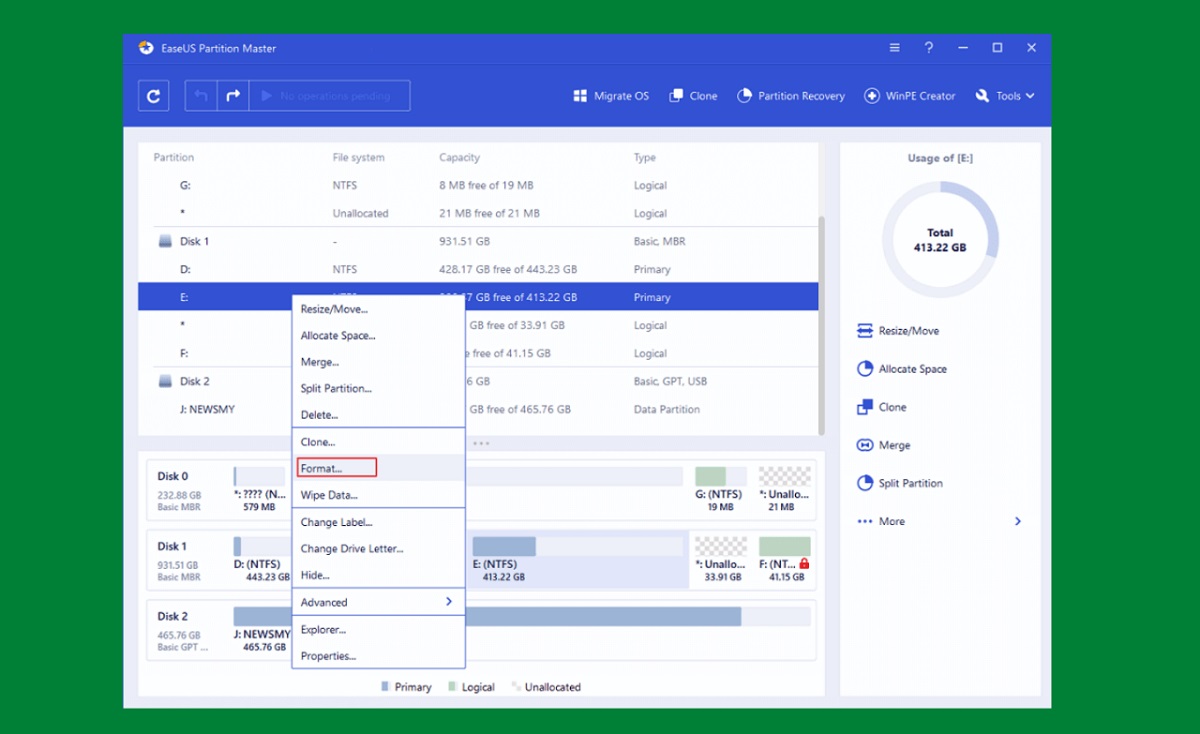
Here are the general steps to format an SSD using third-party software:
1.
Choose a reliable third-party software:Research and select a reputable third-party software program that suits your needs.
Popular options include EaseUS Partition Master, MiniTool Partition Wizard, and AOMEI Partition Assistant.
Download and drop in the chosen software on your box.
Launch the software and locate your SSD:initiate the installed software and identify your SSD within its interface.
It may be labeled as Format, Partition, or something similar.
press this option to proceed with formatting.
), allocation unit size, and volume label.
Adjust the controls according to your preferences or leave them at the default values.
The software will begin formatting your SSD based on the specified configs.
Depending on the size of your SSD and the chosen options, the formatting process may take some time.
you might monitor the progress of the formatting process within the softwares interface.
Some software programs may also offer additional information, such as estimated time remaining or real-time performance metrics.
At this point, your SSD is formatted and ready to be used.
Using third-party software offers the convenience of advanced features and greater control over the formatting process.
These precautions will ensure a smooth and successful formatting process without any unintended data loss or complications.
If you require advanced features and additional formatting options, third-party software is a viable option.
Choose reputable software from trusted sources to ensure the security of your data and system.
Keep your SSD running smoothly and enjoy the benefits of a clean and optimized storage solution.
