Introduction
Welcome to this guide on how to download a recording from Zoom!
Zoom is a popular video conferencing platform that allows users to host virtual meetings, webinars, and conferences.
Downloading a recording from Zoom is a straightforward process that can be done in just a few simple steps.
Now, lets jump right in and learn how to download your Zoom recordings!
To do this, open your preferred web web app and navigate tohttps://zoom.us.
From here, you might explore various functionalities such as hosting meetings or joining existing ones.
However, for the purpose of downloading recordings, we need to jump in to our Zoom account.
If you dont have a Zoom account yet, punch the Sign Up, Its Free button instead.
Lets explore that in the next section.
Heres how you might access to your Zoom account:
1.
On the Zoom homepage, locate the Sign In button at the top right corner of the page.
hit it to proceed.
You will be redirected to the login page.
Enter the email address associated with your Zoom account and your password in the respective fields.
- after you snag entered your login credentials, hit the Sign In button to proceed.
If you have entered the correct credentials, you will be successfully logged in to your Zoom account.
This adds an extra layer of security to protect your account from unauthorized access.
Lets explore that in the next section.
This is where you could access all your recorded sessions and choose which one you want to download.
Heres how you’ve got the option to find the Recordings tab:
1.
After logging in, you will be directed to your account dashboard.
Here, you will see various options and prefs related to your Zoom account.
Look for the navigation menu on the left-hand side of the page.
Scroll down until you find the Recordings tab.
It is usually located under the Meetings or parameters section.
Once you find the Recordings tab, choose it to access your recorded sessions.
Cloud recordings are stored on Zooms servers, while local recordings are saved on your setup or gear.
Simply punch the appropriate column header to sort the recordings accordingly.
By accessing the Recordings tab, you will be able to view a list of all your recorded sessions.
Lets dive into that in the following section.
Step 4: Locating the desired recording
1.
Look through the list of recorded sessions on the Recordings tab.
The recordings are typically organized in chronological order, with the most recent ones appearing at the top.
Enter keywords or dates in the search bar to bring up recordings that match your query.
Zoom also provides additional filters to refine your search.
Identify the relevant filters that will help you locate the desired recording.
Step 5: Downloading the recording
1.
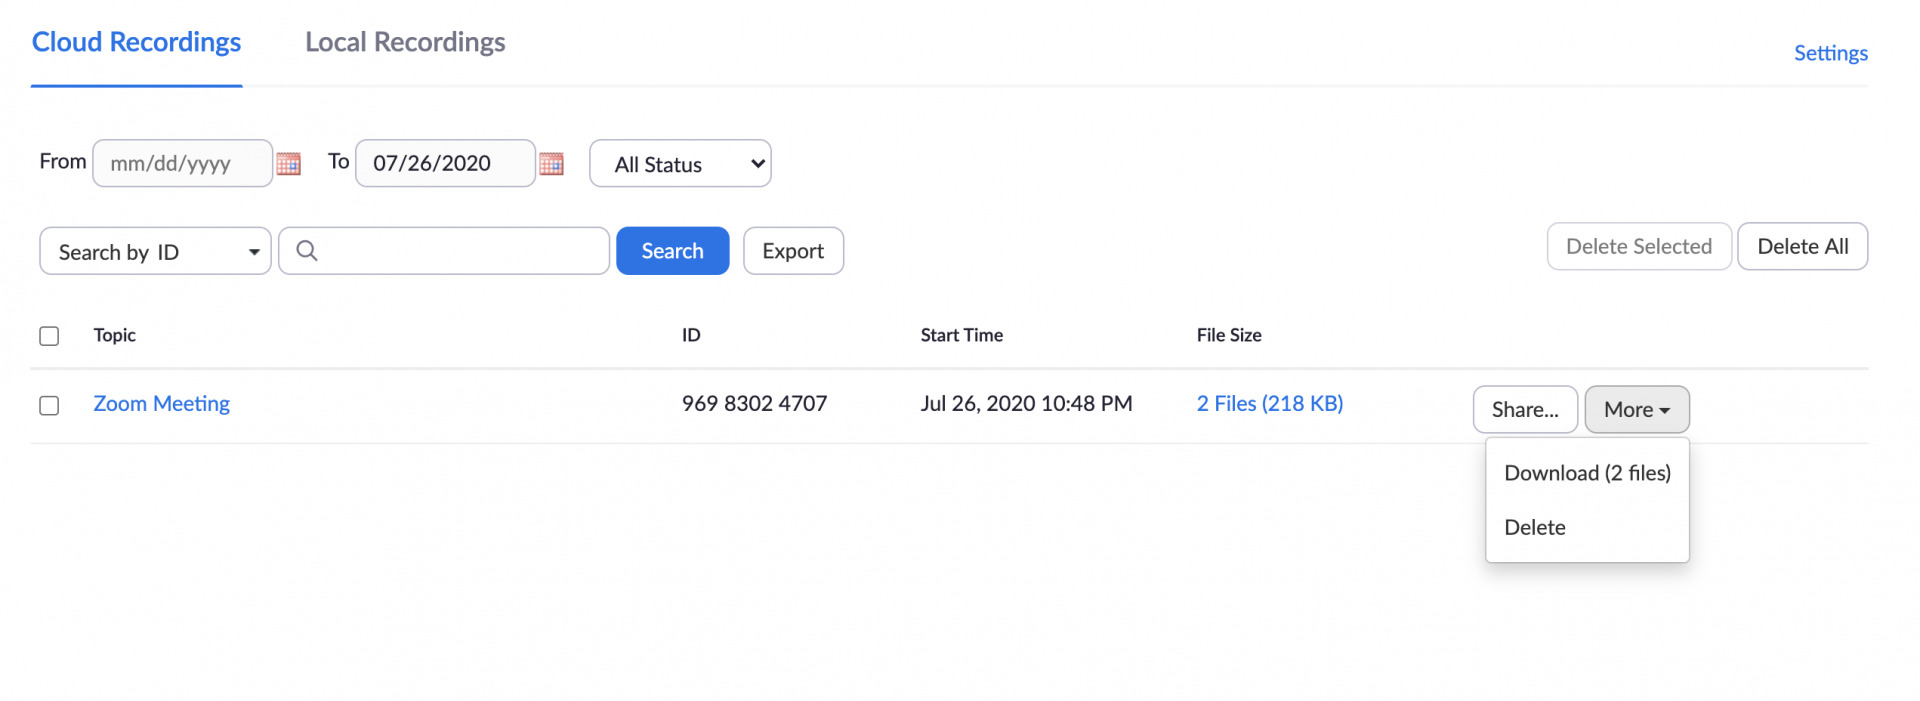
On the Recordings tab, find the specific recording you wish to download.
confirm you have selected the correct recording before proceeding.
Look for the Download option or icon associated with the recording.
This is usually represented by a cloud download icon or a clickable link.
- opt for Download option or icon to initiate the download process.
Select a suitable folder or directory and click Save or OK.
5.
The recording will begin downloading to the chosen location.
Once the download is complete, you will have successfully saved the recording to your setup or rig.
Repeat the above steps for any additional recordings you wish to download.
You have successfully downloaded your recording from Zoom.
This ensures that you’re free to easily locate and reach the recording whenever needed.
Heres how you could choose a download location:
1.
Choose a folder or directory where you want the recording to be saved.
Consider creating a separate folder specifically for your Zoom recordings.
This can help you keep all your recordings organized and easily accessible in one place.
you’re free to name the folder something like Zoom Recordings or Meeting Archive for easy identification.
Choose a location that has enough storage capacity to accommodate your recordings.
Remember to choose a location that is easily accessible and convenient for you.
Take a moment to consider the best download location for your recordings before proceeding with the download process.
Here are some tips for customizing your recording controls:
1.
From the drop-down menu, select tweaks.
Navigate to the Recording tab in your account controls.
This is where you’re free to modify various tweaks related to your recordings.
Choose your preferred recording format.
Zoom provides options to record meetings in MP4 or M4A format.
MP4 is a video format that includes both audio and video components, while M4A is a audio-only format.
snag the format that suits your needs.
Decide whether you want to record video and audio, or just audio.
Consider enabling the option to automatically transcribe your recordings.
Zoom provides an automated transcription service that can transcribe your recordings into text.
Customize the default download location for your recordings.
Take advantage of the advanced options such as recording passwords or enabling encryption for added security.
These prefs can help ensure that your recordings are protected and accessible only to authorized individuals.
Remember to keep your customized tweaks after making any changes to ensure they are applied to your future recordings.
We started by accessing the Zoom website and logging into our Zoom accounts.
Then, we navigated to the Recordings tab and located the desired recording.
After that, we downloaded the recording to our preferred location on our computer or equipment.
By customizing your recording tweaks, you might tailor the download process to meet your specific needs and preferences.
Now you have the knowledge and tools to download your Zoom recordings.
