They are especially essential for designs with overhangs, bridging gaps, or complex interlocking shapes.
Understanding the different types of supports available and how to optimize their options is essential for achieving successful prints.
Lets dive in and explore the world of supports in 3D printing!
There are several reasons why supports are needed in the 3D printing process:
1.
These structures defy the principles of gravity and can result in a failed print if not properly supported.
Complex geometries:Some 3D models have intricate and complex geometries with internal voids or interlocking parts.
Supports help to reduce warping by providing additional anchoring points for these materials.
This is particularly crucial for taller or vertically oriented designs.
Supports activate the realization of structures that would be challenging or impossible to create with traditional manufacturing methods.
The careful implementation of supports ensures successful prints that accurately capture the intended vision.
Lets explore some of the most commonly used types:
1.
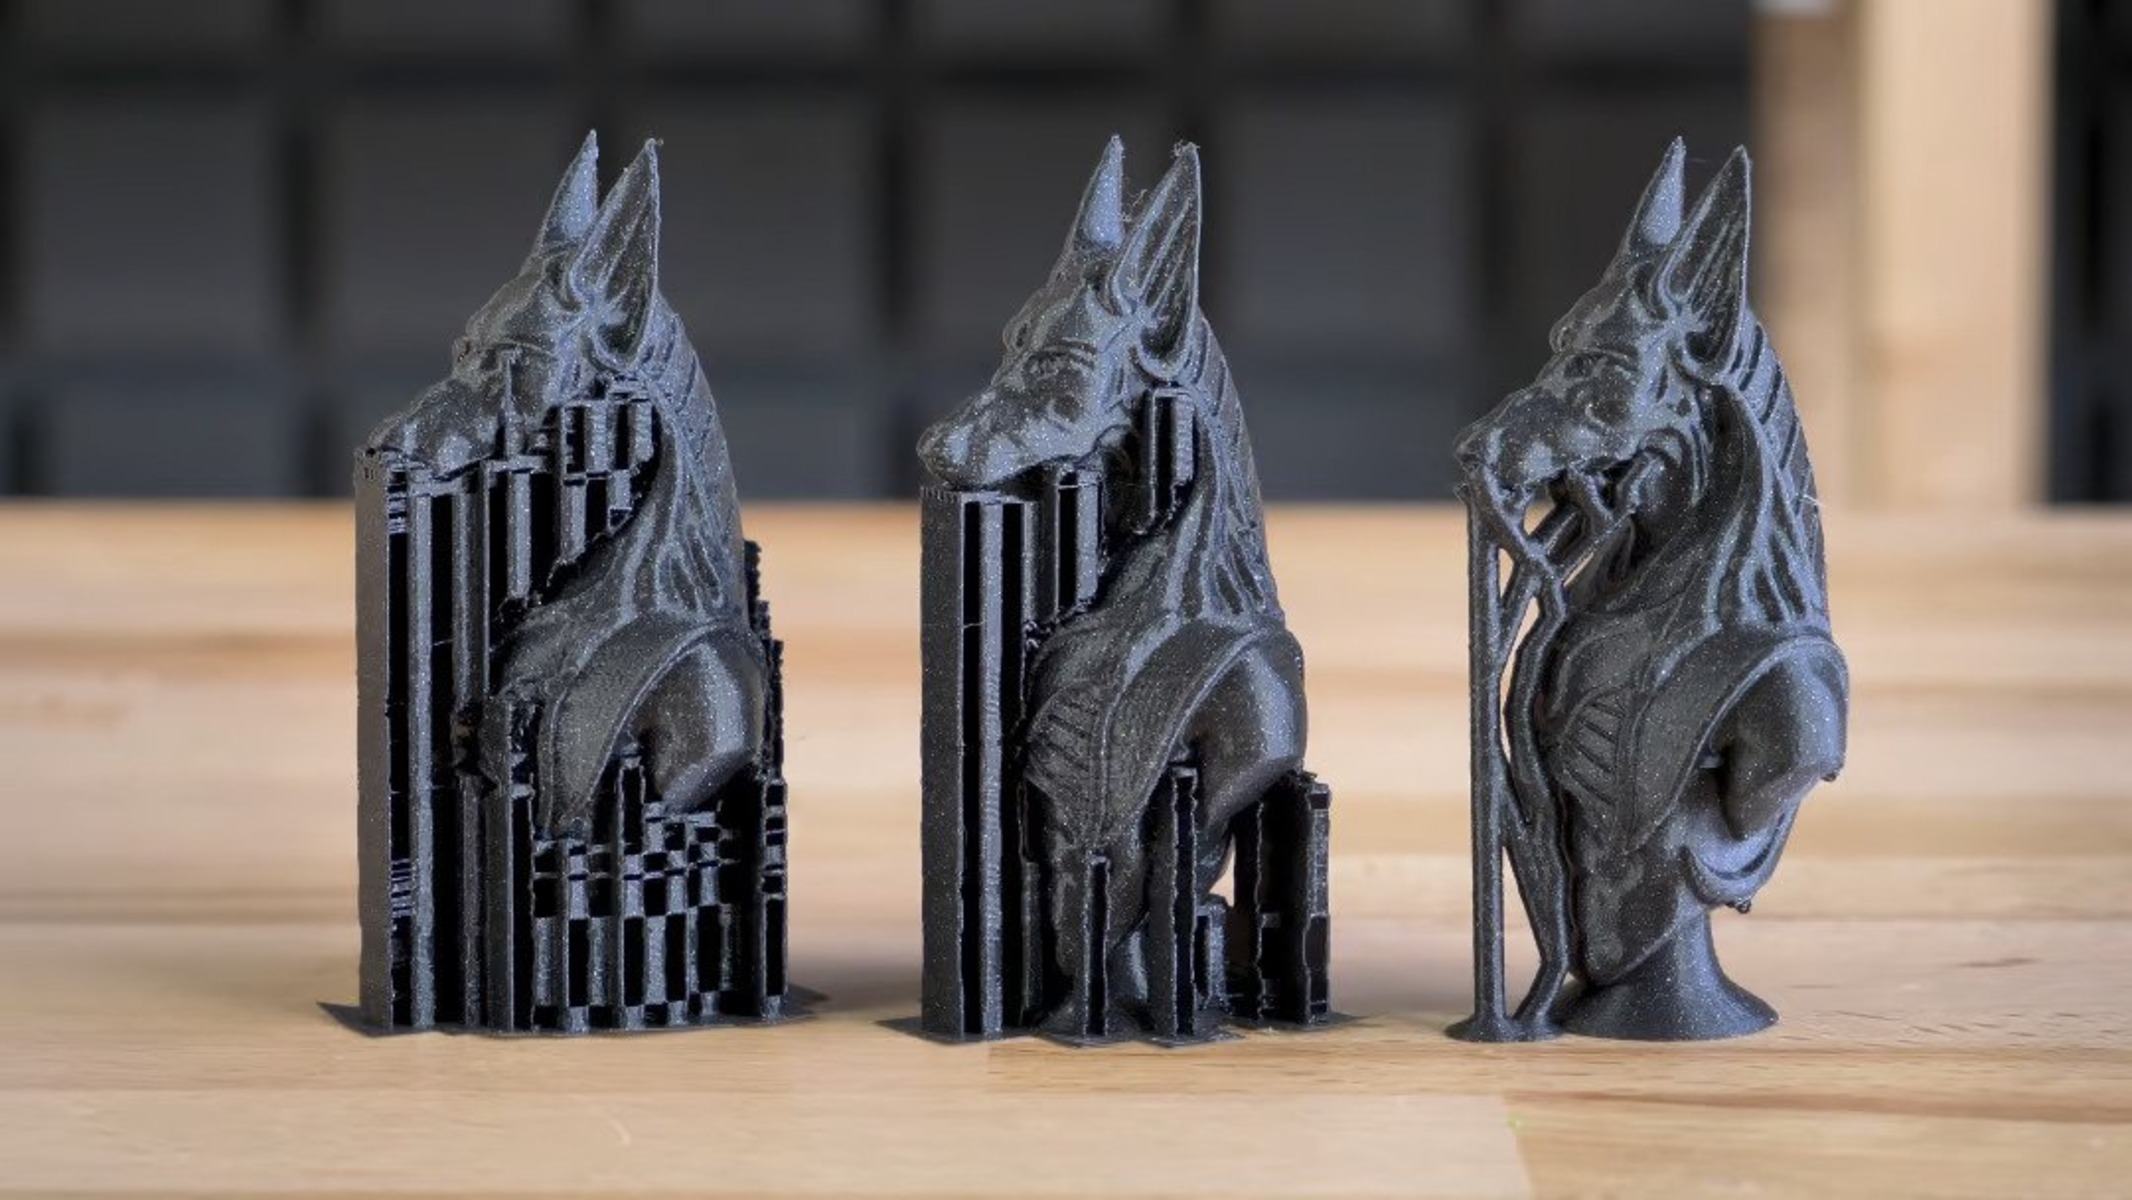
They consist of thin, interconnected stems that gradually taper and provide stability while minimizing material usage.
Tree supports are easy to remove after printing, as they have fewer contact points with the printed object.
They are commonly used when printing taller structures or designs with extended overhangs.
Pillar supports are durable and less prone to bending during the printing process, resulting in more accurate prints.
Custom supports:Some slicing software allows users to manually add or modify supports according to their specific needs.
Custom supports are useful when dealing with unique or complex designs that require tailored support structures for optimal printing.
This level of control allows for precise support placement and can result in better print quality and reduced post-processing.
Here are some factors to consider when configuring your support tweaks:
1.
Support material:The first step is to choose the material for your supports.
Consider the material properties, availability, and ease of removal when selecting the support material.
Support density:The density of supports refers to the amount of material used to create them.
Higher support densities provide better stability but may leave more visible marks or require more effort to remove.
Strike a balance between support density and the desired finish of your print.
Support angle:The support angle determines the angle at which supports are generated.
Avoid placing supports in critical or visible areas, as they may leave blemishes or require more post-processing.
Additionally, consider the accessibility for support removal when positioning them in your design.
Support interface layers:Support interface layers are thin layers printed between the support and the main object.
These layers enhance adhesion and prevent the supports from fusing with the main print.
Support Z-gap:The Z-gap refers to the distance between the print and the support structures.
Finding the right balance is important for successful support utilization.
Experimentation and fine-tuning may be required to find the ideal support controls for your specific print.
Here are some essential steps to follow when preparing your 3D model:
1.
Make note of these areas to ensure accurate support placement later.
Orient the model:Consider the orientation of your model on the build platform.
Experiment with different orientations to find the optimal position for your print.
Hollow structures:If your design allows for it, consider creating hollow structures with adequate wall thickness.
Fix model errors:Before adding supports, double-check to address any errors or issues in your 3D model.
Check for non-manifold geometry, overlapping surfaces, or other mesh errors that could result in printing problems.
Repair any issues using 3D modeling software or online repair tools to ensure a clean and printable model.
This leads to improved print quality and makes the support removal process more manageable.
In the next section, we will guide you through the steps of adding supports to your 3D model.
Slicing software allows you to specify support controls and generate the necessary support structures.
Heres a general guide on how to add supports in slicing software:
1.
Import your model:Open your 3D model file in the slicing software of your choice.
Ensure that the model is correctly scaled, oriented, and positioned on the build platform.
Enable supports:Locate the support tweaks in the slicing software and enable them.
This may involve toggling a switch or checkbox to turn on support generation.
Adjust support controls:Fine-tune the support controls based on your specific requirements.
This may include selecting the support jot down (tree supports, grid supports, etc.
Preview the print:Before saving the sliced file, take advantage of the slicing softwares preview function.
This allows you to visualize the supports and the overall print.
Use this opportunity to inspect the supports, check for any potential issues, and make any necessary adjustments.
double-check to review any additional printer-specific tweaks and configurations, such as printing temperature and print speed.
Remember that the user interfaces and support tweaks may vary across different slicing software platforms.
In the next section, we will explore how to fine-tune support prefs for optimal results.
Here are some tips for optimizing your support options:
1.
Increasing the support density provides better support but may result in more visible marks on the printed object.
Lowering the density can make support removal easier but could compromise the stability of overhangs.
Experiment with different angles to find the optimal balance between material usage and support stability.
Steeper angles may require more supports, while shallower angles may lead to insufficient support.
Optimize the Z-gap:The Z-gap is the distance between the print and the support structures.
Finding the right Z-gap is vital as it affects the attachment strength of the supports.
Experiment with different Z-gap values to improve adhesion without compromising easy removal or damaging the main print.
Evaluate the need for custom supports:In some cases, predefined support structures may not provide optimal results.
Consider manually adding or modifying supports using the slicing softwares custom support features.
Test and iterate:Fine-tuning support controls often involves experimentation and iterative testing.
Analyze the results and make adjustments accordingly to achieve the desired outcome.
Therefore, its essential to familiarize yourself with the capabilities and limitations of your specific printer and slicing software.
In the next section, we will discuss the process ofremoving supports from your 3D prints.
Here are some guidelines to follow when removing supports:
1.
Cool down the print:Allow the printed object to cool down completely before attempting to remove the supports.
This helps prevent any deformation or damage to the print because of handling it while its still warm.
Identify areas where the supports are firmly attached and areas where they may be more easily detached.
Take it slow and steady:Remove the supports using gentle and controlled movements.
Avoid applying excessive force or twisting motions that could cause unintended damage to the print.
With the supports successfully removed, you’re free to now admire and enjoy your completed 3D print.
Finally, we outlined the steps involved in removing supports post-printing while minimizing any damage to the final print.
