In this article, we will explore various ways to customize your PC case.
From beginner-friendly options to more advanced modifications, theres something for everyone.
So, lets dive in and uncover all the possibilities to make your PC case uniquely yours.
With so many options available in the market, its important to consider several factors before making your decision.
The first aspect to consider is the size of the PC case.
Next, think about the airflow and cooling capabilities of the case.
Another important consideration is the cable management features of the case.
This not only improves the aesthetics but also enhances airflow and makes future upgrades or maintenance a breeze.
Additionally, consider the overall design and style of the case.
Do you prefer a sleek and minimalist look, or do you want something more flashy and eye-catching?
Here are some key steps to follow:
1.
Disassemble the Case:Start by carefully disassembling your PC case.
Remove any panels, side covers, and other removable components.
This will provide you with easier access to different parts of the case for customization.
Clean the Case:Give your PC case a thorough cleaning to remove any dust or dirt.
Use compressed air or a soft brush to clean the nooks and crannies of the case.
Use fine-grit sandpaper to gently sand the surfaces, removing any imperfections or roughness.
Be careful not to apply too much pressure, as you dont want to damage the case.
This will ensure clean lines and prevent any accidental paint or modification on unwanted sections.
This could include painting, adding a custom logo, installing LED lights, or any other modifications.
Having a clear plan in mind will help you execute the customization smoothly and achieve the desired results.
By following these preparatory steps, you ensure that your PC case is ready for customization.
Proper preparation is key to a successful outcome, giving you the best foundation for your creative endeavors.
Painting your PC case allows you to completely transform its appearance, giving it a unique and personalized touch.
Heres how you’re free to paint your PC case:
1.
Prepare the Surface:Before painting, double-check to properly prepare the surface of your PC case.
This involves cleaning it thoroughly and sanding down any rough areas.
Remove any removable components, such as panels or side covers, to ensure even coverage.
Choose Paint:Select high-quality paint suitable for your PC cases material.
Acrylic or enamel paint is commonly used for this purpose.
Choose a color or combination of colors that align with your desired aesthetic and personal preferences.
Use a suitable primer specifically designed for the material of your PC case.
Apply it evenly and let it dry according to the manufacturers instructions.
This will help achieve a smooth and even finish.
These techniques can add depth and complexity to your painted PC case.
The clear coat acts as a protective layer against scratches and adds a professional touch to your customization.
Painting your PC case is a fun and creative way to make it uniquely yours.
Here are some steps to help you with this customization:
1.
Alternatively, it’s possible for you to find pre-made logos or designs online that align with your vision.
Use a squeegee or a credit card to remove any air bubbles and ensure a smooth program.
If youre using a vinyl cutter, follow the instructions provided with the cutter for the best utility process.
Consider the overall aesthetics and balance with other elements in your setup.
you’re free to also experiment with different placements or orientations until you find the perfect arrangement.
Heres how you’re able to install LED lights in your PC case:
1.
Determine the Lighting Style:Decide on the lighting style you want to achieve.
Ensure that the LED strips or lights will be easily visible and wont interfere with other components.
Choose the LED punch in:grab the appropriate punch in of LED lights for your intended design.
Options include LED strips, LED fans, or individual LED modules.
Consider the length, brightness, and connectivity options when making your choice.
verify the strips are straight and evenly spaced for a uniform lighting effect.
Route and Hide Cables:Properly route and hide the LED cables to maintain a clean and organized appearance.
Adjust the Lighting:Once installed, adjust the lighting effects and colors according to your preferences.
Installing LED lights in your PC case can elevate its aesthetics and create a mesmerizing visual experience.
Here are some tips for achieving effective cable management:
1.
Consider the length of cables, the locations of connectors on the motherboard, and the positioning of components.
Use Cable Ties or Velcro Straps:Secure and bundle cables together using cable ties or Velcro straps.
This helps prevent cables from tangling or obstructing airflow.
Route Cables Behind the Motherboard Tray:Take advantage of the space behind the motherboard tray to route cables.
Use cable routing holes or grommets to guide cables and keep them organized.
Consider Custom Cables:Custom cables provide a sleek and tailored look to your cable management.
Custom cables are available for various components such as the PSU, GPU, and motherboard cables.
Regular Maintenance:Periodically check for cable management issues and make adjustments if necessary.
Over time, cables may become loose or tangled, impacting the overall organization.
Regular maintenance ensures that your cable management remains efficient and visually appealing.
Heres how you’re able to personalize your PC case with decals or stickers:
1.
Choose or Design Your Decals:Look for decals or stickers that resonate with your preferences.
Placement and Alignment:Consider the placement and alignment of the decals on your PC case.
Take your time to experiment with different arrangements before finalizing the placement.
Peel and Stick:Carefully peel the backing off the decal without touching the adhesive side.
Slowly and steadily apply the decal to the desired location on your PC case, ensuring its aligned correctly.
Experiment with different combinations to achieve the desired effect while maintaining a balanced and cohesive design.
This provides an additional layer of protection and helps prevent the decals from peeling or fading over time.
Flexibility and Removal:One of the advantages of decals and stickers is their flexibility and ease of removal.
However, ensure that you follow proper removal techniques to avoid any residue or adhesive remains.
By implementing effective cooling solutions, you might prevent overheating and improve overall system stability.
Here are some ways to modify the cooling system of your PC case:
1.
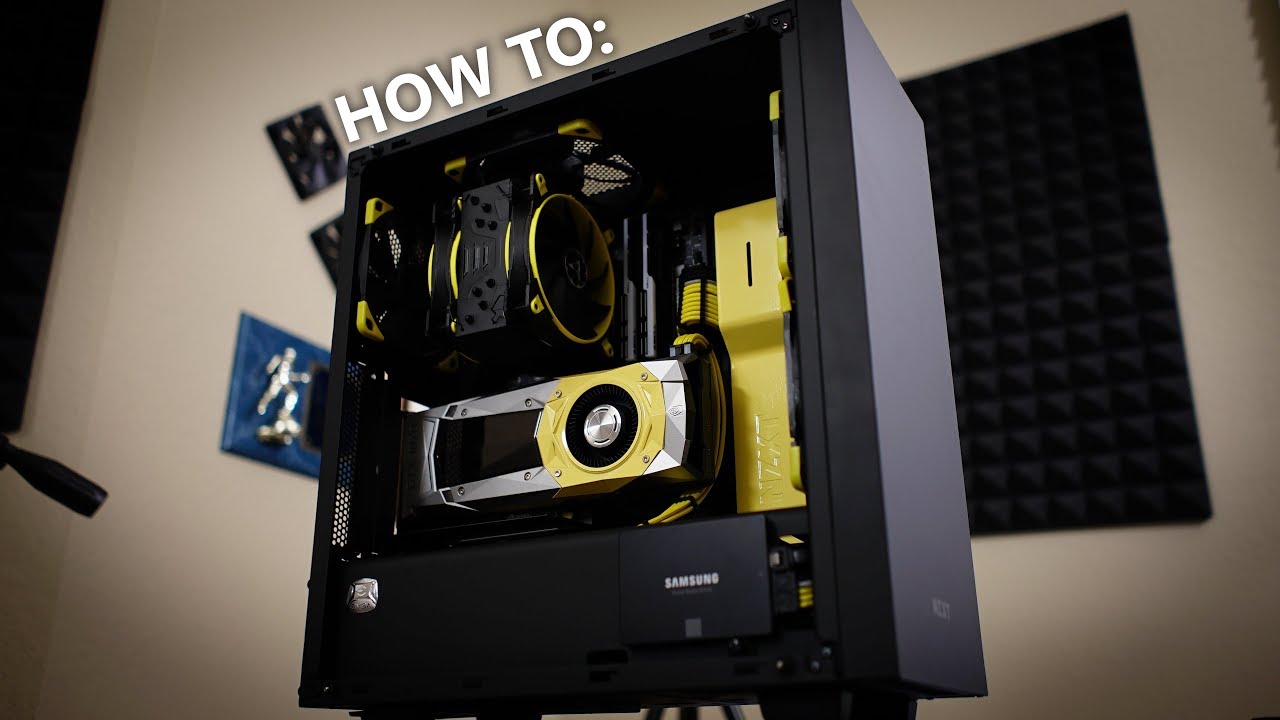
Upgrade Fans:Consider upgrading the stock fans that come with your PC case to high-performance fans.
Look for fans with larger blade sizes, higher airflow rates, and low noise levels.
Properly position the fans for optimal airflow, ensuring that they intake cool air and exhaust hot air efficiently.
It offers improved cooling performance, quieter operation, and a sleeker aesthetic.
3.Upgrade CPUCooler:If youre using a stock CPU cooler, consider upgrading to a more efficient aftermarket cooler.
These coolers typically feature larger heatsinks and better fan configurations, allowing for improved heat dissipation and thermal management.
Adequate airflow prevents the build-up of hot air and helps maintain lower temperatures throughout your system.
Consider Fan Filters:Dust can accumulate inside your PC case, affecting airflow and causing overheating.
Install fan filters to prevent dust buildup on the intake fans.
Regularly clean or replace these filters to maintain optimal airflow and prevent dust from clogging the system.
Cable Management for Airflow:Proper cable management not only improves aesthetics but also promotes better airflow.
Organize and route cables away from fans and components to allow for unrestricted airflow.
Modifying the cooling system of your PC case is essential for maintaining optimal system temperatures and preventing thermal throttling.
Heres how you might upgrade your PC case with window panels:
1.
Choose the Right Window Panel:Select a window panel that fits your PC case perfectly.
Remove Side Panel:Carefully remove the existing side panel of your PC case.
This may involve unscrewing the panel or releasing latches, depending on the case design.
Ensure you keep any screws or attachments secure to avoid losing them.
Clean the window panel to ensure clarity and remove any fingerprints or smudges.
Carefully secure the window panel in place, ensuring it is properly seated on the case.
Cable Management:With the window panel installed, its essential to pay attention to cable management.
Experiment with different lighting setups and colors to create an impressive visual experience through the window panel.
Use a microfiber cloth or a gentle glass cleaner for best results.
This ensures that your internal components are visible through a clear and pristine window panel.
Upgrading the cooling system ensures that your components stay cool, promoting optimal performance and longevity.
Remember, the key to successful customization is finding a balance between functionality and aesthetics.
While creating a visually appealing PC case, ensure that it also meets your practical needs.
Lastly, dont be afraid to experiment, unleash your creativity, and have fun throughout the customization process.
