Introduction
Graphs are a powerful way to visually represent data and gain insights from it.
They are widely used in various fields, including finance, science, and statistics.
In this tutorial, we will explore how tocreate a graph in PHPfrom scratch.
Lets get started by ensuring that we have the required environment set up.
GD allows us to create and manipulate images, making it an ideal tool for generating graphs dynamically.
You should see a detailed page with information about your PHP installation.
Look for the GD section to confirm that the extension is enabled.
In the next sections, we will cover the step-by-step process of creating a graph from scratch using PHP.
you might customize the array to fit your specific data requirements.
This allows you to update the graph with live data whenever necessary.
Once we have our data array, we can move on to initializing the graph and setting the dimensions.
We will cover this in the next section.
The first step is to create a new image using theimagecreate()function.
you’re free to adjust these values according to your requirements.
Next, we need to specify the background color for our graph using theimagecolorallocate()function.
This function takes in the image resource, followed by the RGB values for the desired color.
Again, it’s possible for you to customize this color to your preference.
Finally, we need to fill the image with the specified background color using theimagefill()function.
This function takes in the image resource and the starting x and y coordinates for the fill area.
In our case, we will fill the entire image with the background color.
Defining the Graph Dimensions
After initializing the graph, the next step is to define its dimensions.
The dimensions of the graph include its width, height, and margins.
We can specify these values based on our requirements and the available space for displaying the graph.
In this section, we will discuss how to create a background grid using PHP and the GD library.
The background grid consists of horizontal and vertical lines that intersect at regular intervals, forming a grid-like pattern.
The spacing between these lines can be adjusted based on the desired granularity of the grid.
Next, we use a loop to draw horizontal lines across the graph at the calculated vertical intervals.
Similarly, we draw vertical lines at the calculated horizontal intervals.
Theimageline()function is used to draw lines on the graph.
In this section, we will discuss how to draw axes and labels using PHP and the GD library.
The first step is to draw the x-axis and the y-axis.
We can accomplish this by using theimageline()function to draw straight lines on the graph image.
Once the axes are drawn, we can proceed to add labels to the graph.
Labels help in identifying the data points on the graph and provide information about the axes.
We then use theimagettftext()function to add text labels to the graph at the specified coordinates.
The function allows you to customize the font, size, angle, and other properties of the labels.
By drawing axes and adding labels, we make our graph more informative and user-friendly.
In the next section, we will discuss how to plot the data points on the graph.
In this section, we will discuss how to plot the data points using PHP and the GD library.
We use theimagefilledellipse()function to draw filled circles representing the data points.
With the data points plotted on the graph, we have successfully visualized our data.
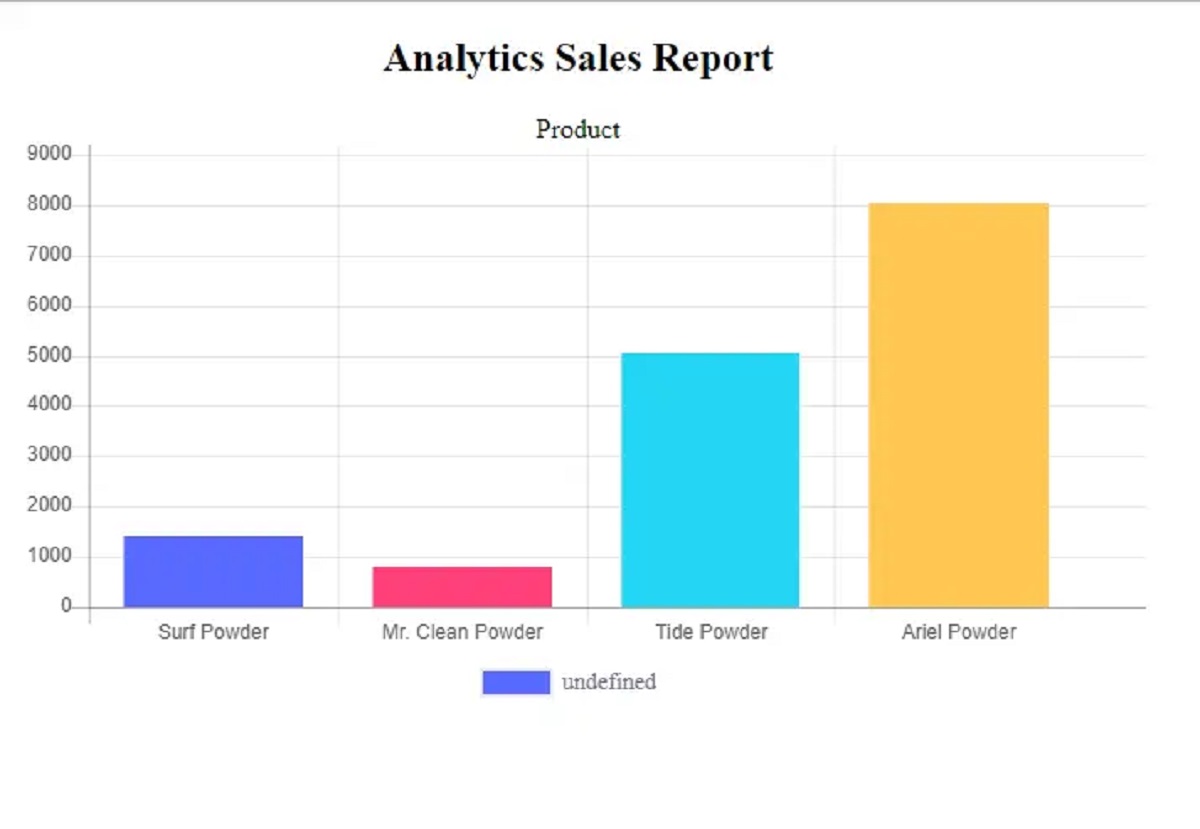
The title of the graph identifies the subject or the purpose of the data being presented.
We then use theimagettftext()function to add the title to the graph at the specified coordinates.
The legend items are added to the graph using theimagettftext()function.
The Y-coordinate is adjusted for each legend item to position them vertically below each other.
By adding a title and a legend, we provide additional information and context to help interpret the graph.
With the title, legend, and data points added, our graph is now complete.
The image file extension can be changed to other supported formats like JPEG or GIF if desired.
This ensures that the memory used by the graph is released.
