Introduction
Are you tired of your setup overheating during intense gaming sessions or resource-intensive tasks?
If so, you may need to invest in a case fan controller.
In this article, we will guide you through the process of connecting acase fan controllerto your system.
Before we dive into the installation process, lets talk about why a case fan controller is essential.
Your computers cooling system plays a crucial role in maintaining optimal performance and preventing damage because of overheating.
Nowadays, many gaming and high-performance computers come equipped with multiple case fans.
This lack of control can result in either insufficient cooling or excessive noise.
With our guidance, youll have your case fan controller up and running in no time.
So, lets get started on optimizing your computers cooling system!
Here are the items you will need:
1.
Thermal paste ensures proper heat transfer between the CPU and the cooler, improving cooling performance.
They help prevent clutter and improve airflow, enhancing overall cooling efficiency.
Before proceeding, ensure that you have all the materials readily available.
This will help streamline the installation process and prevent any unnecessary delays.
Consult the user manual or manufacturers website for any specific instructions or precautions related to installing a fan controller.
Here are a few factors to consider when determining the appropriate fan controller:
1.
Most fan controllers support both 3-pin and 4-pin PWM fans, but its essential to double-check this compatibility.
Fan Control Options: Evaluate the control options provided by the fan controller.
Basic controllers typically offer manual control with physical knobs or buttons to adjust fan speed.
Number of Channels: Consider the number of fans you want to control simultaneously.
Fan controllers come with varying numbers of channels, typically ranging from 2 to 6 or more.
Ensure that the controller you choose has enough channels to accommodate all your case fans.
Power Supply: Determine how the fan controller will receive power.
see to it the fan controllers power requirements align with the available power sources in your system.
Aesthetics and Form Factor: Consider the visual appeal and form factor of the fan controller.
It should fit seamlessly into your machine case and complement its overall design.
when you land considered these factors, start researching and comparing different fan controllers.
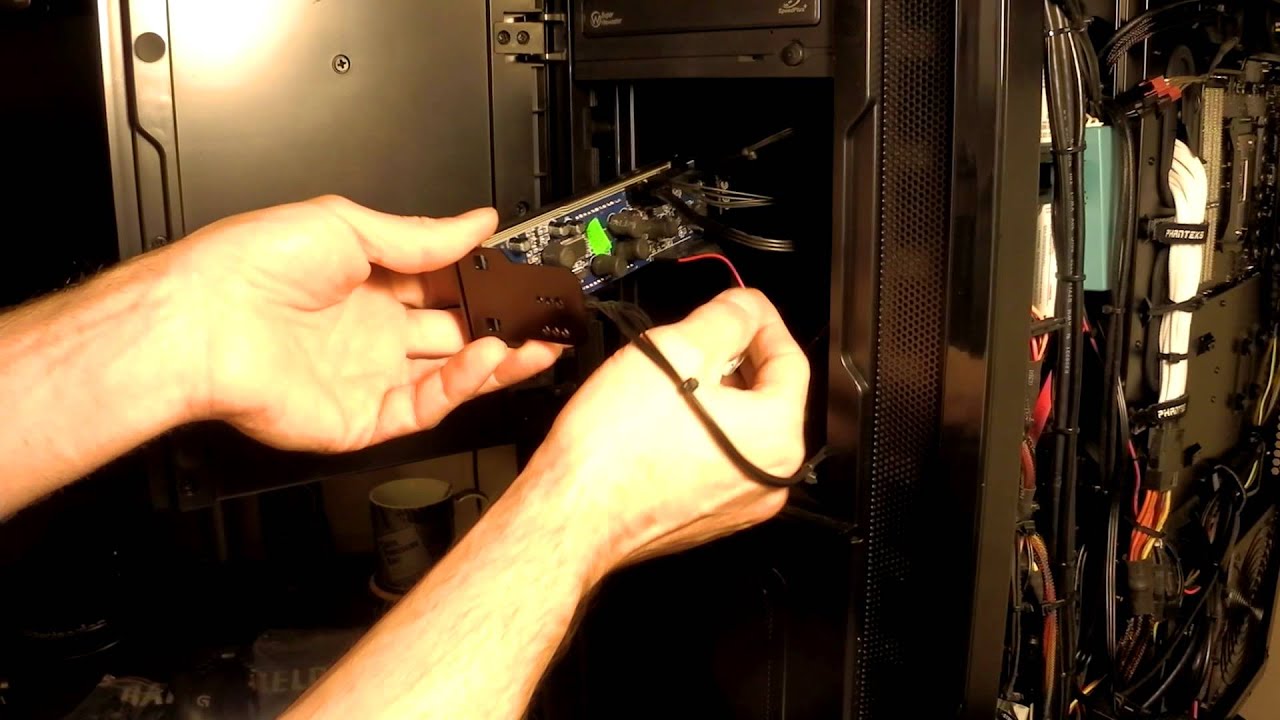
Step 3: plant the fan controller in the case
1.
This will ensure your safety and prevent any accidental damage to the components.
- pop pop the computer case: Use a screwdriver to remove the side panels of your rig case.
Gently slide the panels off to expose the internal components.
Ensure that there is enough space to accommodate the size and dimensions of the controller.
Then, slide the controller into the designated position in the case.
Refer to the fan controller manual to determine the appropriate method.
Use cable ties or zip ties to secure the cables and maintain a clean and tidy setup.
Heres how you’ve got the option to do it:
1.
Locate the power supply cables: Identify the cables coming from your power supply unit (PSU).
Look for the cables with molex connectors or SATA power connectors.
These connectors are typically used to power peripherals and components in your machine.
Ensure that the connector is inserted securely to avoid any loose connections.
A loose connection can lead to intermittent power supply or even damage the fan controller.
This helps keep the cables organized and prevents them from obstructing other components or affecting airflow.
With the power supply successfully connected to the fan controller, you have completed this step.
Step 5: Connect the fans to the fan controller
1.
Identify the fan connectors: Locate the fan connectors on your fan controller.
Depending on the model, there may be labeled ports or headers specifically designated for connecting the fans.
These are usually grouped together and may be numbered or color-coded.
Determine the jot down of fan connectors: Check the jot down of connectors on your case fans.
Most fans use either a 3-pin or 4-pin connector.
Ensure that the fan controller has compatible headers for the bang out of fans you have.
If your fan connectors dont match the fan controllers headers, you may need adapters to make the connection.
Insert it firmly to establish a secure connection.
Repeat this process for each of the fans you want to control using the fan controller.
This helps keep the cables organized and prevents them from interfering with other components or blocking airflow.
Test the connections: Before closing the computer case, its important to test the fan connections.
Power on your system and verify that the fan controller is properly controlling the fans.
Refer to the fan controllers manual for instructions on accessing and adjusting these options.
With the fans successfully connected to the fan controller and functioning correctly, you have completed this step.
Step 6: Secure all connections and end the case
1.
Verify all connections: Double-check all the connections you have made throughout the installation process.
Organize cables: Take some time to organize the cables inside your setup case.
This will help improve airflow and prevent any obstruction or damage resulting from the cables.
Route cables properly: Route the cables along the designated cable management pathways within your gear case.
Many modern cases have built-in channels or hooks to help you route and hide cables.
Align them correctly with the case chassis and use the appropriate screws to fasten them in place.
Ensure that the panels are snugly secured, providing a proper seal for your setup components.
Test the fans at different speeds to ensure they respond to the changes accordingly.
Monitor the performance of the fans and make any necessary adjustments to optimize cooling and noise levels.
This may involve fine-tuning the fan speeds or adjusting the temperature targets in the fan controller software.
With all connections secured and your machine case closed, you have completed the installation process.
Keep an eye on the temperatures and adjust the fan speeds if necessary to achieve the desired cooling efficiency.
Remember, proper cable management and organization are crucial in maintaining a clean and efficient computer build.
Routing cables appropriately not only improves airflow but also enhances the overall appearance of your system.
your box will operate at optimum temperatures, ensuring better performance and longevity of your hardware components.
By following these steps, you could maintain the ideal balance of cooling and noise in your rig system.
