Introduction
A clean computer keyboard is essential for optimal performance and hygiene.
Regularly cleaning your keyboard not only helps to maintain its longevity but also ensures a healthier typing experience.
In this guide, we will provide you with step-by-step instructions on how to clean yourcomputer keyboardeffectively.
We will discuss general cleaning techniques that can be applied to most keyboards.
Before we dive into the cleaning process, ensure to power off your machine and unplug the keyboard.
This will prevent any accidental input or damage to your system system while cleaning.
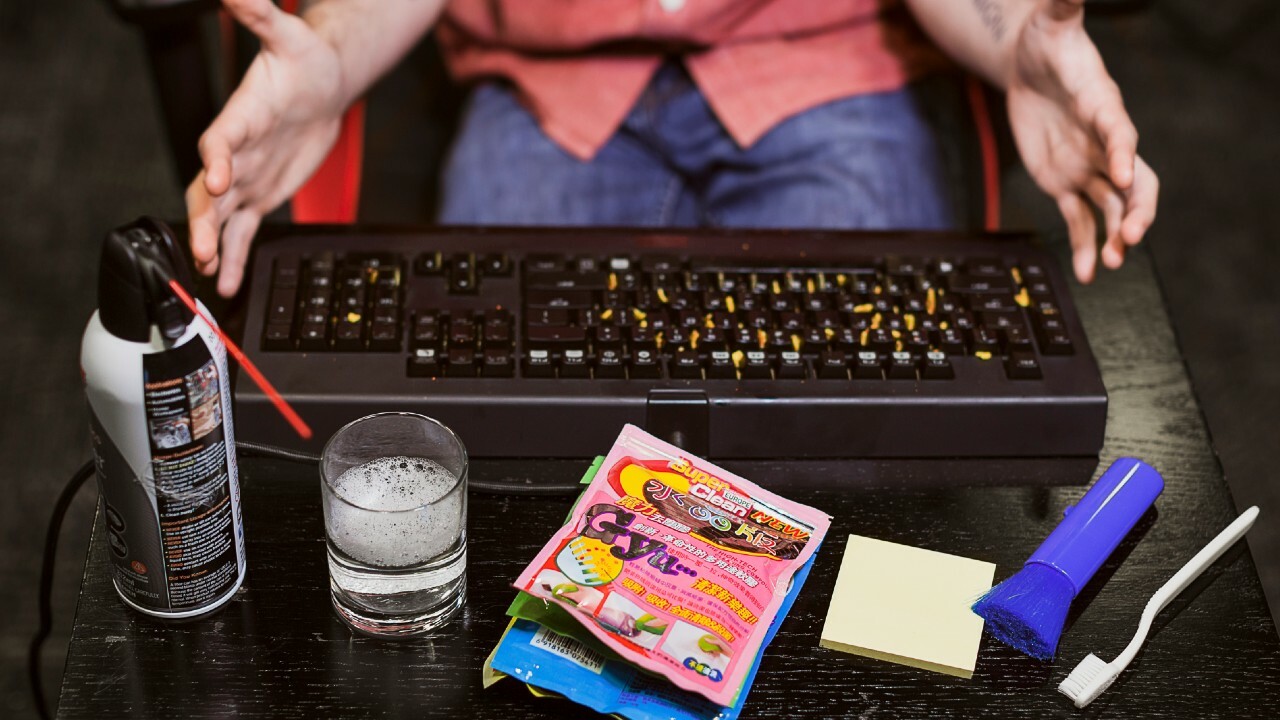
Now, lets gather the materials and get started with cleaning your system keyboard.
It is important to use a non-abrasive cloth to avoid scratching the surface of the keys.
Isopropyl alcohol or a mild cleaning solution is necessary to remove any grime or sticky residue from the keys.
wise to dilute the cleaning solution with water to prevent any damage to the keyboard.
Cotton swabs or a small brush will come in handy to clean the hard-to-reach areas between the keys.
The small bristles or cotton tips will help remove any debris or dirt stuck in these crevices.
This will help dislodge and remove hidden dirt.
Lastly, a microfiber cloth or paper towels will be used to dry the keyboard after cleaning.
These materials are absorbent and will prevent any moisture from affecting the keyboards performance.
Disinfecting wipes are optional but highly recommended for sanitizing the keyboard and eliminating bacteria and germs.
With these materials prepared, you are now ready to start cleaning your setup keyboard.
This step ensures your safety and prevents any accidental key presses or damage to your system.
Forwireless keyboards, turn off the power switch or remove the batteries, if applicable.
By disconnecting the keyboard, you eliminate the risk of any electrical interference or accidental command inputs while cleaning.
Take extra caution when handling the keyboard and its cables.
Avoid pulling on the cord forcefully or at an angle that may cause any damage.
A gentle and careful approach will ensure that your keyboard remains intact throughout the cleaning process.
To shake off the loose debris, hold the keyboard upside down and gently tap or shake it.
This will dislodge any loose particles, thereby making it easier to clean the keyboard later on.
While shaking the keyboard, you may notice small objects or debris falling out.
Its important to be careful and avoid dropping the keyboard or causing any damage during this process.
Tip the keyboard in different directions to ensure that any debris trapped in between the keys also falls out.
The brush can be gently swept over the keys and in between the crevices to dislodge any remaining particles.
If using compressed air, use short bursts to blow away the debris from the keyboards surface.
Before using the compressed air, ensure that you carefully read and follow the instructions provided with the canister.
This will ensure that you use the product safely and effectively.
To use compressed air, hold the canister upright and at a distance from the keyboard.
It is essential to maintain a safe distance to prevent any potential damage to the keys or internal components.
Direct the nozzle of the compressed air canister towards the gaps and spaces between the keys.
Press the trigger or button to release short bursts of air into these areas.
The force of the air will dislodge any dirt or debris that may be trapped.
Move across the keyboard, paying special attention to the corners and edges where particles tend to accumulate.
Repeat the process for all the keys, ensuring that you cover the entire surface of the keyboard.
To do this, you will need a soft, lint-free cloth and a cleaning solution.
Isopropyl alcohol or a mild cleaning solution diluted with water works well for this purpose.
Dampen the cloth with the cleaning solution, ensuring it is not dripping wet.
Gently rub the cloth over each key, applying light pressure to remove any dirt or grime.
Pay special attention to any sticky or heavily soiled keys, as they may require a little extra cleaning.
When cleaning the keys, it is important to avoid using excessive moisture.
Excess liquid can seep under the keys and potentially damage the internal components of the keyboard.
Therefore, use a minimal amount of cleaning solution on the cloth.
To protect these markings, avoid rubbing them vigorously.
Continue cleaning each key until all visible dirt and grime are removed.
If necessary, you could dampen the cloth with the cleaning solution again as you progress through the keyboard.
This will remove any excess liquid and ensure that the keyboard is thoroughly dried.
For this step, you will need a small brush or cotton swabs.
A small, soft-bristled toothbrush or a specifickeyboard cleaning brushworks well for this purpose.
Take care not to apply excessive moisture, as it can seep under the keys and potentially cause damage.
Continue cleaning between each row of keys until you have covered the entire keyboard.
Pay attention to the corners and edges, as these areas are more prone to accumulating debris.
This prevents the transfer of dirt and grime from one area to another.
To disinfect your keyboard, you could use disinfecting wipes that are specifically designed for electronic devices.
These wipes are pre-moistened with a disinfectant solution that will kill bacteria and germs effectively.
Take a disinfecting wipe and gently rub it over the keys and the surface of the keyboard.
check that to cover all areas, including the sides and corners.
Pay extra attention to frequently touched keys, such as the Enter key or the spacebar.
While disinfecting, avoid pressing the keys forcefully or allowing excess liquid to drip into the keyboard.
This will protect the electronic components from potential damage.
Allow the disinfectant to air dry on the keyboard.
This will ensure that it has sufficient contact time with the surface to effectively kill any bacteria or germs.
Remember to wash your hands thoroughly after handling disinfecting wipes or cleaning solutions to avoid any potential skin irritation.
Now that your keyboard is disinfected, its time to let it dry before reconnecting it to your gear.
Proceed to the next step to ensure proper drying.
This step helps prevent any potential damage that moisture may cause to the keyboards internal components.
This will help absorb any excess moisture left behind from the cleaning and disinfecting process.
If needed, you’re free to use a separate cloth or towel for drying purposes.
Allow the keyboard to air dry naturally for some time.
This will ensure that any remaining moisture evaporates from the keys and the crevices.
Avoid using any external heat sources, such as hairdryers or heaters, to speed up the drying process.
These heat sources can damage the keyboard and its components.
During the drying process, avoid reconnecting the keyboard or using it.
Patience is key to allow sufficient time for the keyboard to dry completely.
check that that the keyboard is within the range of the receiver to ensure a stable connection.
Check for any stuck or unresponsive keys and address them if necessary.
Remember to maintain regular cleaning habits to prevent the accumulation of dirt and debris on your keyboard.
Afterward, you clean the keys with a cloth and a cleaning solution, ensuring thorough coverage.
Disinfection is the next step, using disinfecting wipes or a diluted cleaning solution to eliminate bacteria and germs.
Drying the keyboard completely before reconnecting it is vital to prevent any moisture-related damage.
Remember to regularly clean your keyboard to prevent the buildup of dirt, grime, and bacteria.
This not only ensures its longevity but also promotes a more hygienic working environment.
