It boasts a longer flight time of up to 31 minutes, thanks to its powerful battery.
One of the standout features of the DJI Mini 3 Pro is its compact size and portability.
Weighing just under 250 grams, its incredibly lightweight and can easily fit into your backpack or pocket.
Before using the battery, its important to ensure that it is fully charged.
This can be done using the provided charging equipment, which we will discuss in detail later.
The DJI Mini 3 Pro battery features built-in safeguards to protect against overheating, overcharging, and overdischarging.
These safety mechanisms help prevent any potential damage to the battery or the drone itself.
However, its still recommended to follow proper charging and usage guidelines to maintain the batterys health.
High temperatures can negatively impact the batterys performance and overall lifespan.
Similarly, storing the battery in extremely cold conditions can affect its ability to hold a charge.
Its advisable to charge the battery in a well-ventilated area and on a non-flammable surface to minimize any risks.
Understanding the batterys capacity and flight time is crucial for planning your drone activities efficiently.
Preparing the charging equipment correctly is essential for a safe and efficient charging process.
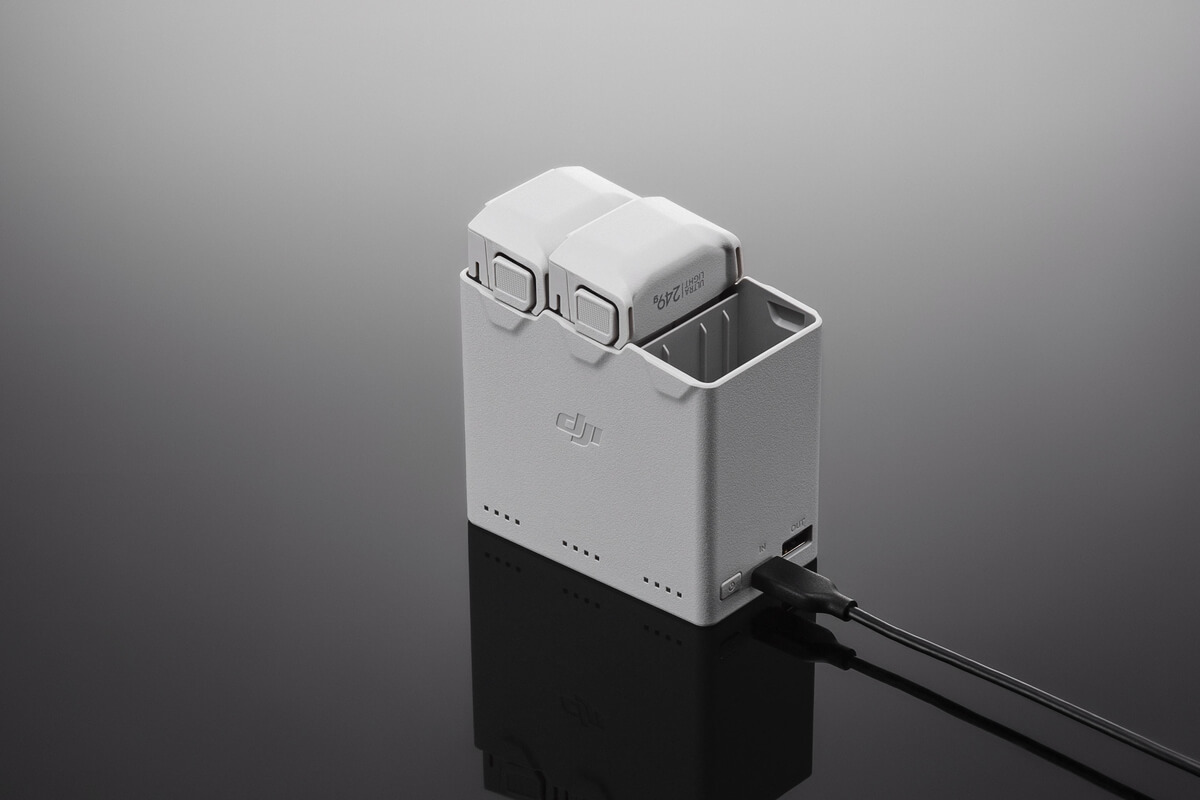
The DJI Mini 3 Pro comes with a specific charger designed to charge its battery.
Using third-party chargers can be risky and may void the warranty.
If you notice any damage, do not use the charger as it may pose a safety hazard.
Instead, contact DJI for a replacement or visit an authorized service center.
Ensure that you have access to a reliable power source.
Take note of thecharging time required for the DJI Mini 3 Pro battery.
The charging time can vary depending on the batterys current level and the power supplys output.
Creating a dedicated charging station for your DJI Mini 3 Pro can help streamline the charging process.
Lastly, familiarize yourself with the LED indicators on the charger.
Understanding these indicators will help you monitor the charging process effectively.
Start by locating the charging port on your DJI Mini 3 Pro drone.
The charging port is typically located on the side or bottom of the drones body.
Next, connect the charging cable to the charger.
Ensure that the cable is securely plugged into the chargers output port.
A firm connection will ensure a stable power supply to the battery during the charging process.
Gently push the connector into the port until it is fully inserted.
Replace the cable if necessary or contact DJI for guidance.
This step is crucial for maintaining the batterys health and ensuring its optimal performance for the next flight.
During the charging process, its crucial to keep an eye on the LED indicators to monitor the progress.
Typically, the indicators will display a solid or blinking light to indicate that the battery is being charged.
Refer to the user manual for specific details on the LED indicators behavior.
On average, it takes approximately 90-120 minutes to charge the DJI Mini 3 Pro battery fully.
However, charging times may be longer if the battery is significantly depleted.
While the battery is charging, its recommended to keep the charging area well-ventilated and away from flammable materials.
This helps dissipate any heat generated during the charging process and minimizes any potential risks.
Doing so can disrupt the charging flow and may result in inefficient or incomplete charging.
This indicates that the battery is ready to be disconnected from the charger.
To disconnect the charging cable, first unplug the charger from the power source.
Take care not to bend or damage the charging port during this process.
This allows the battery to stabilize and helps prevent any potential issues during flight.
Start by observing the LED indicators on the charger.
These indicators provide valuable information about the charging status.
Refer to the user manual for specific details on the LED indicators behavior for your charger model.
Throughout the charging process, its important to maintain a safe and well-ventilated charging area.
Avoid covering or obstructing the charger or the LED indicators to ensure proper airflow and prevent overheating.
Keep the charging area away from flammable materials and out of reach of children or pets.
They can provide guidance and help troubleshoot any charging-related problems.
Safety Tips for Charging
1.
Avoid charging unattended: Its recommended to never leave the battery charging unattended.
This can help identify any issues or abnormalities early on.
Charge in a well-ventilated area: Ensure that the charging area is well-ventilated to prevent the buildup of heat.
Avoid charging the battery near flammable materials or in confined spaces.
Proper airflow will help dissipate any heat generated during the charging process and reduce the risk of heat-related incidents.
Its essential to use a reliable power source to ensure a safe and efficient charge.
Avoid charging the battery in excessively hot or cold environments.
Instead, charge the battery in a temperature-controlled area within the recommended operating range.
They can provide professional guidance, troubleshoot any problems, and ensure your safety.
Avoid storing the battery for prolonged periods with a full charge or in a completely depleted state.
Instead, aim to store the battery at around 50-60% charge to maintain its health.
Charge the battery before each flight: Before your drone flight, ensure that the battery is fully charged.
This will provide you with the maximum flight time and prevent unexpected battery depletion during flight.
Regularly charging the battery before each use helps maintain its overall health and performance.
Allow for a safe margin of power remaining in the battery after each flight.
Completely draining the battery can lead to irreversible damage and a decrease in battery capacity over time.
Perform regular power cycles: Occasionally, perform a full discharge and recharge cycle on the battery.
This helps recalibrate the batterys power gauge and ensures accurate battery level readings.
DJI recommends performing a power cycle every few months or when you notice battery level inconsistencies.
Regularly inspect and clean the battery contacts using a dry and lint-free cloth.
Avoid using harsh cleaning agents or liquids that could damage the contacts.
Inspect the battery regularly: Periodically check the battery for any visible signs of damage or swelling.
Update firmware and software: Keep your drones firmware and software updated to ensure compatibility and optimize battery usage.
Damaged batteries can pose safety risks and may not perform as expected.
Treat the battery as a valuable component of your drone system and handle it accordingly.
Using third-party chargers can be risky and may affect the batterys performance or even cause damage.
Overcharging the battery can negatively impact its lifespan and performance.
Once the battery is fully charged, disconnect it from the charger to avoid any potential issues.
Its recommended to check the power banks specifications and follow DJIs guidelines.
This helps recalibrate the batterys power gauge and ensures accurate readings.
The battery needs to be removed from the drone and connected to the charger using the provided charging cable.
Contact DJI support or consult an authorized service center for guidance and assistance.
These FAQs should provide helpful information about charging the DJI Mini 3 Pro battery.
Proper care and maintenance of the battery are equally important.
Handling the battery with care and keeping it clean contribute to its longevity and optimal performance.
Remember to follow the manufacturers guidelines and seek professional assistance when needed.
