Before we delve into the solutions, lets briefly discuss what a read-only external hard drive means.
This read-only status is usually set by default to protect the integrity of the data on the drive.
However, there are situations where you may need to change this status to enable read and write access.
So, without further ado, lets jump right in and find a solution that works for you!
However, there are instances where the external hard drive becomes read-only, preventing any modifications to its contents.
One common reason for an external hard drive being read-only is the file system compatibility issue.
Another possible cause is the ownership and permissions options.
If the external hard drives ownership and permissions are not set correctly, it can result in read-only status.
Furthermore, hardware or software malfunctions might play a role in the read-only status of your external hard drive.
Understanding these reasons can help you identify the root cause of the issue and choose the most appropriate solution.
4.Write protection:Some external hard drives come with a physical write protection switch or button.
Its important to verify if your drive has this feature and ensure it is in the correct position.
verify to choose the actual drive and not just a specific folder or file within it.
This will initiate the Get Info window for the drive.
4.Unlock the options:At the bottom of the Get Info window, you may see a padlock icon.
If the padlock is locked, tap on it and input your administrator password to unlock the prefs.
This will allow you to make changes to the permissions.
5.Adjust permissions:In the Get Info window, you will see a section named Sharing & Permissions.
Here, you’re free to view the current permissions configs for the selected drive.
This will apply the new permissions to all files and folders within the external hard drive.
If you are now able to write to the drive, congratulations!
If not, proceed to the next method.
However, if this method did not sort out the issue, dont worry.
We have several other methods to explore, which we will cover in the upcoming sections.
2.Launch Disk Utility:Open Finder and navigate to Applications > Utilities > Disk Utility.
4.Erase the drive:press the Erase tab at the top of the Disk Utility window.
Choose a new name for your drive and choose the desired file system.
5.Start the reformatting process:Double-check that you have selected the correct drive and choose the Erase button.
Disk Utility will warn you that all data on the drive will be erased.
Confirm your decision and let Disk Utility reformat the drive.
The process may take some time, depending on the size of the drive.
6.Verify the drive:Once the reformatting process is complete, Disk Utility will display a notification.
you could select Done to kill the window.
You should now be able to read from and write to the drive without any restrictions.
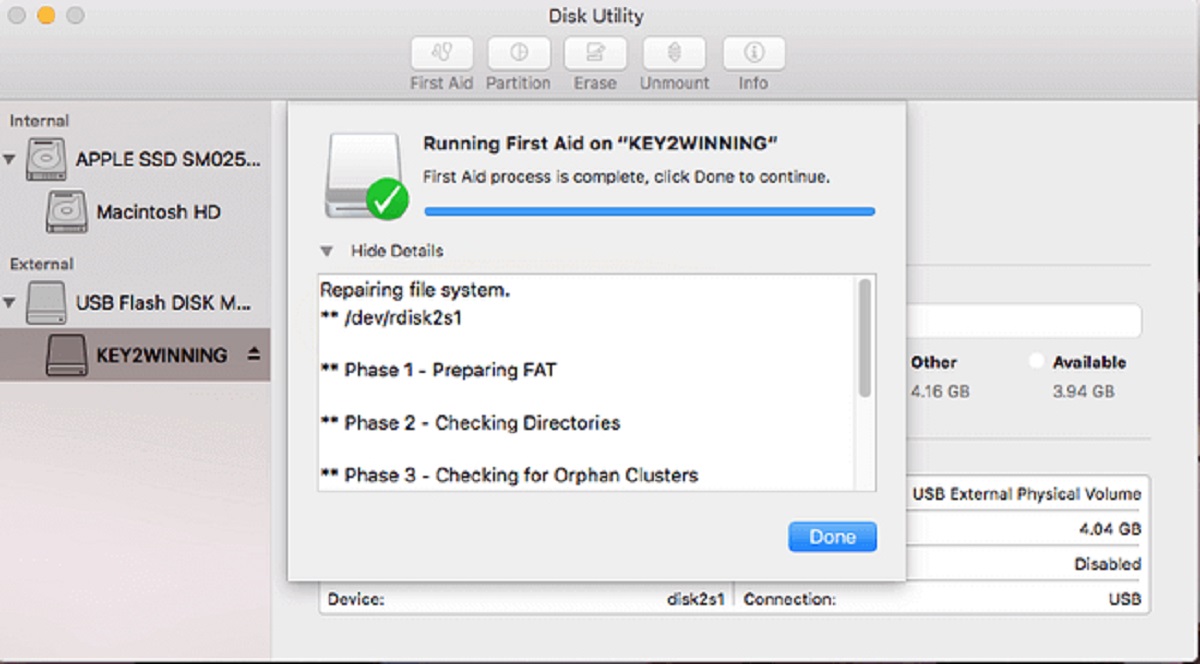
Disk Utility can help identify and fix any disk errors that may be causing the read-only status.
confirm you choose the actual drive and not any of its partitions or volumes.
3.Choose First Aid:punch the First Aid button at the top of the Disk Utility window.
This will initiate the disk repair process.
4.spin up the repair:punch the Run button to begin the repair process.
Disk Utility will scan the drive for errors and attempt to fix any issues that are found.
you’re free to monitor the progress in the progress bar displayed by Disk Utility.
Take note of any specific errors that were addressed, as they may provide insights into the read-only issue.
You should now be able to jump into the drive with read and write permissions.
This method is particularly useful if the issue is not related to permissions or compatibility.
However, if the read-only issue persists, we have another method to explore.
Take some time to read reviews and determine which software is most suitable for your specific needs.
see to it to only download software from trusted sources to avoid any potential security risks.
3.Launch the software:pop fire up software and connect your external hard drive to your Mac.
The software should detect the drive and display relevant information about it.
The specific steps may vary depending on the software you are using.
You should now have full read and write access to the drive.
Conclusion
Dealing with a read-only external hard drive on your Mac can be a frustrating experience.
By identifying the root cause, it’s possible for you to choose the most appropriate solution.
We then explored four methods to remove the read-only status.
Remember, its crucial to back up your data before attempting any changes to your external hard drive.
Additionally, ensure to choose reputable software if opting for a third-party solution.
Enjoy the freedom of modifying, transferring, and backing up your files with ease!
