Introduction
Building your own PC can be an exciting and rewarding experience.
However, if youre new to the world of PC building, the process might seem intimidating at first.
Dont worry, though!
In this comprehensive guide, we will walk you through the step-by-step process of building a PC from scratch.
Well cover everything from choosing the right components to troubleshooting common issues.
If youre new to these concepts, dont fret!
This guide is designed to be beginner-friendly and will explain everything in simple terms.
Throughout this guide, well provide detailed instructions and tips to help you build your PC with confidence.
So lets roll up our sleeves and embark on this exciting journey of building your very own personal computer!
With so many options available in the market, it can be overwhelming to make the right choices.
Were here to guide you through the process and help you go for the perfect components for your build.
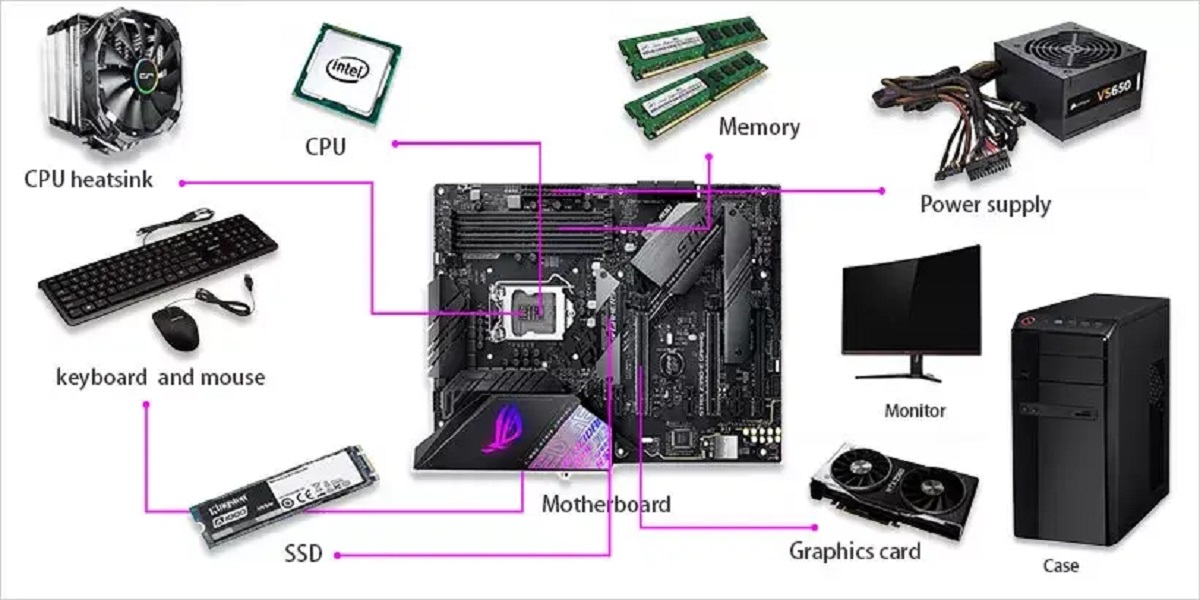
The first and most important component to consider is the motherboard.
This is the foundation of your PC and determines what other components you might use.
Next, youll need to choose a processor (CPU).
This is the brain of your PC and dictates its performance.
Consider factors such as the number of cores, clock speed, and cache size when making your decision.
Memory or RAM is another important component to consider.
The amount of RAM youll need depends on your usage.
For smooth multitasking and gaming, aim for at least 8GB of RAM.
However, if youre into video editing or professional work, 16GB or more is recommended.
A graphics card (GPU) is essential for gamers and those who work with graphically intensive applications.
Depending on your needs, you could choose from entry-level to high-end GPUs.
Storage is another consideration.
Choose a reputable brand with sufficient wattage for your build.
Its recommended to go for a PSU that has modular cables, as they allow for easier cable management.
Lastly, consider the case for your build.
Look for a case that has sufficient space for your components and good airflow to keep everything cool.
Additionally, opt for a case that matches your preferred aesthetics and has room for future expansions.
When choosing components, its important to strike a balance between performance, compatibility, and budget.
Do some research, read reviews, and compare different options before making a decision.
Remember to take your time and double-check everything as you go along.
Lets start by installing thepower supply unit.
This is where your PC starts to take shape, so continue following the guide for a successful build!
Properly mounting the motherboard is crucial to ensure stability and proper functioning of your PC.
In the next section, well cover the installation of the CPU and CPU cooler.
Keep following the guide to build your PC like a pro!
Ensure that the CPU is correctly seated and that the CPU cooler is securely fastened.
Additionally, double-check that the CPU fan is properly connected for adequate cooling.
Installing the RAM modules correctly ensures optimal performance and system stability.
Consult your motherboard manual to determine the recommended slots to populate first for dual-channel or quad-channel memory configurations.
If youre a gamer or work with graphic-intensive applications, installing a dedicated graphics card is essential.
Stay tuned to continue building your PC!
Connecting these devices correctly ensures smooth data transfers and efficient storage management.
Consult your motherboard manual or UEFI/BIOS tweaks to set the desired boot priority if necessary.
With the storage devices connected, you now have the capability to store and retrieve data on your PC.
Keep following the guide to continue building your PC!
Installing an effective cooling system helps dissipate heat and prevents overheating.
With the cooling system installed, youre one step closer to completing your PC build.
In the next section, we will cover connecting the power cables to power up your system.
Continue following the guide to finish building your PC!
Properly connecting the power cables ensures that your components receive the necessary electrical power to function.
But before that, verify you have connected all necessary peripherals as well.
In the next section, we will cover connecting peripherals such as the monitor, keyboard, and mouse.
Stay tuned to complete your PC build!
Before doing so, double-check all connections and ensure that everything is properly connected and secured.
Troubleshooting common problems can help resolve issues and ensure your PC is running smoothly.
In most cases, solutions can be found by identifying the root cause and following step-by-step troubleshooting procedures.
Remember, troubleshooting and resolving issues is a common part of the PC building process.
With any identified issues resolved, youre now ready to fully enjoy your custom-built PC.
Congratulations on your successful build!
Conclusion
Building your own PC can be an exciting and rewarding experience.
Remember, building a PC requires attention to detail, patience, and careful handling of components.
Take your time to research and opt for right components that meet your needs and budget.
Properly installing each component ensures optimal performance and longevity for your system.
During the build process, we emphasized the importance of cable management, proper cooling, and thorough testing.
Good cable management not only improves airflow but also contributes to a clean and visually appealing build.
Efficient cooling keeps your components operating at optimal temperatures, preventing overheating issues.
Thorough testing helps identify any potential problems early on, ensuring your PC runs smoothly.
While troubleshooting issues can be frustrating, it is part of the PC building process.
Remember to consult online resources, manuals, or seek advice from technical support if necessary.
Congratulations on completing your PC build!
You now have a custom-built machine that meets your specific requirements.
Enjoy the performance, flexibility, and satisfaction that come with building your own PC.
Wishing you success and enjoyment with your custom-built PC!
