Introduction
Welcome to our guide on how to backup Time Machine to an external hard drive.
Why is it necessary to backup Time Machine to an external hard drive?
The main reason is simple: redundancy.
This is especially crucial in the event of a catastrophic failure of your Macs internal hard drive.
Why Backup Time Machine to an External Hard Drive?
Lets explore why its crucial to have an additional backup on an external drive.
By having multiple copies of your data, you significantly reduce the risk of losing it.
Protection against Accidental Deletions:Weve all been there accidentally deleting a crucial file or folder.
With Time Machine backups on an external hard drive, you could easily restore deleted files without any hassle.
Extended Storage Space:Macs often come with limited internal storage capacity.
As you accumulate more data over time, your internal hard drive may fill up quickly.
Lets explore the criteria that will help you make an informed decision.
Connectivity:External hard drives come with various connectivity options, such as USB, Thunderbolt, or FireWire.
Ensure that the drive you choose is compatible with your Macs available ports.
USB 3.0 or later is a popular choice due to its widespread compatibility and faster data transfer speeds.
Reliability:Reliability is crucial when it comes to storing your valuable data.
Look for reputable brands known for producing reliable and durable external hard drives.
Reading customer reviews and researching the reliability of different models can help you make an informed decision.
Compatibility:Ensure that the external hard drive you choose is compatible with your Macs operating system version.
Check the specifications of the drive and ensure that it supports macOS to avoid any compatibility issues.
Form Factor:External hard drives are available in different form factors, including portable and desktop models.
Portable drives are lightweight and compact, making them ideal for on-the-go use.
Consider your needs and preferences when choosing between the two.
This allows you to encrypt your Time Machine backups for an extra layer of protection.
Preparing Your External Hard Drive for Backup
2.
Giving the Drive a Meaningful Name:Its helpful to provide a descriptive name for your external hard drive.
This will make it easier to identify and snag the drive in Time Machine tweaks.
To rename the drive, simply right-tap on its icon and choose the Rename option.
Enter a meaningful name that reflects its purpose.
Verifying Drive Health:Use disk utility software to perform a health check on your external hard drive.
This will detect and repair any disk errors and ensure that the drive is in optimal condition for backup.
Running routine health checks will help identify any potential issues before they affect your backups.
Its recommended to reserve at least twice the capacity of your Macs internal hard drive for backups.
you could enable Time Machine encryption in the Time Machine controls on your Mac.
Connecting Your External Hard Drive to Your Mac
1.
Additionally, verify that the USB port on your Mac is functioning properly.
Wait for Recognition:Once the cable is connected, your Mac should recognize the external hard drive automatically.
In the Finder, you should see your external hard drive listed in the sidebar under Devices.
hit the drive to open it and verify that it is accessible.
This ensures that any ongoing read or write operations are completed and prevents data corruption.
In the next section, well guide you through configuring Time Machine for backup.
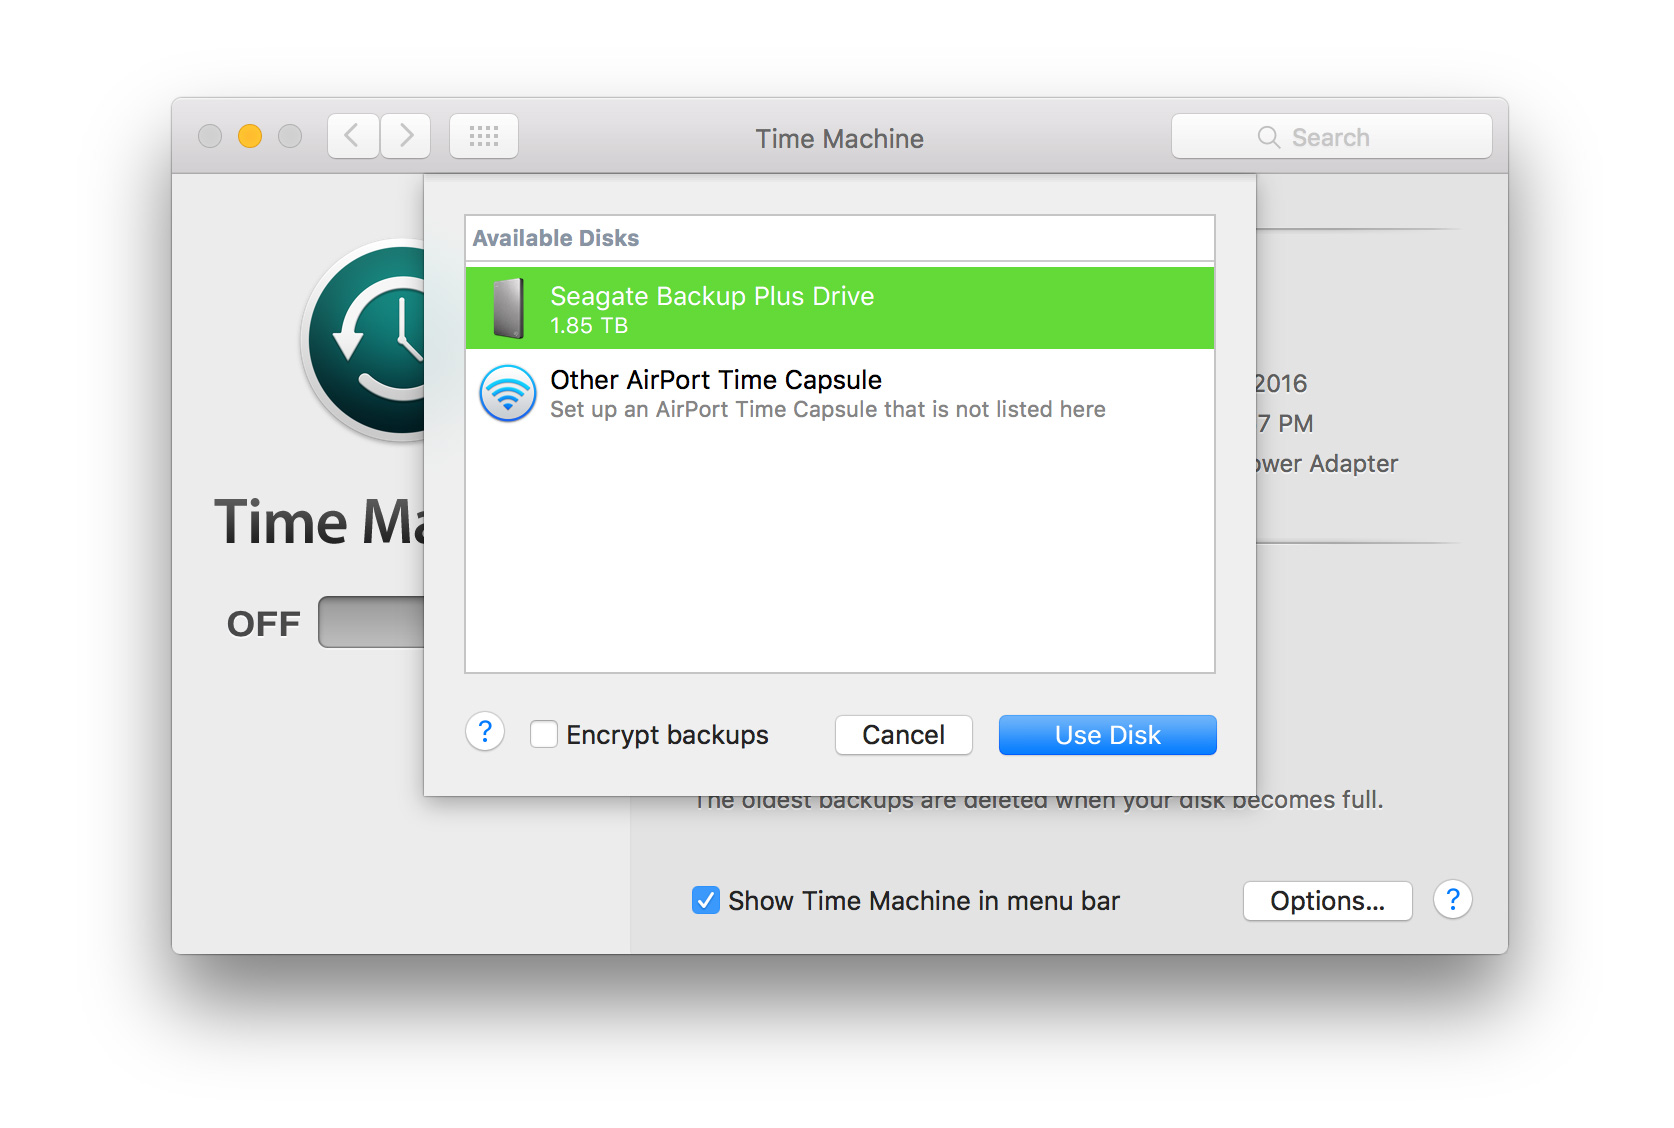
Configuring Time Machine for Backup
1.
In the System Preferences window, choose Time Machine.
snag the connected external hard drive that you want to use as your Time Machine backup destination.
Customize Options (Optional):Time Machine provides various options to customize your backup preferences.
hit the Options button to access advanced parameters.
You will be prompted to set a password for accessing your encrypted backup data.
Remember to choose a strong password and keep it in a secure location.
It will show the status of the backup and the time of the last successful backup.
Regularly Check Backup Status:Its important to periodically check the status of your Time Machine backups.
Ensure that backups are occurring regularly and without any errors.
In the next section, well explain how to initiate and check the progress of your Time Machine backups.
It will only capture the changes made since the previous backup, minimizing the time required for subsequent backups.
In the next section, well discuss how to check the progress and status of your Time Machine backups.
In the next section, well explore how to restore files from your Time Machine backup if needed.
Move your cursor over the timeline to browse through snapshots of your backups.
Restore Files:After selecting the files or folders you want to restore, hit the Restore button.
This will allow you to choose a specific destination for the restored files.
Press Command + Space to open Spotlight and start typing the name of the file.
Spotlight will display search results including the files location in your Time Machine backups.
pick the file and choose the Restore button to bring it back.
Here are a few troubleshooting tips for addressing these issues:
1.
Ensure that the drive is powered on and functioning properly.
Also, see if any other applications or processes are running in the background and consuming system resources.
It may be helpful to limit resource-intensive tasks during the backup process.
This will free up space for more critical data.
Additionally, try repairing disk errors on the external drive using Disk Utility.
Reformatting the drive and starting fresh as a Time Machine backup destination may also resolve persistent backup errors.
In such cases, Time Machine should automatically resume the backup when the connection is reestablished.
Remember that the file may be located in different folders within the backup snapshot.
Additionally, check for any macOS updates and install them if available.
Remember to regularly test and verify your backups to ensure that your data is properly protected.
In the final section, well provide a brief summary of the key points discussed in this guide.
