Introduction
Welcome to our guide on how to add a pickup to your acoustic guitar!
Acoustic guitars, unlike electric guitars, dont have built-in pickups.
By the end of this guide, youll have a fully functional pickup installed in your acoustic guitar.
If youre not comfortable with these tasks, its always best to consult a professional technician.
Lets dive into the world of pickups and get started on adding one to your guitar!
These vibrations create an electrical signal that can be amplified and reproduced through speakers or headphones.
Pickups come in different types, each with its own unique characteristics and sonic qualities.
The two main types of pickups used for acoustic guitars are magnetic pickups and piezo pickups.
Magnetic pickups work by using magnets to create a magnetic field.
Magnetic pickups are known for their warm, rich, and natural tone.
They are commonly found in electric guitars but can also be installed in acoustic guitars to amplify their sound.
They consist of crystals or ceramic elements that produce an electrical charge when pressure is applied to them.
Ultimately, the choice between the two comes down to personal preference and the sound you want to achieve.
In addition to the types of pickups, its also worth considering the placement of the pickup.
Again, personal preference and the desired sound will dictate your pickup placement choice.
In the next section, well discuss the materials youll need to gather before starting the installation process.
Lets explore some of the most common types of pickups used in acoustic guitars.
Experimenting with different types of pickups can help you find the perfect match for your musical needs.
In this section, well guide you through the step-by-step process of installing a pickup in your acoustic guitar.
Its important to choose a pickup that suits your preferences and fits your guitars design.
Step 2: Preparing the Guitar
Start by preparing your guitar for the installation process.
Its essential to work in a clean and well-lit area to avoid losing any small components.
Step 3: Installing the Pickup
Next, youll roll out the pickup in your acoustic guitar.
The placement will depend on the throw in of pickup youre using.
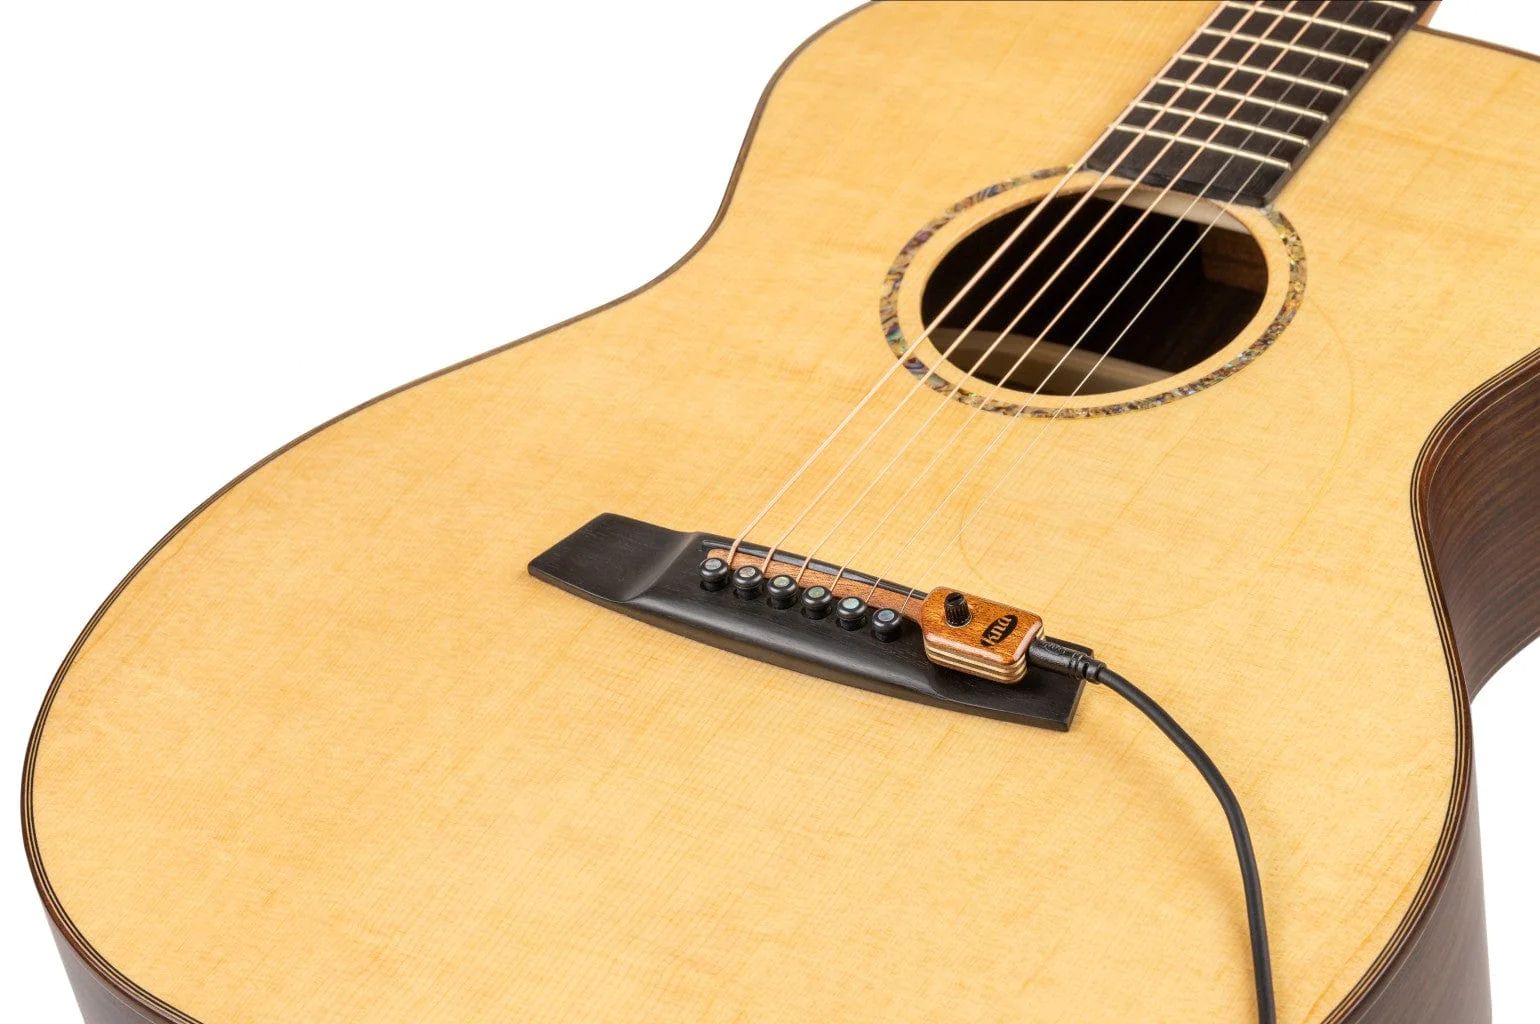
For under-saddle pickups, youll need to remove the saddle and carefully slide the pickup strip underneath it.
Re-string your guitar and connect it to an amplifier or audio interface.
Gently strum the strings and listen for the amplified sound.
Make any necessary adjustments to the pickup height and placement to achieve the desired tone and volume levels.
Remember, installing a pickup may require basic knowledge of guitar electronics and soldering.
If youre not comfortable with these tasks, its always best to consult a professional technician for assistance.
In the next section, well discuss how to adjust your pickup to achieve the best possible sound.
Before you begin the installation process, its essential to gather all the necessary materials and tools.
Having everything you need at hand will ensure a smooth and efficient process.
Poor-quality materials may lead to subpar sound quality, weak connections, or even damage to your guitar.
Before starting the installation, double-check that you have all the necessary materials and tools.
This will save you from interruptions and ensure a more efficient process.
Remove the Strings:
Start by loosening and removing the strings from your acoustic guitar.
Removing the strings will provide easier access to the inside of the guitar and the pickup area.
Use caution when detaching the strings to prevent any damage to the bridge or other components of the guitar.
Clean the Guitar:
Take this opportunity to give your guitar a thorough cleaning.
3. pull up the Pickup Area:
4.
Clear any clutter from your workspace, ensuring you have enough room to maneuver around the guitar.
Good lighting will enable you to see the installation process clearly and reduce the chances of making any mistakes.
This extra precaution will help maintain the guitars pristine appearance and protect it from any unintended mishaps.
By following these preparatory steps, youll set the stage for a successful pickup installation process.
Now that youve prepared your guitar for installation, its time to implement the pickup.
The process will vary depending on the pop in of pickup youve chosen and its specific installation requirements.
Here are some general steps to guide you through the installation process:
2.
Position the Pickup:
Determine the ideal position for your pickup.
This will depend on the pop in of pickup and tonal characteristics youre aiming for.
Under-saddle pickups should be placed beneath the saddle, while soundhole pickups need to be inserted through the soundhole.
Some pickups may require drilling holes if external mounting is necessary.
Take your time to align the pickup properly and ensure a secure fit.
Secure the Pickup:
4.
Pay attention to the pickups positioning and its impact on the amplified sound.
Make any necessary adjustments to the pickups placement to achieve the desired tonal balance and volume.
Consulting a guitar technician can ensure a precise installation and optimal performance of your pickup.
With the pickup successfully installed, the next step is to wire it to the output jack.
This will allow the electrical signal generated by the pickup to be transferred to an amplifier or audio interface.
Heres a step-by-step guide to help you with the wiring process:
1.
The wiring diagram outlines the connections between the pickup, volume and tone controls, and the output jack.
Study the diagram to understand the correct wiring sequence and color codes, if applicable.
Pay attention to the positive and negative terminals on the pickup and match them correctly with the jack terminals.
This will protect the connections from damage and reduce the risk of interference or short circuits.
Gently strum the strings and listen for the amplified sound.
Check for any buzzing, humming, or intermittent connections that may require adjustment or re-soldering.
Re-string Your Guitar:
Before testing the pickup, re-string your acoustic guitar with new or properly tuned strings.
Fresh strings will provide a more accurate representation of the pickups performance and tone.
Gently Strum and Play:
Begin by gently strumming the guitar strings.
Listen carefully to the amplified sound and assess the pickups performance.
Pay attention to the tone, volume, and clarity of the sound.
Play different chords and techniques to thoroughly test the pickup across the full range of your playing.
Evaluate Tone and Volume:
Listen critically to the tone and volume of the pickup.
Take note of any tonal imbalances or volume discrepancies that may require further adjustments.
Check for loose connections, examine the wiring, and ensure that all components are properly secured and insulated.
If necessary, consult a professional guitar technician for assistance in addressing any issues.
Dont be afraid to experiment with different options and adjustments to achieve the best sound quality.
Here are some steps to help you in adjusting the pickup:
1.
Pickup Height:
One of the critical aspects of adjusting a pickup is finding the optimal height.
Different pickup types, such as under-saddle pickups or soundhole pickups, may require different adjustments.
Experiment with small adjustments to find the sweet spot that suits your playing style and sonic preferences.
Tilting the pickup slightly can impact the tonal response, emphasizing certain frequencies or adjusting the overall balance.
Experiment with small adjustments, and listen attentively to determine the changes in tone and dynamics.
This allows you to compensate for any inconsistencies or imbalances in the volume or tone of the strings.
These controls can shape the overall sound of the pickup and allow you to dial in the desired tone.
Play Different Techniques:
Test the pickups performance across different playing techniques and musical styles.
Listen for any inconsistencies, muddiness, or excessive brightness that may require further adjustments.
Seek Feedback from Others:
If possible, seek feedback from other musicians or experienced guitarists.
Their opinions can provide valuable insights and objective feedback on the performance of your pickup.
Consider their suggestions and make adjustments accordingly to enhance your pickups overall sound and performance.
Conclusion
Congratulations!
You have successfully learned how to add a pickup to your acoustic guitar.
Throughout this guide, we discussed various aspects of adding a pickup to an acoustic guitar.
You also learned the importance of preparing your guitar and gathering the necessary materials before beginning the installation process.
Installing a pickup requires attention to detail and some knowledge of guitar electronics and soldering.
Adjustments were made to achieve the desired sound, including adjusting the pickups height, angle, and orientation.
Dont be afraid to make small incremental changes and seek feedback from others to fine-tune your pickup setup.
Now its time to plug in, turn up the volume, and let your music soar!
