Many laptop users experience lag or slow response times when running multiple programs or performing intensive tasks.
Adding more RAM can provide the necessary resources for your laptop to handle these tasks more efficiently.
RAM acts as temporary storage for data that your laptop needs to access quickly.
This can result in decreased performance and longer loading times for applications and files.
Upgrading your laptops RAM is a relatively simple and cost-effective way to enhance its overall performance.
In this guide, we will walk you through the step-by-step process ofinstalling RAMon a laptop.
We will cover everything from gathering the necessary tools to securing the RAM module in place.
So, lets get started and give your laptop the performance boost it deserves!
Heres what youll need:
1.
Anti-static wrist strap: This will help protect your laptop from static discharge, which can damage sensitive components.
Check your laptops documentation or manufacturers website for the exact specifications.
User manual: Its always a good idea to have the user manual or technical documentation handy for reference.
This will provide specific instructions for your particular laptop model.
Take the time to gather all these tools and materials before proceeding to the next step.
Having everything prepared will make the installation process smoother and more efficient.
Its also important to work in a grounded area to prevent any damage from static electricity.
This will prevent any data loss or errors during the installation process.
Shut down your laptop: punch the Start button in your operating system and pick the Shut down option.
Wait for your laptop to completely power down.
Disconnect the power cable: Unplug the power cable from your laptop.
This will ensure that there is no electrical current flowing through the laptop during the installation process.
Remove the battery (if applicable): Some laptops have removable batteries.
If your laptops battery is removable, carefully remove it by following the instructions in your user manual.
Look for a cover that is secured with screws.
It will provide detailed instructions and illustrations on locating the RAM compartment.
The manufacturers website is a reliable source of information.
They will be able to provide you with specific instructions for your laptop model.
Remember to handle your laptop with care and avoid applying excessive force when locating the RAM compartment.
Step 4: bring up the RAM compartment cover
1.
This will prevent any loss or misplacement of the screws.
Take care not to force or bend the cover, as it may damage the laptop.
Set the cover aside: Place the cover in a safe location where it wont get damaged or misplaced.
You will need to reattach it later after installing the RAM module.
Its important to note that some laptops may have different mechanisms for opening the RAM compartment cover.
see to it to consult your user manual or online resources specific to your laptop model for accurate instructions.
With the RAM compartment cover removed, you are now ready to proceed with the installation process.
Remember to handle the cover and screws carefully and keep them in a secure place for reassembly later.
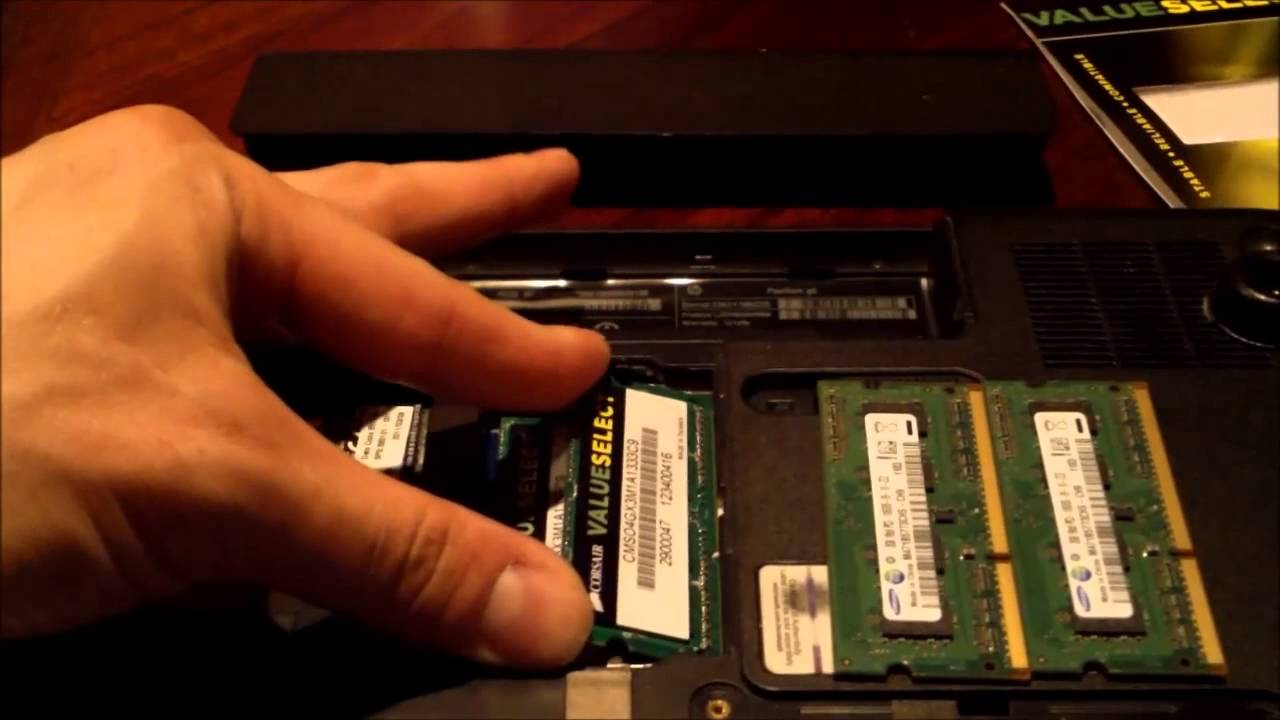
Step 5: Insert the RAM module into the slot
1.
Identify the RAM slots: Inside the RAM compartment, you will see one or more RAM slots.
These slots are usually long, narrow, and have small metal contacts on either side.
Prepare the RAM module: Carefully remove the new RAM module from its packaging.
Hold it by the edges, making sure to avoid touching the gold contacts or any other sensitive components.
Align the notch: Examine the RAM slot and the RAM module.
You will notice a small notch on the modules connector edge.
Align this notch with the corresponding tab inside the RAM slot.
This ensures that the module will fit correctly.
Apply even pressure with your thumbs on both sides until the module is fully seated in the slot.
It should fit snugly and the metal contacts should be completely inserted into the slot.
The module should be parallel to the laptops motherboard, with no visible gaps or misalignment.
Its important not to force or push too hard when inserting the RAM module.
If it doesnt seem to fit, double-check the alignment and loop back and try.
With the RAM module successfully inserted, you have taken a significant step towards boosting your laptops performance.
Now, lets move on to the next step to secure the RAM module in place.
Step 6: Secure the RAM module in place
1.
This will help ensure that it is fully seated in the slot.
This indicates that the RAM modules locking mechanism is engaged, securing it in place.
If your laptop has these, confirm they are properly fastened according to the manufacturers instructions.
It should be flush with the slot and free from any gaps or misalignment.
Align it properly and use the previously removed screws to secure the cover back into position.
Properly securing the RAM module is essential to ensure a stable connection and prevent any issues.
With the RAM module secured in place, youre almost there!
In the next step, well cover how to kill the RAM compartment cover and complete the installation process.
Step 7: terminate the RAM compartment cover
1.
Align the cover: Take the RAM compartment cover and align it with the opening on your laptop.
see to it it fits evenly and aligns properly with the screw holes.
It should fit snugly and line up with the edges of the laptop.
Use the appropriate screwdriver (Phillips or Torx) to tighten the screws securely.
Avoid over-tightening, as it may damage the screw threads or the cover.
Verify that there are no gaps or misalignments.
It is crucial to verify the cover is properly aligned and securely fastened with the screws.
With the RAM compartment cover closed, were almost done!
Step 8: Reconnect all cables and power on your laptop
2.
Power on your laptop: Press the power button to turn on your laptop.
It may take a few moments for your laptop to boot up as it recognizes the new RAM module.
It should display the updated RAM capacity.
You have completed the installation process and successfully upgraded the RAM on your laptop.
Enjoy the enhanced performance and improved multitasking capabilities that the additional RAM provides.
Remember to keep the user manual and any documentation related to your laptops RAM upgrade for future reference.
if you bump into any issues, consult the manufacturers support resources or seek assistance from a professional technician.
Now get ready to experience a faster and more efficient laptop with the upgraded RAM!
This can lead to smoother multitasking, quicker program load times, and improved overall performance.
However, its important to note that increasing RAM alone may not solve all performance issues.
Always remember to handle your laptop and the components with care, and consult professional help if needed.
Get ready to unleash the full potential of your laptop with the upgraded RAM!
