It serves as the temporary storage for data that is actively being accessed by the processor.
RAM allows your setup to quickly access and retrieve data needed by the applications youre running.
An inadequate amount of RAM can lead to sluggish performance, freezing, and even crashes.
RAM provides fast and temporary data access, allowing your CPU to efficiently process tasks.
The amount of RAM you need depends on the specific tasks you perform on your setup.
Its essential to consider the operating system requirements and the software you intend to use before upgrading your RAM.
This will help you determine if an upgrade is necessary and how much additional RAM you might add.
There are a few different methods you’re able to use to check your current RAM.
One way is to reach the System Information tool on your rig.
Another method is to use the Task Manager on Windows.
you’re able to open it by right-clicking on the taskbar and selecting Task Manager.
hit the Performance tab and then select Memory from the left-hand side.
Here, youll see a breakdown of your current RAM usage, including the total amount of RAM installed.
Adding more RAM can significantly improve your computers speed and responsiveness.
Consult your computers documentation or manufacturers website to find out the maximum amount of RAM your system can handle.
This will ensure that you dont exceed the hardware limitations and waste resources.
Not all RAM modules are compatible with every computer, so its important to consider a few key factors.
The first consideration is the throw in of RAM your box supports.
The most common types are DDR3 and DDR4, with DDR4 being the more recent and faster option.
Check your computers documentation or motherboard specifications to determine the compatible throw in of RAM.
Mixing different RAM types is generally not recommended and can cause compatibility issues.
Another factor to consider is the speed of the RAM.
RAM speed is measured in megahertz (MHz) and determines how quickly the data can be accessed.
Its important tochoose RAMwith a speed that is supported by your motherboard.
The capacity of your motherboard is also significant.
Different motherboards have different limits on how much RAM they can support.
Consult your motherboards documentation or manufacturers website to find the maximum amount of RAM your system can accommodate.
Ensure that the total capacity of the RAM modules you plan to install does not exceed this limit.
Additionally, consider the configuration of your RAM modules.
Most motherboards support dual-channel or quad-channel memory configuration, which offers increased performance by accessing memory in parallel.
Its important to set up the RAM modules in the correct slots to take advantage of these configurations.
Consult your motherboards documentation to determine the proper installation and configuration guidelines.
Mixing RAM modules with different speeds or timings may lead to instability or compatibility conflicts.
In the next section, we will discuss how to snag the appropriate RAM for your needs.
By taking these factors into account, you might ensure optimal compatibility and performance.
The first consideration is the punch in of RAM your rig supports.
As mentioned earlier, the most common types are DDR3 and DDR4.
Ensure that you choose RAM that matches the jot down supported by your motherboard.
RAM speed is another important factor to consider.
Higher RAM speeds allow for faster data transfer, resulting in better overall performance.
However, its crucial to select RAM with a speed that is supported by your motherboard.
Check your motherboards specifications to determine the maximum RAM speed it can handle.
Choose RAM modules that match this speed to avoid any compatibility issues.
Capacity is also an important consideration when selecting RAM.
Determine your needs and the tasks youll be performing on your gear.
For everyday tasks like web browsing and word processing, a lower capacityRAM modulemay suffice.
In addition to capacity, be mindful of the number of RAM slots available on your motherboard.
Choosing reputable brands for your RAM modules is recommended.
Established brands often provide better quality control and compatibility assurance.
Lastly, consider your budget when selecting RAM.
Higher capacity and faster speed RAM modules tend to be more expensive.
The first step is to power off your machine and disconnect any cables or peripherals.
This includes the power cord, keyboard, mouse, and any other devices connected to your PC.
Disconnecting these components will prevent any accidental damage and electrostatic discharge during the installation process.
Next, find a clean and well-lit workspace to work on.
A static-free environment is ideal to avoid potential damage triggered by static electricity.
Ensure that you have the necessary tools for the installation process.
Most RAM modules can be installed without any specialized tools.
This step helps prevent any accidental damage to the sensitive electronic components of the RAM modules.
Take note of any latches or retention mechanisms that may be present.
By taking these preparatory steps, youll be well-equipped and ready to install your new RAM modules.
Removing old RAM
1.
Ensure that your PC is powered off and disconnected from any power source.
Locate the RAM slots on your motherboard.
These are usually long, thin slots with small retention mechanisms on each end.
Gently press outward on the retention mechanisms on each side of the RAM module until you hear a click.
This will release the module from the slot.
Carefully remove the old RAM module by pulling it straight out of the slot.
Avoid touching the gold contacts on the bottom of the module, as this can cause static damage.
If you have multiple RAM modules installed, repeat the process for each module.
Take a moment to inspect the RAM slots for any dust or debris.
Use compressed air or a soft brush to clean out any particles that may have accumulated.
Always handle the RAM modules with care, avoiding excessive force or bending.
They are delicate electronic components that need to be treated gently.
By following these steps, you’re able to safely remove the old RAM modules from your PC.
In the next section, we will guide you through the process of installing the new RAM modules.
Installing new RAM
1.
Take the new RAM modules out of their packaging, being careful to handle them only by the edges.
Avoid touching the gold contacts on the bottom of the modules to prevent static damage.
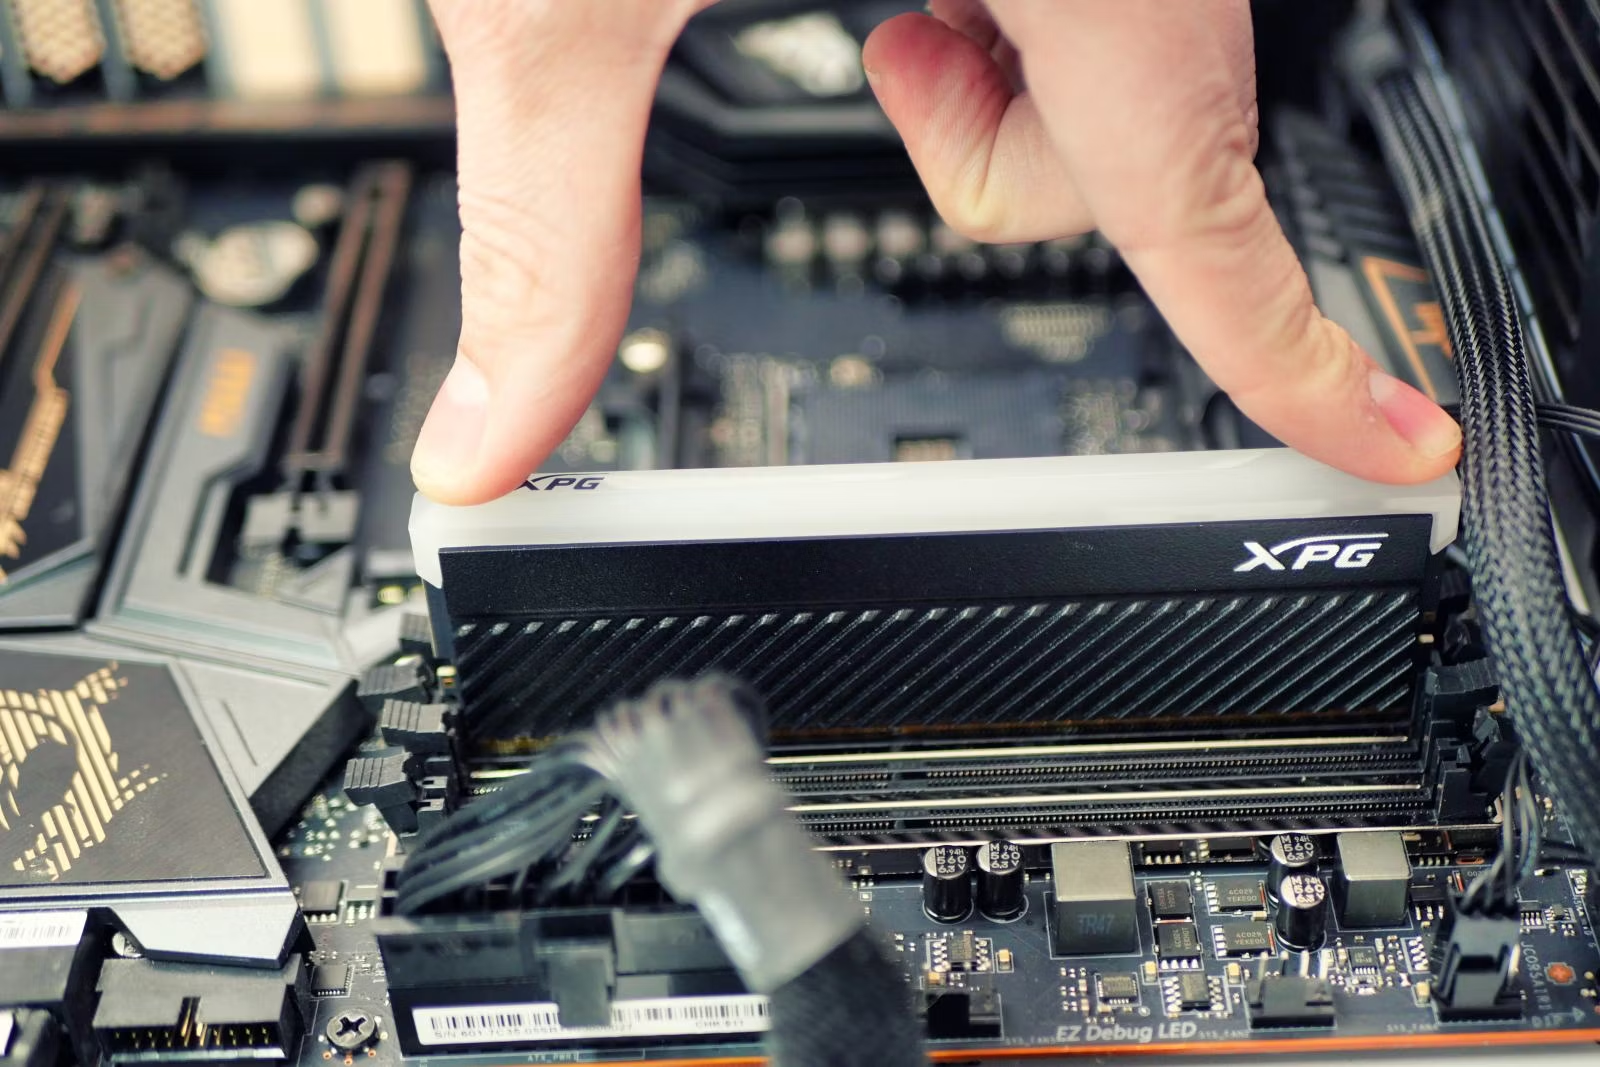
Ensure that the module is facing the right way by matching the notch position with the slot key.
Gently insert the RAM module into the slot at a 45-degree angle.
Apply even pressure to both ends of the module until it is fully seated in the slot.
Once the module is seated correctly, push down with your fingers until you hear a click.
This indicates that the retention mechanisms have locked the module in place.
Repeat the process for any additional RAM modules you are installing, following the same alignment and insertion steps.
Once all the new modules are installed, double-check that they are securely seated in the slots.
Give them a light tug to ensure they are firmly in place.
Power on your system and wait for it to boot up.
The computer should automatically detect the new RAM modules and adjust its controls accordingly.
Here are some steps to follow to verify the installation:
1.
Start by powering on your rig and allowing it to fully boot up.
It may take a little longer than usual as the system adjusts to the new RAM configuration.
Once your gear is up and running, go to the system information tool on your operating system.
In the system information tool, you should see the total amount of RAM installed in your box.
It should match the cumulative capacity of the new RAM modules you installed.
This increased memory capacity should boost your systems performance, allowing for smoother multitasking and faster program loading times.
If you see the newly installed RAM being actively utilized, it indicates that its functioning as expected.
Power off your setup, remove the new RAM modules, and reseat them in their slots.
Ensure that they are properly aligned and firmly seated.
- see if the RAM modules are compatible with your motherboard and operating system.
Ensure that they meet the necessary specifications and requirements.
Double-check that the RAM modules are properly inserted into the correct slots.
Refer to your motherboards documentation for the recommended slot configurations.
Remove them and reinsert them, ensuring they are firmly in place.
First, see to it that the RAM modules are fully compatible with your motherboard and operating system.
Try running a diagnostic tool, such as Memtest86, to check for any errors in the RAM.
If errors are detected, its best to replace the faulty module(s) or seek professional assistance.
Some integrated graphics solutions and BIOS configurations allocate a portion of system memory for graphics use.
4.Incompatibility with existing RAM:When installing new RAM alongside existing RAM modules, its essential to ensure compatibility.
Mismatched speeds, timings, or capacities can sometimes cause issues.
Try removing the existing RAM and installing only the new modules to see if they work correctly.
5.Insufficient power supply:High-capacity or overclocked RAM modules may require more power.
Consult your power supplys specifications or consider upgrading to a higher wattage unit if necessary.
They can provide more specific guidance tailored to your system and help you resolve any technical difficulties.
Remember, adding more RAM is just one aspect of optimizing your computers performance.
Regular maintenance, such as software updates, disk cleanup, and malware scans, are equally important.
